
This article is the Next Step following Relational Database and SQL Fundamentals, exploring topics that developers and Database Administrators (DBAs) should understand, including database design with ER Diagrams, Primary/Foreign Keys and Referential Integrity, Normalization (1NF–3NF), Views, Indexes, Access Control, Backup & Recovery, and system administration best practices.
Before You Begin: Install CAMPP and Open phpMyAdmin#
CAMPP is an environment for developing and testing web applications and databases locally (on your machine), free and easy to install. It bundles a web server, database system (MySQL/MariaDB), and database management tools in a single package.
Download and install CAMPP from https://campp.melivecode.com/ ↗

After installation, open CAMPP and click Start to begin the various services.
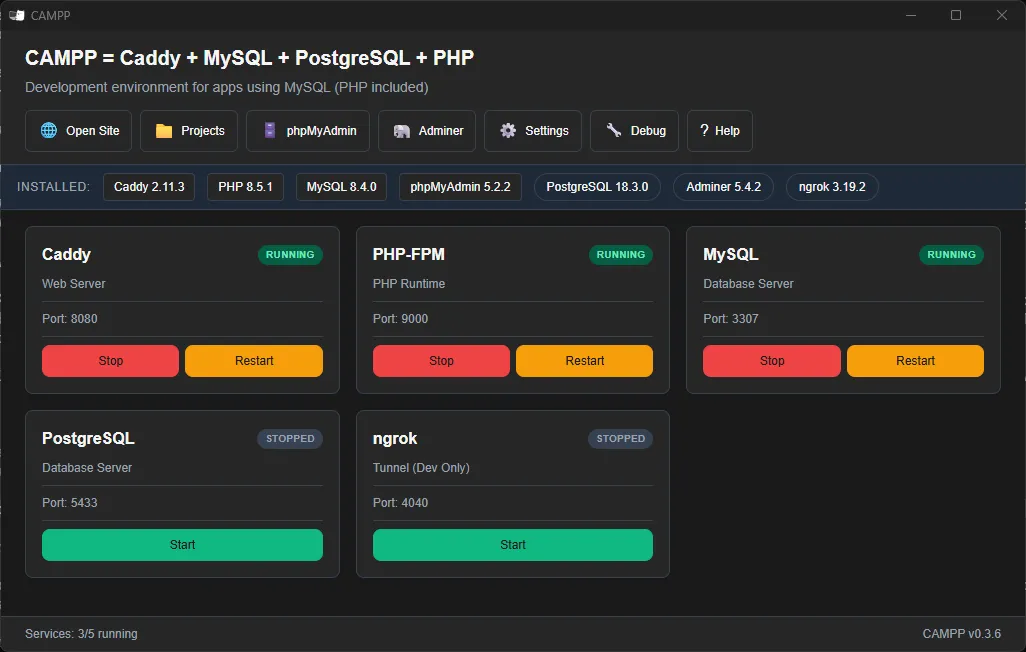
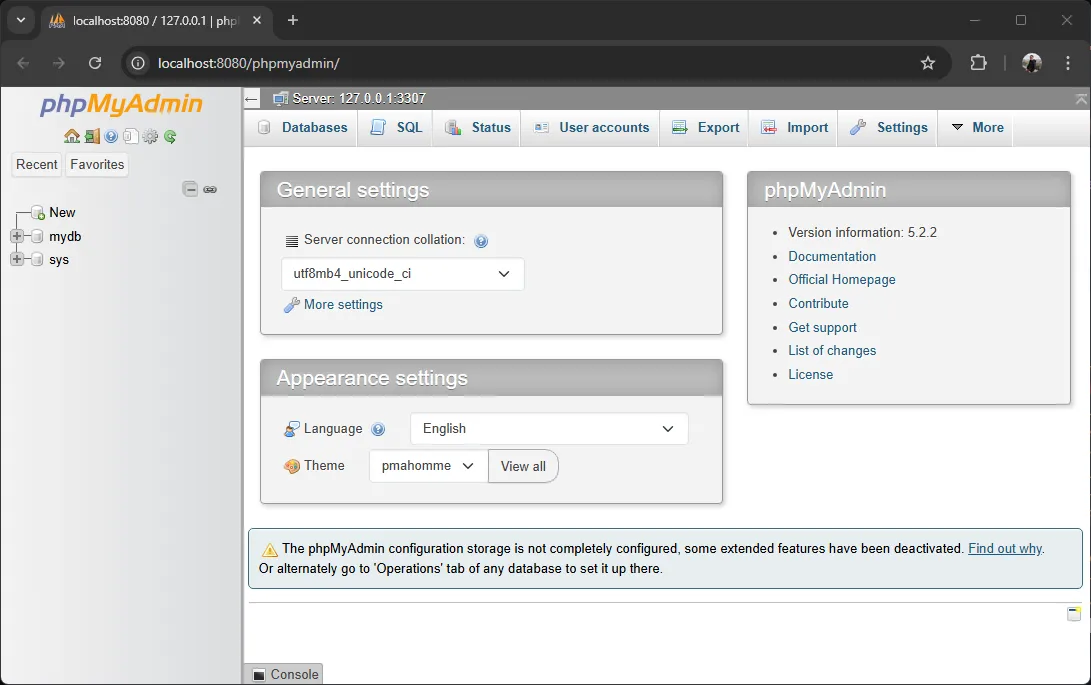
Then open phpMyAdmin by clicking the phpMyAdmin button in the CAMPP interface, or by visiting http://127.0.0.1:8080/phpmyadmin/ ↗ directly in your web browser. You can manage databases using the graphical user interface (GUI), or click the SQL tab to type and run the SQL commands used in this article directly.
1. Database Design and ER Diagrams#
Good database design is the foundation of a fast, flexible system without redundant data. Popular tools for this phase include ER Diagrams (Entity-Relationship Diagrams), which visualize data structure before creating tables.
Entity, Attribute, and Relationship#
- Entity — Something we want to store data for, like
Student,Course,Patient - Attribute — Properties of an entity, like Student having
student_id,fname,lname - Relationship — Connections between entities, like Student “enrolls in” Course
One-to-One, One-to-Many, and Many-to-Many Relationships#
| Type | Meaning | Example |
|---|---|---|
| One-to-One (1:1) | 1 record of A connects to only 1 record of B | user ↔ user_profile |
| One-to-Many (1:N) | 1 record of A connects to multiple records of B | province → multiple patient |
| Many-to-Many (M:N) | Multiple records of A connect to multiple records of B | student ↔ course |
Important: Many-to-Many relationships cannot be stored directly in a relational database. You must create a junction table in between, like the
enrollmenttable betweenstudentandcourse.
Creating ER Diagrams#
ER Diagrams use standard symbols: rectangles for entities, ovals for attributes, and diamonds for relationships. Modern design tools include draw.io ↗, dbdiagram.io ↗, and MySQL Workbench ↗.
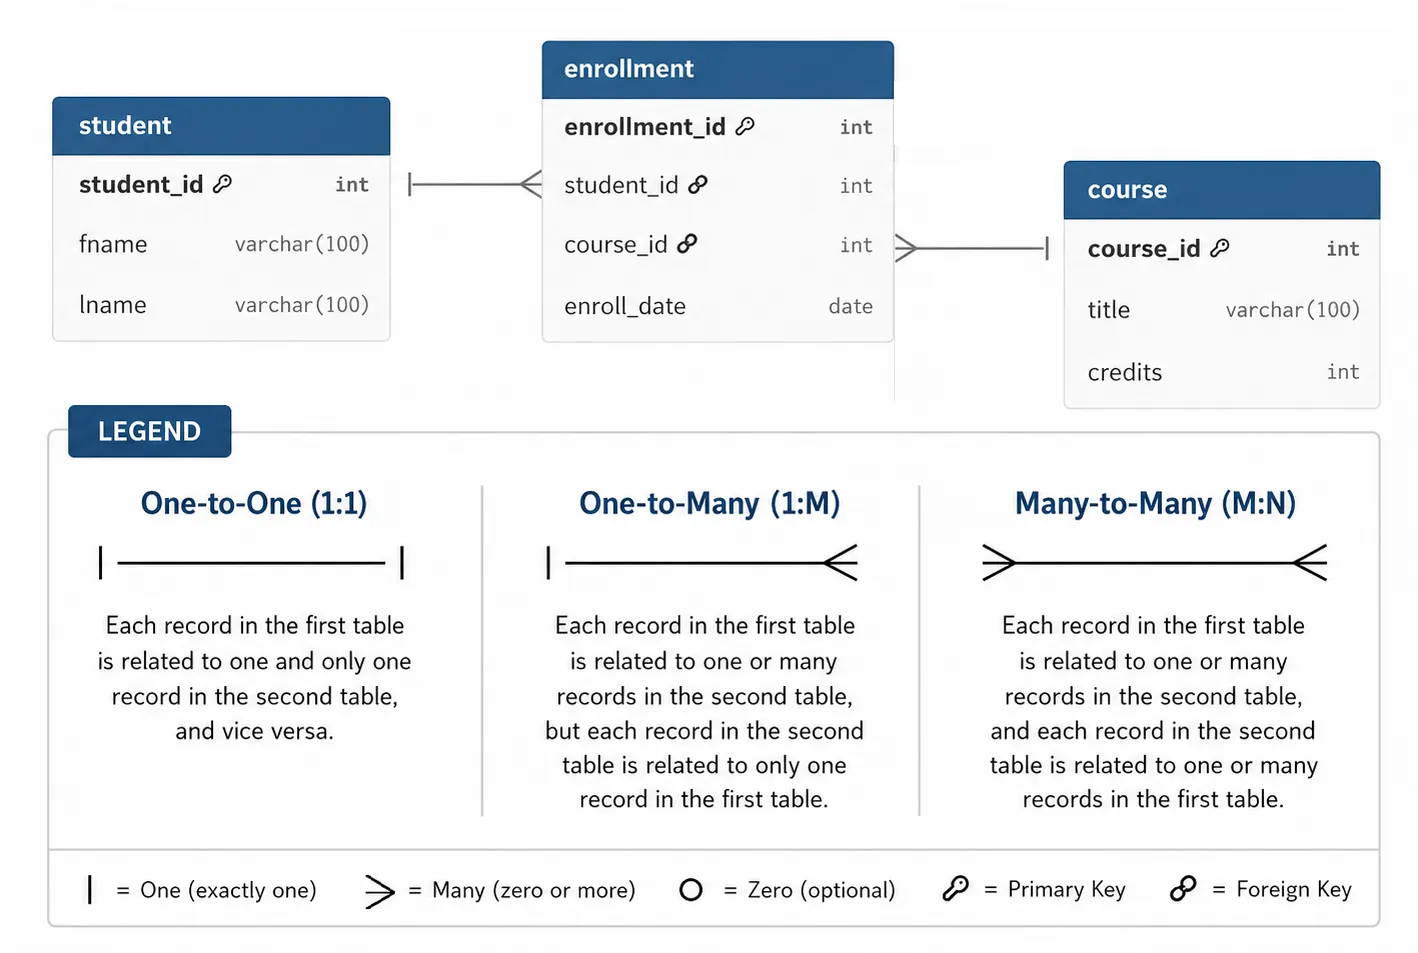
The image above shows standard ER Diagram symbols with a legend explaining each mark. The image below is an example of an actual ER Diagram created with dbdiagram.io:
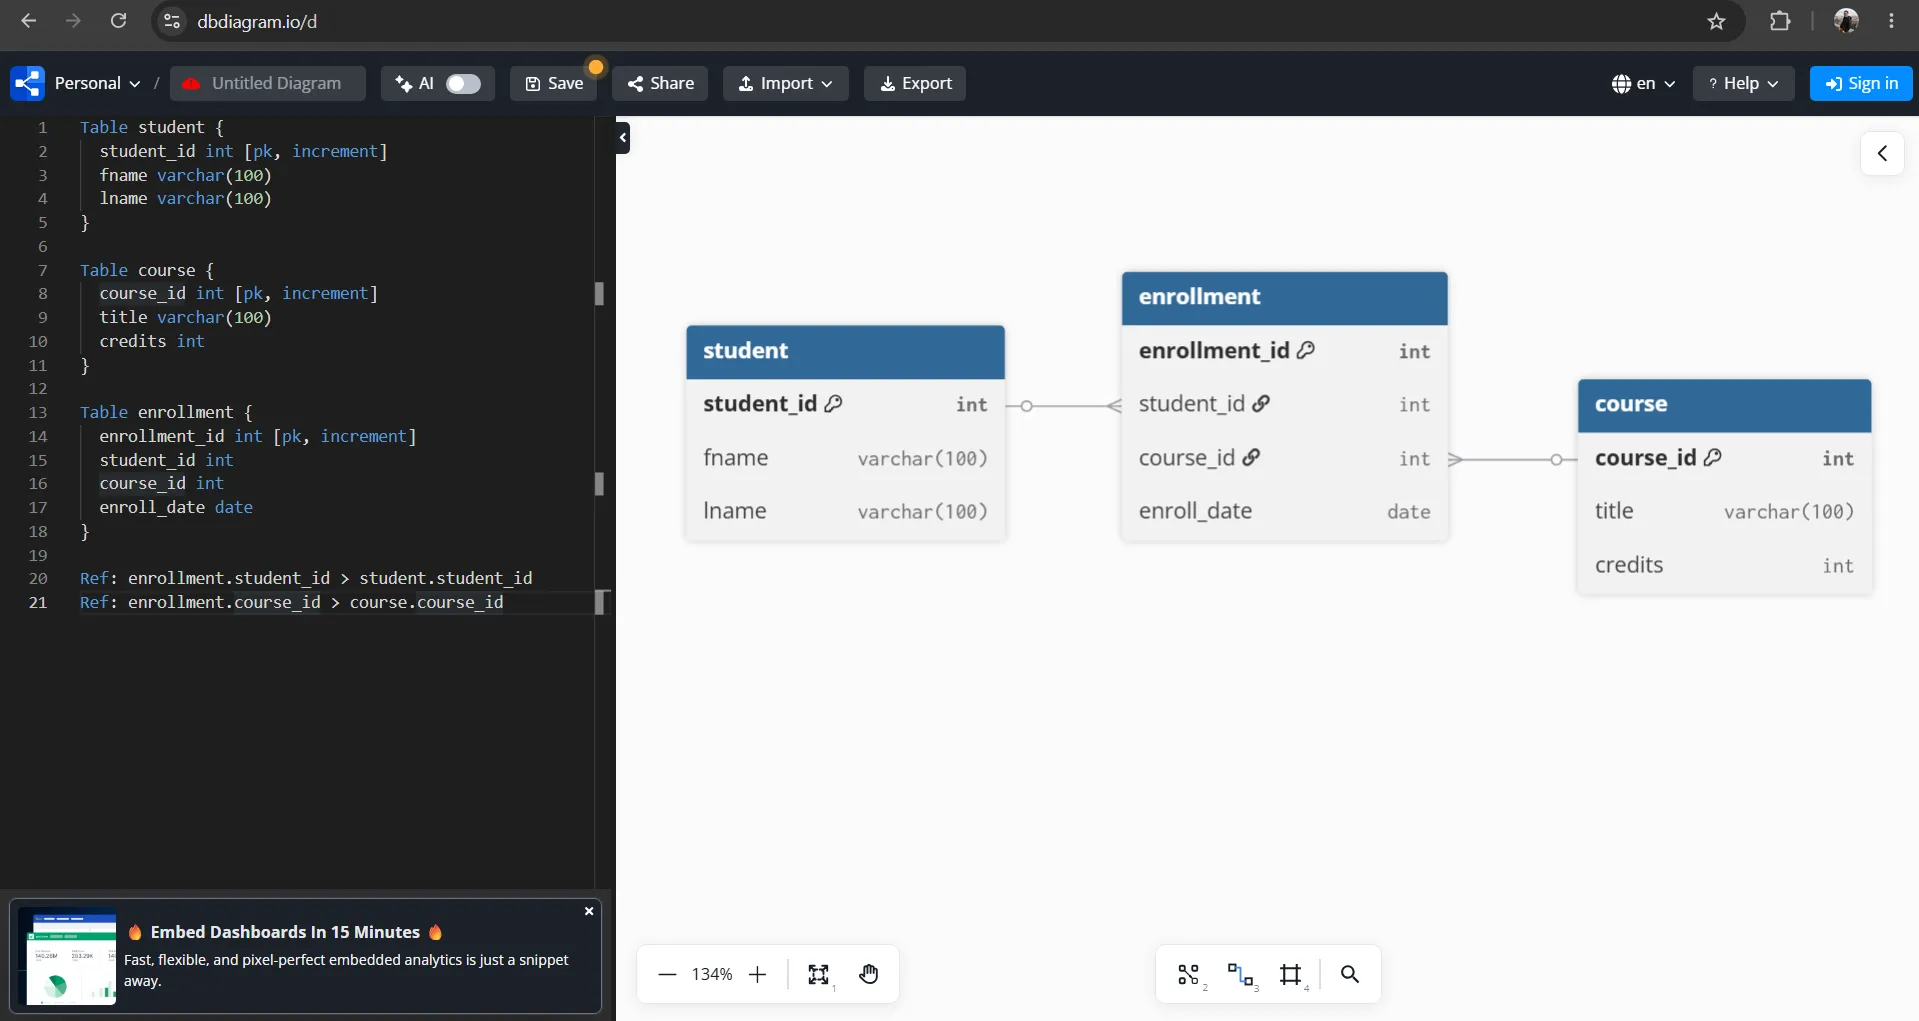
The ER Diagram above was created with dbdiagram.io ↗ using DBML language to define tables and relationships. Copy the code below and paste it into dbdiagram.io:
Table student {
  student_id int [pk, increment]
  fname varchar(100)
  lname varchar(100)
}

Table course {
  course_id int [pk, increment]
  title varchar(100)
  credits int
}

Table enrollment {
  enrollment_id int [pk, increment]
  student_id int
  course_id int
  enroll_date date
}

Ref: enrollment.student_id > student.student_id
Ref: enrollment.course_id > course.course_id[pk, increment]— Sets as Primary Key with auto-increment (equivalent toAUTO_INCREMENTin SQL)- Lines
Ref: ... > ...— Define Foreign Keys fromenrollmenttostudentandcourse(the>symbol means a many-to-one relationship)
Converting ER Diagrams to Database Tables#
When the ER Diagram is ready, convert it to tables immediately:
- Each entity → One table
- Each attribute → One column
- 1:N relationships → Store Foreign Key of the “1” side in the “N” side table
- M:N relationships → Create a junction table with FKs to both tables
Example: For a course enrollment system, we create a new database called schooldb and create three tables, converted to SQL as follows:
-- 1. Create schooldb database and select it
CREATE DATABASE IF NOT EXISTS schooldb;

-- Select schooldb database
-- (In phpMyAdmin, click schooldb from left panel instead of running USE)
USE schooldb;

-- 2. Entity: Student
CREATE TABLE student (
  student_id INT AUTO_INCREMENT PRIMARY KEY,
  fname VARCHAR(100),
  lname VARCHAR(100)
);

-- 3. Entity: Course
CREATE TABLE course (
  course_id INT AUTO_INCREMENT PRIMARY KEY,
  title VARCHAR(100),
  credits INT
);

-- 4. Junction table for M:N relationship (Student ↔ Course)
CREATE TABLE enrollment (
  enrollment_id INT AUTO_INCREMENT PRIMARY KEY,
  student_id INT,
  course_id INT,
  enroll_date DATE,
  FOREIGN KEY (student_id) REFERENCES student(student_id),
  FOREIGN KEY (course_id) REFERENCES course(course_id)
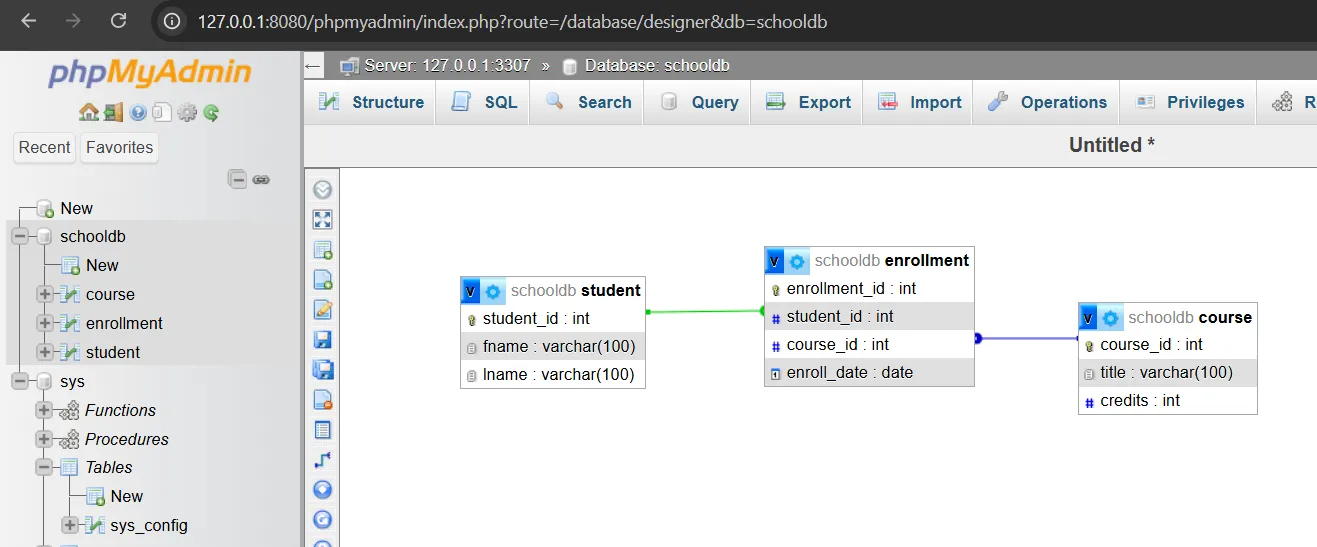
);After creating all tables, phpMyAdmin can automatically draw an ER Diagram from the tables and Foreign Keys we defined. Steps:
- Select the
schooldbdatabase from the left panel - Click the Designer tab at the top
- phpMyAdmin will display all tables with relationship lines (Foreign Keys) connecting them immediately
Do We Still Need to Draw ER Diagrams?#
In an era where we can use AI (like ChatGPT, Claude) to help design database structures, or even generate SQL CREATE TABLE statements in seconds, the question becomes: “Do we still need to draw ER Diagrams first?”
The answer is “Not always”, but ER Diagrams still have great value, depending on system size and complexity:
- Small systems or prototypes — Often don’t need formal ER Diagrams. Can describe requirements to AI and adjust structure gradually. Fewer tables and less complex relationships.
- Medium to large systems or team work — ER Diagrams still hold great value as a “common language” where everyone on the team and stakeholders can see the same structure and relationships. Also serves as a good map for AI to work in our intended direction.
In other words, AI helps us create structures faster, but doesn’t replace understanding of good design. ER Diagrams are like house blueprints — the larger and more complex the house, the more essential a plan is before construction.
Summary: ER Diagrams help visualize data before creating tables, enabling correct design from the start. Entities become tables, attributes become columns, and relationships become Foreign Keys or junction tables.
2. Primary Keys and Foreign Keys#
Primary Keys and Foreign Keys are critical mechanisms that connect tables correctly and reliably, especially in relational databases where data is often separated into multiple tables.
In this section, we’ll use the schooldb database created in section 1, which consists of 3 main tables:
studentstores student informationcoursestores course informationenrollmentstores student enrollment information for each course
The relationship between student and course is Many-to-Many because one student can enroll in multiple courses, and one course can have multiple students. Therefore, a junction table named enrollment is required.
Primary Key Concept#
Primary Key (PK) is a column or set of columns that uniquely identifies each record and cannot be NULL. A table can have only one Primary Key.
For example, the student table uses student_id as Primary Key to identify each student:
CREATE TABLE student (
  student_id INT AUTO_INCREMENT PRIMARY KEY,
  fname VARCHAR(100),
  lname VARCHAR(100)
);The course table uses course_id as Primary Key to identify each course:
CREATE TABLE course (
  course_id INT AUTO_INCREMENT PRIMARY KEY,
  title VARCHAR(100),
  credits INT
);The enrollment table uses enrollment_id as Primary Key (full structure with Foreign Keys shown in next subsection).
Foreign Key Concept#
Foreign Key (FK) is a column that references the Primary Key of another table to create relationships between tables.
In this example, the enrollment table has two Foreign Keys:
student_idreferencesstudent(student_id)course_idreferencescourse(course_id)
CREATE TABLE enrollment (
  enrollment_id INT AUTO_INCREMENT PRIMARY KEY,
  student_id INT,
  course_id INT,
  enroll_date DATE,
  FOREIGN KEY (student_id) REFERENCES student(student_id),
  FOREIGN KEY (course_id) REFERENCES course(course_id)
);This means each enrollment record must reference an actual student in the student table and an actual course in the course table.
Referential Integrity#
Referential Integrity is the rule guaranteeing that every Foreign Key value must reference existing data in the parent table.
For example, if trying to add data to the enrollment table specifying student_id = 999, but there’s no student with student_id = 999 in the student table, the system will reject that command.
Similarly, if specifying course_id = 999, but that course doesn’t exist in the course table, the data cannot be added.
Preparing the Database for Experiments#
Before starting examples in this section, it’s recommended to delete the existing schooldb database first, so everyone starts from the same database state.
Dropping the Old Database in phpMyAdmin#
- Click the schooldb database from the left bar
- Select the Operations tab
- Click Drop the database (DROP)
- Press OK to confirm deletion
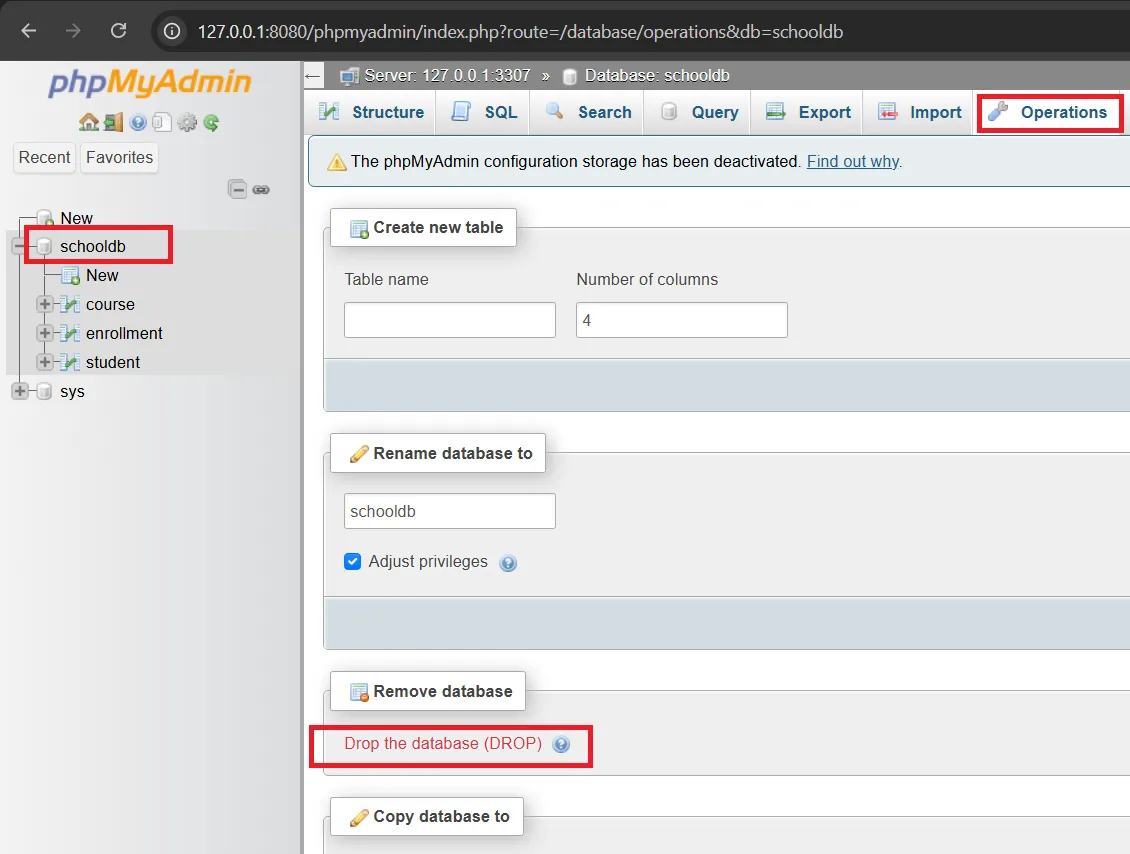
⚠️ Warning: Dropping a database permanently deletes all tables and data within that database.
Creating New Database and Tables#
Run the following SQL in the SQL tab of phpMyAdmin or your preferred database management tool:
-- 1. Create schooldb database and select it
CREATE DATABASE IF NOT EXISTS schooldb;

-- Select schooldb database
USE schooldb;

-- 2. Entity: Student
CREATE TABLE student (
  student_id INT AUTO_INCREMENT PRIMARY KEY,
  fname VARCHAR(100),
  lname VARCHAR(100)
);

-- 3. Entity: Course
CREATE TABLE course (
  course_id INT AUTO_INCREMENT PRIMARY KEY,
  title VARCHAR(100),
  credits INT
);

-- 4. Junction table for M:N relationship between Student and Course
CREATE TABLE enrollment (
  enrollment_id INT AUTO_INCREMENT PRIMARY KEY,
  student_id INT,
  course_id INT,
  enroll_date DATE,
  FOREIGN KEY (student_id) REFERENCES student(student_id),
  FOREIGN KEY (course_id) REFERENCES course(course_id)
);Adding Sample Data#
After creating tables, add sample data to student and course tables first, because enrollment needs to reference data from these two tables:
-- Add student data
INSERT INTO student (fname, lname) VALUES
('Somchai', 'Jaidee'),
('Suda', 'Sukjai'),
('Anan', 'Meesuk'),
('Malee', 'Thongdee'),
('Krit', 'Wongsa');

-- Add course data
INSERT INTO course (title, credits) VALUES
('Database Systems', 3),
('Web Programming', 3),
('Artificial Intelligence', 3),
('Cybersecurity Basics', 2);

-- Add enrollment data
INSERT INTO enrollment (student_id, course_id, enroll_date) VALUES
(1, 1, '2026-06-01'),
(1, 2, '2026-06-01'),
(2, 1, '2026-06-02'),
(2, 3, '2026-06-02'),
(3, 2, '2026-06-03'),
(4, 3, '2026-06-03'),
(5, 4, '2026-06-04');Defining Relationships Between Tables#
The student and course tables have a Many-to-Many relationship:
- One student can enroll in multiple courses
- One course can have multiple students enrolled
Therefore, the enrollment table serves as a Junction Table to store the relationship between students and courses.
The relationship structure can be described as follows:
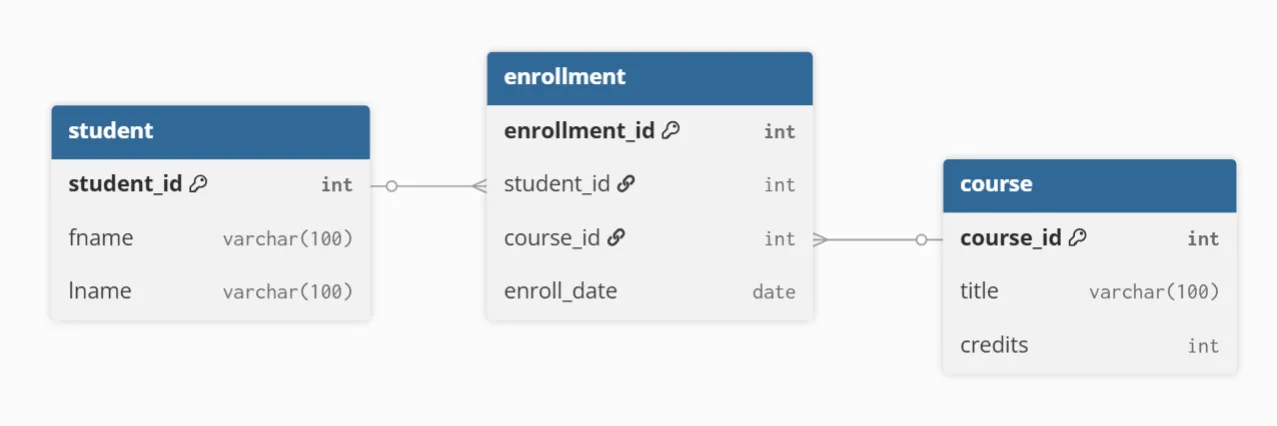
Specifically:
student.student_idconnects toenrollment.student_idcourse.course_idconnects toenrollment.course_id
SQL Example to View Connected Data#
After adding data, use JOIN to see which courses each student enrolled in:
SELECT
  student.student_id,
  student.fname,
  student.lname,
  course.title,
  course.credits,
  enrollment.enroll_date
FROM enrollment
JOIN student ON enrollment.student_id = student.student_id
JOIN course ON enrollment.course_id = course.course_id
ORDER BY student.student_id;The result will be combined data from all 3 tables:
| student_id | fname | lname | title | credits | enroll_date |
|---|---|---|---|---|---|
| 1 | Somchai | Jaidee | Database Systems | 3 | 2026-06-01 |
| 1 | Somchai | Jaidee | Web Programming | 3 | 2026-06-01 |
| 2 | Suda | Sukjai | Database Systems | 3 | 2026-06-02 |
| 2 | Suda | Sukjai | Artificial Intelligence | 3 | 2026-06-02 |
| 3 | Anan | Meesuk | Web Programming | 3 | 2026-06-03 |
| 4 | Malee | Thongdee | Artificial Intelligence | 3 | 2026-06-03 |
| 5 | Krit | Wongsa | Cybersecurity Basics | 2 | 2026-06-04 |
Key Constraint Example#
Try running the following commands in the SQL tab of phpMyAdmin to see how Primary Keys and Foreign Keys work:
-- Correct: Add enrollment for existing student_id and course_id
INSERT INTO enrollment (student_id, course_id, enroll_date)
VALUES (1, 3, '2026-06-05');

-- Wrong: Add enrollment for non-existent student_id
-- Will be rejected because there's no student_id = 999 in student table
INSERT INTO enrollment (student_id, course_id, enroll_date)
VALUES (999, 1, '2026-06-05');

-- Wrong: Add enrollment for non-existent course_id
-- Will be rejected because there's no course_id = 999 in course table
INSERT INTO enrollment (student_id, course_id, enroll_date)
VALUES (1, 999, '2026-06-05');Example of Deleting Referenced Data#
If a student is being referenced in the enrollment table and you try to delete that student, the system will reject it because it could make enrollment data inconsistent:
-- Wrong: Delete a student who has enrollment data
-- Will be rejected because student_id = 5 is being referenced
DELETE FROM student
WHERE student_id = 5;If you really want to delete, you must delete the related enrollment data first, then delete the student:
-- Delete enrollment data for student_id = 5 first
DELETE FROM enrollment
WHERE student_id = 5;

-- Then delete the student
DELETE FROM student
WHERE student_id = 5;ON DELETE and ON UPDATE#
We can control behavior when referenced data is deleted or modified using ON DELETE and ON UPDATE:
FOREIGN KEY (student_id) REFERENCES student(student_id)
  ON DELETE RESTRICT
ON UPDATE CASCADE| Action | Behavior |
|---|---|
RESTRICT / NO ACTION | Reject deletion or modification if other records still reference it |
CASCADE | Delete or modify cascades to referenced records |
SET NULL | Set Foreign Key to NULL if column allows NULL |
Generally, for enrollment data, you might choose RESTRICT to prevent accidental deletion of students or courses while enrollment relationships exist.
Summary: Primary Key uniquely identifies records (like
student_id), Foreign Key connects tables together. Theenrollmenttable makes Many-to-Many relationships possible, and Referential Integrity prevents referencing non-existent data.
3. Normalization (1NF–3NF)#
Normalization is the process of organizing tables to reduce data redundancy and eliminate data anomalies. In this section, we’ll use the school system example (schooldb) from section 2 — starting from a single table “not yet normalized” and gradually separating it into the familiar student, course, and enrollment tables.
Starting Point: Single Table Storing Everything#
Suppose we initially designed a single table named student_course that stores students, courses, and enrollments together, putting multiple courses for one student in a single column:
| student_id | fname | lname | courses |
|---|---|---|---|
| 1 | Somchai | Jaidee | Database Systems, Web Programming |
| 2 | Suda | Sukjai | Database Systems, Artificial Intelligence |
| 3 | Anan | Meesuk | Web Programming |
Storing multiple values in one cell makes searching, updating, or joining difficult — this is what Normalization fixes.
Redundancy and Anomalies#
Poorly designed tables create redundancy and 3 types of anomalies:
- Update Anomaly — Changing a course name requires modifying multiple rows. If not all rows are updated, data becomes inconsistent.
- Insert Anomaly — Cannot add a new course that nobody has enrolled in yet (no students yet → no rows to insert into).
- Delete Anomaly — Deleting the last enrollment for a course removes the course data as well.
First Normal Form (1NF)#
1NF requires every column to store atomic values — not multiple values in one cell. The solution is to separate each course into its own row and extract course details as columns:
| student_id | fname | lname | course_id | title | credits | enroll_date |
|---|---|---|---|---|---|---|
| 1 | Somchai | Jaidee | 1 | Database Systems | 3 | 2026-06-01 |
| 1 | Somchai | Jaidee | 2 | Web Programming | 3 | 2026-06-01 |
| 2 | Suda | Sukjai | 1 | Database Systems | 3 | 2026-06-02 |
| 2 | Suda | Sukjai | 3 | Artificial Intelligence | 3 | 2026-06-02 |
| 3 | Anan | Meesuk | 2 | Web Programming | 3 | 2026-06-03 |
Now it passes 1NF, but still has obvious redundancy — “Somchai/Jaidee” repeats in 2 rows, and “Database Systems/3cr” also repeats in 2 rows.
Second Normal Form (2NF)#
2NF requires passing 1NF and no partial dependencies — every column must depend on the entire PK, not just part of it.
In this table, PK is (student_id, course_id), but:
fname,lnamedepend on onlystudent_id(part of PK)title,creditsdepend on onlycourse_id(part of PK)enroll_datedepends on both (it’s specific to that enrollment)
The solution is to separate into 3 tables:
student—student_id→fname,lnamecourse—course_id→title,creditsenrollment—student_id,course_id→enroll_date
Third Normal Form (3NF)#
3NF requires passing 2NF and no transitive dependencies — non-key columns must not depend on other non-key columns.
Example of transitive dependency: To illustrate, suppose our student table also stores advisor (faculty mentor) information in the same table:
| student_id | fname | lname | advisor_id | advisor_name | advisor_dept |
|---|---|---|---|---|---|
| 1 | Somchai | Jaidee | 101 | Dr. Smith | Computer Science |
| 2 | Suda | Sukjai | 101 | Dr. Smith | Computer Science |
| 3 | Anan | Meesuk | 102 | Dr. Lee | Mathematics |
PK is student_id, but advisor_name and advisor_dept don’t depend directly on student_id — they depend on advisor_id:
student_id → advisor_id → advisor_name, advisor_dept
This is a transitive dependency, which causes the same problems: if “Dr. Smith” transfers departments, you must modify multiple rows. If an advisor changes names, you must update it in every row of their assigned students.
Solution (3NF): Separate advisor data into its own advisor table, and have student reference it with advisor_id:
CREATE TABLE advisor (
  advisor_id INT PRIMARY KEY,
  advisor_name VARCHAR(100),
  advisor_dept VARCHAR(100)
);

CREATE TABLE student (
  student_id INT AUTO_INCREMENT PRIMARY KEY,
  fname VARCHAR(100),
  lname VARCHAR(100),
  advisor_id INT,
  FOREIGN KEY (advisor_id) REFERENCES advisor(advisor_id)
);Now every column in each table depends directly on PK with no transitive dependency — passes 3NF.
Back to our example: after separating in 2NF, all three tables student, course, enrollment also pass 3NF (no transitive dependencies), and the result is the same structure we created in section 2:
-- student: Student data, all depends on student_id
CREATE TABLE student (
  student_id INT AUTO_INCREMENT PRIMARY KEY,
  fname VARCHAR(100),
  lname VARCHAR(100)
);

-- course: Course data, all depends on course_id
CREATE TABLE course (
  course_id INT AUTO_INCREMENT PRIMARY KEY,
  title VARCHAR(100),
  credits INT
);

-- enrollment: Stores M:N relationship + enrollment details
CREATE TABLE enrollment (
  enrollment_id INT AUTO_INCREMENT PRIMARY KEY,
  student_id INT,
  course_id INT,
  enroll_date DATE,
  FOREIGN KEY (student_id) REFERENCES student(student_id),
  FOREIGN KEY (course_id) REFERENCES course(course_id)
);Note: Theoretically, PK of
enrollmentis(student_id, course_id), but in practice we often use a surrogate key (enrollment_idwithAUTO_INCREMENT) to make referencing rows easier, as done in section 2.
Benefits of Normalized Databases#
- Reduces redundancy → Saves space
- Eliminates anomalies → Data is consistent and correct
- Single point of change → Reflects everywhere (e.g., change course name in one place in
course) - Easier maintenance and system expansion
Summary: Normalization transforms a single table containing everything into multiple tables where “each table stores only one thing” through 1NF → 2NF → 3NF — resulting in the
student/course/enrollmentstructure we use in section 2.
What’s Denormalization? Sometimes in production, we might intentionally store some redundant data (denormalize), like storing course names in
enrollmenttoo, to reduce multiple tableJOINs when reading. This makes queries faster but trades off with maintaining consistency of duplicated data.
4. Views#
Views are virtual tables created from the results of a query. They do not store actual data (except in the case of materialized views); instead, they store only the definition of the query. In this section, we will use the student, course, and enrollment tables introduced in Section 2.
When working with databases that contain multiple related tables, we often need to write the same JOIN queries repeatedly to retrieve connected data. For example, displaying students along with the courses they have enrolled in may require a complex query. If the same query is used frequently, we can create a View to save and reuse it.
A View acts as a virtual table based on the result of a SELECT statement. It makes queries shorter, easier to read, and reduces the complexity of SQL code.
Creating a View#
The following example creates a View named student_courses, which combines data from the student, course, and enrollment tables.
CREATE VIEW student_courses AS
SELECT
  s.student_id,
  s.fname,
  s.lname,
  c.title AS course_title,
  c.credits,
  e.enroll_date
FROM enrollment e
JOIN student s ON e.student_id = s.student_id
JOIN course c ON e.course_id = c.course_id;After executing this statement, the student_courses View will be created in the database.
Querying Data from a View#
Once a View has been created, it can be used just like a regular table. In phpMyAdmin, the student_courses View will appear in the left navigation panel of the database as a virtual table. You can click on it to browse its data in the same way you would open a normal table.
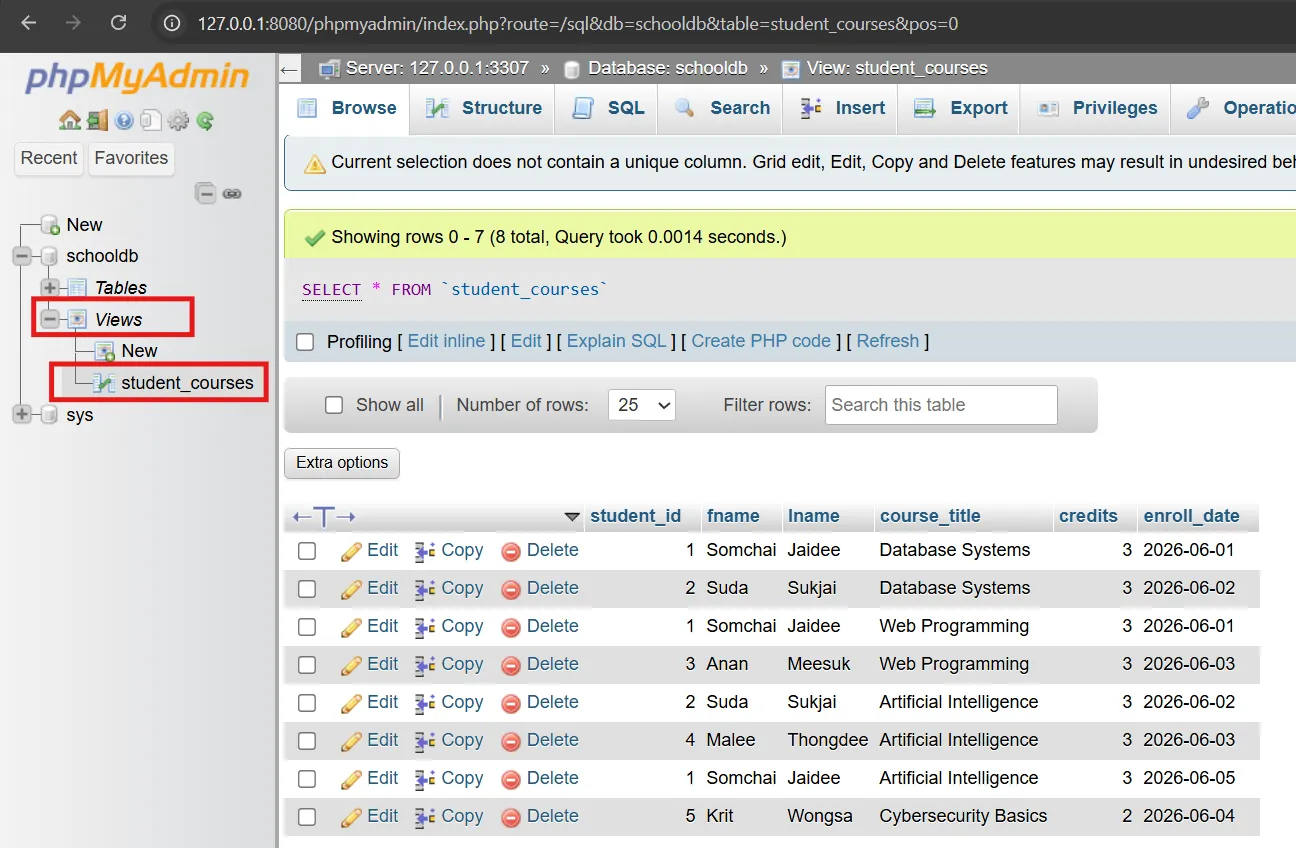
The following query:
SELECT * FROM student_courses;returns the same result as running the original JOIN query across the student, course, and enrollment tables. This is because a View simply stores the query definition under a convenient name, allowing it to be reused without rewriting the entire SQL statement.
Reducing Query Complexity#
Instead of writing long JOIN queries repeatedly, we wrap them in a view and call SELECT * FROM student_courses — whether in applications, reports, or data analysis tools.
Data Abstraction#
Views hide the complexity of actual table structure. Users don’t need to know how many tables data is distributed across. Suitable for creating “interfaces” for users or applications.
Using Views for Security#
You can grant users access to only specific views instead of actual tables, hiding sensitive columns. For example, create a view summarizing student counts per course without revealing student identities, then let external users access only that view instead of the student table.
Summary: Views reduce query complexity, provide abstraction, and increase security by controlling what data users can see.
5. Indexes#
Why Indexes Are Important#
Index is like a book’s index, helping databases find records much faster without reading the entire table. In this section, we’ll use the student/course/enrollment tables from section 2.
Full Table Scan vs Indexed Search#
- Full Table Scan — Reads every row, slow with lots of data
- Indexed Search — Uses index to jump directly to target rows, much faster
Use the EXPLAIN command to see whether a query uses an index or does a full table scan:
EXPLAIN SELECT * FROM student WHERE lname = 'Jaidee';Result (before creating index):
| id | select_type | table | type | possible_keys | key | rows | filtered | Extra |
|---|---|---|---|---|---|---|---|---|
| 1 | SIMPLE | student | ALL | NULL | NULL | 5 | 20.00 | Using where |
The key points are type = ALL and key = NULL — meaning MySQL doesn’t have an index to use yet, so it must read every row (Full Table Scan) and filter with WHERE (seen in Extra: Using where). With only 5 rows, it doesn’t feel slow, but if the table has 100,000 rows, reading every row every time would be very slow.
After creating an index (in the next subsection) and running EXPLAIN again, you’ll see type change from ALL to ref and key become the index name — meaning it switched to Indexed Search.
Single-Column Index#
-- Create index on lname column of student table (search students by last name)
CREATE INDEX idx_student_lname ON student(lname);After creating the index, run EXPLAIN again for the new result:
| id | select_type | table | type | possible_keys | key | rows | filtered | Extra |
|---|---|---|---|---|---|---|---|---|
| 1 | SIMPLE | student | ref | idx_student_lname | idx_student_lname | 1 | 100.00 | NULL |
Comparing before/after creating index:
| Column | Before (no index) | After (with index) |
|---|---|---|
type | ALL (reads all rows) | ref (searches via index) ✅ |
key | NULL (doesn’t use index) | idx_student_lname ✅ |
rows | 5 (reads all rows) | 1 (jumps to matching row) ✅ |
Now MySQL uses the index to search (key: idx_student_lname) and jumps directly to the matching row (rows: 1) instead of reading all rows — this is Indexed Search.
Composite Index#
Index on multiple columns together, suitable for queries using those columns together:
-- Index on student_id and enroll_date of enrollment table
CREATE INDEX idx_enrollment_student_date ON enrollment(student_id, enroll_date);Order matters: Composite index
(student_id, enroll_date)works well withWHERE student_id = ...andWHERE student_id = ... AND enroll_date > ..., but doesn’t help withWHERE enroll_date = ...alone.
Index Benefits and Trade-offs#
- Benefits —
WHERE,JOIN,ORDER BYqueries become much faster - Drawbacks — Slightly slows down
INSERT/UPDATE/DELETE(must update index too) and uses additional storage space
Summary: Create indexes on columns used frequently for search/join/sort, but don’t create too many because they impact write performance.
6. Stored Procedures#
Introduction to Stored Procedures#
Stored Procedure is a set of SQL commands collected together and stored in the database. It can be called repeatedly without rewriting the same SQL, making application code more compact, reducing data transfer between application and database, and increasing security by hiding business logic complexity.
Benefits of Stored Procedures#
- Reduces data transfer between app and database — Instead of sending multiple lines of SQL, the app just calls the Stored Procedure name
- Better security — Users can call Stored Procedures without direct table access permissions, and can hide complex business logic
- Easier maintenance — Modify business logic directly in the database without changing application code and redeploying
- Better performance — Database compiles and caches execution plan, making it faster than sending SQL one command at a time
- Reduces application complexity — Application just calls
CALL procedure_name(...)without writing long queries
Creating Your First Stored Procedure#
In MySQL/MariaDB, creating Stored Procedures requires temporarily changing the delimiter so the database understands where the CREATE PROCEDURE command ends, because Stored Procedures contain semicolons (;).
Example of creating a Stored Procedure named AddStudent that accepts fname and lname parameters and adds a new student:
DELIMITER $$

CREATE PROCEDURE AddStudent(
    IN p_fname VARCHAR(100),
    IN p_lname VARCHAR(100)
)
BEGIN
    INSERT INTO student (fname, lname)
    VALUES (p_fname, p_lname);
END $$

DELIMITER ;Explaining each part:
DELIMITER $$— Temporarily change command delimiter from;to$$to allow writing multi-line SQL inside Stored ProcedureCREATE PROCEDURE AddStudent(...)— Create Stored Procedure namedAddStudentaccepting 2 parametersIN p_fname VARCHAR(100)— Input parameter namedp_fnameof typeVARCHAR(100)BEGIN ... END— Block containing all SQL commands of the Stored ProcedureINSERT INTO student ...— SQL command that adds new student dataEND $$— End Stored Procedure block (using$$instead of;)DELIMITER ;— Change delimiter back to;as before
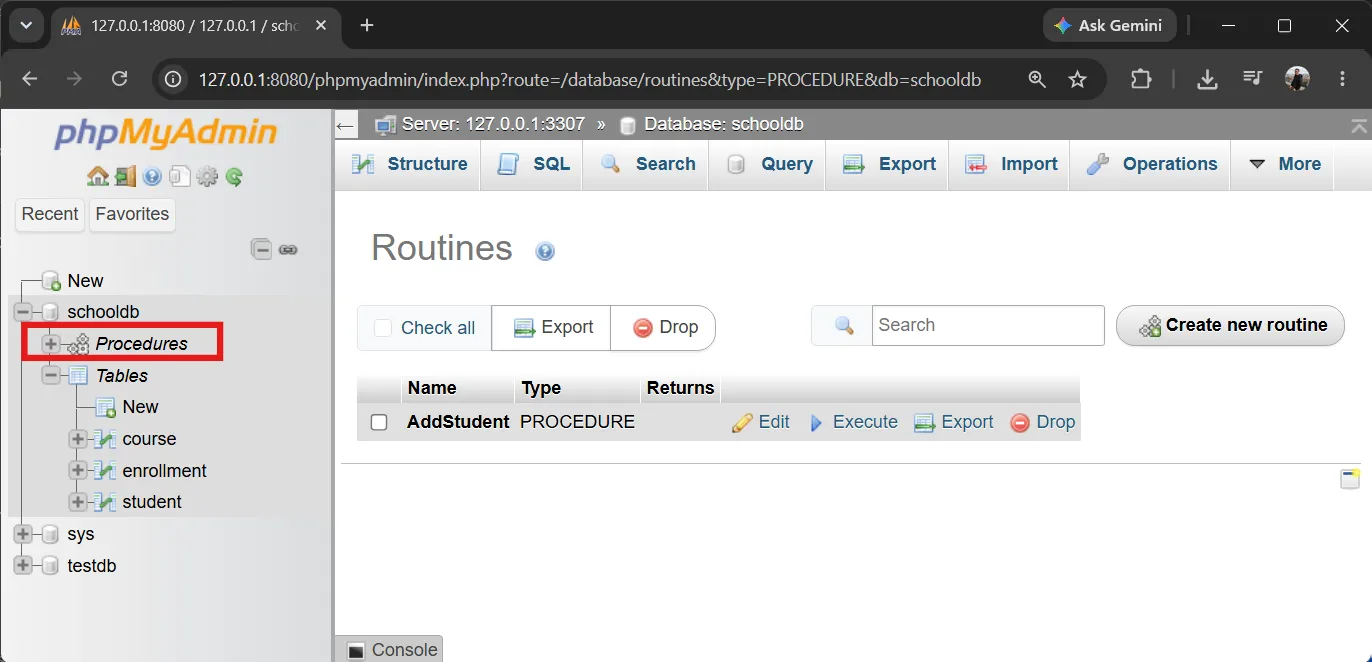
After creating the Stored Procedure, you can view all Stored Procedures in phpMyAdmin by:
- Select the
schooldbdatabase from the left panel - Click the Procedures menu at the top
- phpMyAdmin will display all Stored Procedures created in the
schooldbdatabase
Calling Stored Procedures to Add Data#
After creation, call the Stored Procedure with the CALL command:
CALL AddStudent('Nopphadol', 'Sriwilai');After running CALL AddStudent('Nopphadol', 'Sriwilai');, verify the result:
SELECT * FROM student;Result will show the newly added student:
| student_id | fname | lname |
|---|---|---|
| 1 | Somchai | Jaidee |
| 2 | Suda | Sukjai |
| 3 | Anan | Meesuk |
| 4 | Malee | Thongdee |
| 5 | Krit | Wongsa |
| 6 | Nopphadol | Sriwilai |
Stored Procedures with Conditions#
Stored Procedures can have multiple commands, use variables, and include conditions or loops. For example, a Stored Procedure that adds enrollment while verifying that the student and course exist:
DELIMITER $$

CREATE PROCEDURE EnrollStudent(
    IN p_student_id INT,
    IN p_course_id INT
)
BEGIN
    -- Variables to store counts
    DECLARE student_count INT;
    DECLARE course_count INT;

    -- Check if student exists
    SELECT COUNT(*) INTO student_count
    FROM student
    WHERE student_id = p_student_id;

    -- Check if course exists
    SELECT COUNT(*) INTO course_count
    FROM course
    WHERE course_id = p_course_id;

    -- If both student and course exist, add enrollment
    IF student_count > 0 AND course_count > 0 THEN
        INSERT INTO enrollment (student_id, course_id, enroll_date)
        VALUES (p_student_id, p_course_id, CURDATE());
        SELECT 'Enrollment successful' AS result;
    ELSE
        SELECT 'Student or course not found' AS result;
    END IF;

END $$

DELIMITER ;Calling this Stored Procedure to enroll student ID 1 in course ID 3:
CALL EnrollStudent(1, 3);Result from calling the Stored Procedure:
| result |
|---|
| Enrollment successful |
Check data in the enrollment table:
SELECT * FROM enrollment;Result:
| enrollment_id | student_id | course_id | enroll_date |
|---|---|---|---|
| 1 | 1 | 1 | 2026-06-01 |
| 2 | 1 | 2 | 2026-06-01 |
| 3 | 2 | 1 | 2026-06-02 |
| 4 | 2 | 3 | 2026-06-02 |
| 5 | 3 | 2 | 2026-06-03 |
| 6 | 4 | 3 | 2026-06-03 |
| 7 | 5 | 4 | 2026-06-04 |
| 8 | 1 | 3 | 2026-06-20 |
Try calling the Stored Procedure with non-existent data:
CALL EnrollStudent(999, 1);Result:
| result |
|---|
| Student or course not found |
SELECT Stored Procedures - Retrieving Data#
Example of a Stored Procedure that retrieves all students:
DELIMITER $$

CREATE PROCEDURE GetAllStudents()
BEGIN
    SELECT student_id, fname, lname
    FROM student
    ORDER BY student_id;
END $$

DELIMITER ;Call the Stored Procedure:
CALL GetAllStudents();Result:
| student_id | fname | lname |
|---|---|---|
| 1 | Somchai | Jaidee |
| 2 | Suda | Sukjai |
| 3 | Anan | Meesuk |
| 4 | Malee | Thongdee |
| 5 | Krit | Wongsa |
| 6 | Nopphadol | Sriwilai |
Example of a Stored Procedure that retrieves a student by ID:
DELIMITER $$

CREATE PROCEDURE GetStudentById(
    IN p_student_id INT
)
BEGIN
    SELECT student_id, fname, lname
    FROM student
    WHERE student_id = p_student_id;
END $$

DELIMITER ;Call the Stored Procedure:
CALL GetStudentById(2);Result:
| student_id | fname | lname |
|---|---|---|
| 2 | Suda | Sukjai |
OUTPUT Parameter Stored Procedures#
Stored Procedures can have input (IN), output (OUT), and input/output (INOUT) parameters. Example of a Stored Procedure that counts students and returns the value via an output parameter:
DELIMITER $$

CREATE PROCEDURE GetStudentCount(
    OUT p_total INT
)
BEGIN
    SELECT COUNT(*) INTO p_total
    FROM student;
END $$

DELIMITER ;Call with an output parameter using MySQL session variables (prefixed with @):
CALL GetStudentCount(@total);Display the received value:
SELECT @total AS total_students;Result:
| total_students |
|---|
| 6 |
Example of a Stored Procedure that returns multiple values via output parameters:
DELIMITER $$

CREATE PROCEDURE GetEnrollmentStats(
    OUT p_total_students INT,
    OUT p_total_courses INT,
    OUT p_total_enrollments INT
)
BEGIN
    SELECT COUNT(*) INTO p_total_students FROM student;
    SELECT COUNT(*) INTO p_total_courses FROM course;
    SELECT COUNT(*) INTO p_total_enrollments FROM enrollment;
END $$

DELIMITER ;Call the Stored Procedure:
CALL GetEnrollmentStats(@students, @courses, @enrollments);Display all values:
SELECT @students AS total_students,
       @courses AS total_courses,
@enrollments AS total_enrollments;Result:
| total_students | total_courses | total_enrollments |
|---|---|---|
| 6 | 4 | 8 |
UPDATE Stored Procedures#
Example of a Stored Procedure that modifies data and displays the number of affected rows:
DELIMITER $$

CREATE PROCEDURE UpdateStudentName(
    IN p_student_id INT,
    IN p_new_fname VARCHAR(100),
    IN p_new_lname VARCHAR(100)
)
BEGIN
    UPDATE student
    SET fname = p_new_fname,
        lname = p_new_lname
    WHERE student_id = p_student_id;

    SELECT ROW_COUNT() AS affected_rows;
END $$

DELIMITER ;Call the Stored Procedure to update student ID 6:
CALL UpdateStudentName(6, 'Nopphadol', 'Updated');Result:
| affected_rows |
|---|
| 1 |
Verify the changes:
SELECT * FROM student WHERE student_id = 6;Result:
| student_id | fname | lname |
|---|---|---|
| 6 | Nopphadol | Updated |
Complex Stored Procedures - JOINing Tables#
Example of a Stored Procedure that retrieves enrollment data with student and course names:
DELIMITER $$

CREATE PROCEDURE GetStudentEnrollments()
BEGIN
    SELECT
        s.student_id,
        s.fname,
        s.lname,
        c.title AS course_title,
        c.credits,
        e.enroll_date
    FROM enrollment e
    JOIN student s ON e.student_id = s.student_id
    JOIN course c ON e.course_id = c.course_id
    ORDER BY s.student_id, c.title;
END $$

DELIMITER ;Call the Stored Procedure:
CALL GetStudentEnrollments();Result:
| student_id | fname | lname | course_title | credits | enroll_date |
|---|---|---|---|---|---|
| 1 | Somchai | Jaidee | Artificial Intelligence | 3 | 2026-06-20 |
| 1 | Somchai | Jaidee | Database Systems | 3 | 2026-06-01 |
| 1 | Somchai | Jaidee | Web Programming | 3 | 2026-06-01 |
| 2 | Suda | Sukjai | Artificial Intelligence | 3 | 2026-06-02 |
| 2 | Suda | Sukjai | Database Systems | 3 | 2026-06-02 |
| 3 | Anan | Meesuk | Web Programming | 3 | 2026-06-03 |
| 4 | Malee | Thongdee | Artificial Intelligence | 3 | 2026-06-03 |
| 5 | Krit | Wongsa | Cybersecurity Basics | 2 | 2026-06-04 |
| 6 | Nopphadol | Updated | Database Systems | 3 | 2026-06-20 |
Managing and Deleting Stored Procedures#
View all Stored Procedures in the database:
SHOW PROCEDURE STATUS WHERE Db = 'schooldb';Result (example):
| Db | Name | Type | Definer | Modified | Created |
|---|---|---|---|---|---|
| schooldb | AddStudent | PROCEDURE | root@localhost | 2026-06-20 10:00:00 | 2026-06-20 10:00:00 |
| schooldb | EnrollStudent | PROCEDURE | root@localhost | 2026-06-20 10:05:00 | 2026-06-20 10:05:00 |
| schooldb | GetAllStudents | PROCEDURE | root@localhost | 2026-06-20 10:10:00 | 2026-06-20 10:10:00 |
View the code of a Stored Procedure named AddStudent:
SHOW CREATE PROCEDURE AddStudent;Delete a Stored Procedure:
DROP PROCEDURE IF EXISTS AddStudent;Summary: Stored Procedures are sets of SQL commands stored in the database, reducing application complexity, improving performance, and increasing security by hiding business logic and controlling data access. They can be called repeatedly and maintained more easily than embedding SQL in application code.
Why Stored Procedures Are Less Popular in Modern Web Applications#
While Stored Procedures offer several benefits, they have become less popular in modern web application development for several reasons:
-
Vendor Lock-in — Stored Procedures use database-specific syntax (PL/SQL for Oracle, T-SQL for SQL Server, etc.). Migrating between databases requires rewriting all procedures, which is expensive and time-consuming.
-
Version Control Challenges — Stored Procedures live in the database, making them harder to track with version control systems like Git compared to application code.
-
Limited Modern Framework Support — Popular frameworks like Django, Rails, Laravel, and Prisma encourage writing business logic in application code rather than the database.
-
Horizontal Scaling Issues — Stored procedures execute on the database server, which can become a bottleneck. Modern architectures prefer scaling application servers horizontally while keeping databases focused on data storage.
-
Developer Productivity — Most developers are more comfortable with general-purpose programming languages (JavaScript, Python, Ruby) than SQL-based procedural languages for complex business logic.
-
Testing and Debugging — Unit testing and debugging stored procedures is more difficult compared to testing application code using modern testing frameworks.
Note: Stored Procedures still have valid use cases, such as complex data processing close to the data, batch operations, or performance-critical queries where reducing network round-trips is essential.
7. Access Control and Security#
Configuring phpMyAdmin for Access Control Testing#
Before testing Access Control hands-on, we need to configure phpMyAdmin to allow logout and login with different users.
By default, phpMyAdmin in CAMPP is configured to auto-login as root, making logout impossible. We need to edit the config file as follows:
Editing phpMyAdmin’s config.inc.php#
Open the phpMyAdmin config file with a text editor like Notepad or VS Code:
C:\CAMPP\runtime\phpMyAdmin-5.2.2-all-languages\config.inc.phpIf you can’t find this file, search for config.inc.php in the C:\CAMPP\runtime\ folder.
Open the file and look for these lines:
$cfg['Servers'][$i]['auth_type'] = 'config';
$cfg['Servers'][$i]['user'] = 'root';
$cfg['Servers'][$i]['password'] = '1234';Make these changes:
-
Remove or comment out the
userandpasswordlines:
php// $cfg['Servers'][$i]['user'] = 'root'; // $cfg['Servers'][$i']['password'] = '1234'; -
Change
auth_typefromconfigtocookie:
php$cfg['Servers'][$i]['auth_type'] = 'cookie'; -
Add this line (if not already present):
php$cfg['PmaAbsoluteUri'] = 'http://127.0.0.1:8080/phpmyadmin/';
Your edited file should look like this:
/* Server Parameters */
$cfg['Servers'][$i]['auth_type'] = 'cookie';
// $cfg['Servers'][$i]['user'] = 'root';
// $cfg['Servers'][$i]['password'] = '1234';
$cfg['PmaAbsoluteUri'] = 'http://127.0.0.1:8080/phpmyadmin/';Creating Users and Granting Permissions#
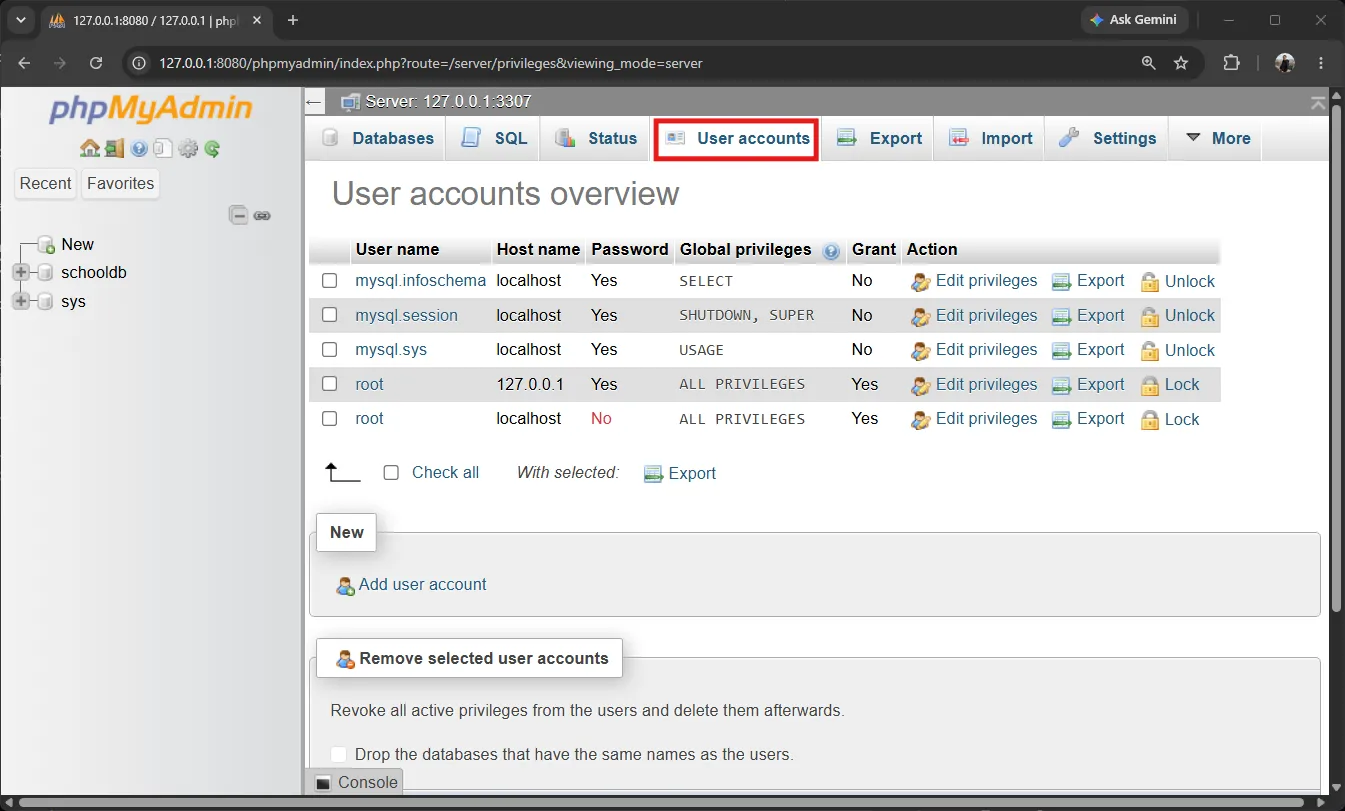
phpMyAdmin has a User accounts tab for managing users through a GUI interface, which is convenient and easy to use. However, in this article we’ll use SQL commands to help you understand how Access Control works deeply and apply it to other database tools.
After configuring phpMyAdmin, visit http://127.0.0.1:8080/phpmyadmin/ and login with:
- Username:
root - Password:
1234(default CAMPP password)
In the SQL tab, run the following commands to create new users:
-- Create user staff_viewer for viewing data only
CREATE USER 'staff_viewer'@'127.0.0.1' IDENTIFIED BY 'staff123';

-- Create user teacher_admin for managing enrollments
CREATE USER 'teacher_admin'@'127.0.0.1' IDENTIFIED BY 'teacher123';

-- Don't forget to grant access to schooldb database
GRANT USAGE ON schooldb.* TO 'staff_viewer'@'127.0.0.1';
GRANT USAGE ON schooldb.* TO 'teacher_admin'@'127.0.0.1';Result from running the commands:
| Result |
|---|
| Query OK, 0 rows affected |
Granting Privileges#
Now grant permissions to each user according to their role:
-- Grant staff_viewer read-only access to student and course tables
GRANT SELECT ON schooldb.student TO 'staff_viewer'@'127.0.0.1';
GRANT SELECT ON schooldb.course TO 'staff_viewer'@'127.0.0.1';

-- Grant teacher_admin read and modify access to enrollment table
GRANT SELECT, UPDATE ON schooldb.enrollment TO 'teacher_admin'@'127.0.0.1';

-- View grants for staff_viewer
SHOW GRANTS FOR 'staff_viewer'@'127.0.0.1';Result from SHOW GRANTS:
| Grants for staff_viewer@localhost |
|---|
GRANT USAGE ON . TO staff_viewer@127.0.0.1 |
GRANT SELECT ON schooldb.student TO staff_viewer@127.0.0.1 |
GRANT SELECT ON schooldb.course TO staff_viewer@127.0.0.1 |
Testing - Logout and Login with New Users#
Now let’s test the permissions we’ve configured:
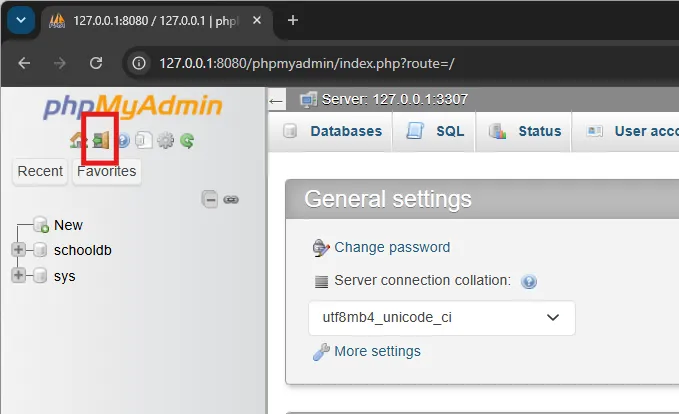
Step 1: Logout from phpMyAdmin
- Click the Logout button at the top-left of phpMyAdmin or visit
http://127.0.0.1:8080/phpmyadmin/index.php?route=/logout
Step 2: Login as staff_viewer
The phpMyAdmin login page will appear. Enter:
- Username:
staff_viewer - Password:
staff123
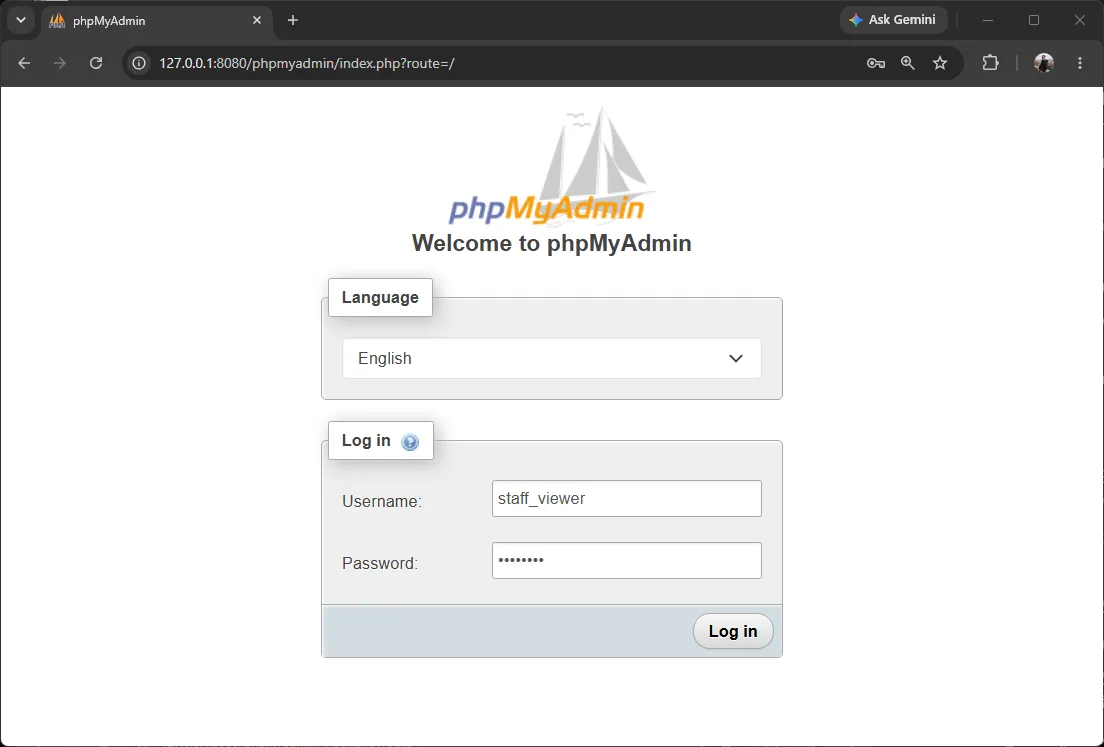
After successful login, you’ll see the phpMyAdmin interface, but only the databases and tables you have permission to access.
Step 3: Test staff_viewer Permissions
Click on the student and course tables - you’ll find you can browse data (Browse and Structure tabs are available).
However, when you click on the enrollment table, you’ll find no Browse tab or cannot access it, because staff_viewer has no permissions on this table.
Try typing an INSERT command in the SQL tab:
INSERT INTO student (fname, lname) VALUES ('Test', 'User');Result (should show an error since there’s no INSERT permission):
| Error |
|---|
| #1142 - INSERT command denied to user ‘staff_viewer’@‘127.0.0.1’ for table ‘student’ |
Step 4: Switch to teacher_admin
- Click Logout again
- Login with:
- Username:
teacher_admin - Password:
teacher123
- Username:
Step 5: Test teacher_admin Permissions
Click on the enrollment table - you’ll find you can view and edit data (Browse and Edit tabs are available).
Try typing an UPDATE command in the SQL tab:
UPDATE enrollment
SET enroll_date = '2026-06-20'
WHERE enrollment_id = 1;Result (should succeed):
| Error |
|---|
| (No error - Query OK) |
But when trying to INSERT new data:
INSERT INTO enrollment (student_id, course_id, enroll_date)
VALUES (1, 1, '2026-06-20');Result (should show an error since there’s no INSERT permission):
| Error |
|---|
| #1142 - INSERT command denied to user ‘teacher_admin’@‘127.0.0.1’ for table ‘enrollment’ |
Step 6: Return to root
- Click Logout again
- Login with:
- Username:
root - Password: (empty) or
1234
- Username:
Authentication and Authorization#
From the test above, we see two mechanisms at work:
- Authentication — Confirming who the user is (e.g., username
staff_viewer+ passwordstaff123) - Authorization — Determining what that user can do (e.g.,
staff_viewercan only read)
Available Privileges#
Grantable permissions include SELECT, INSERT, UPDATE, DELETE, CREATE, DROP, and grant levels (*.* for all databases, schooldb.* for all tables in schooldb, schooldb.student for specific tables).
Example of granting at different levels:
-- Grant everything on all databases (dangerous - use only for root)
GRANT ALL PRIVILEGES ON *.* TO 'admin'@'localhost';

-- Grant everything on schooldb database
GRANT ALL PRIVILEGES ON schooldb.* TO 'schooldb_admin'@'localhost';

-- Grant specific table permissions
GRANT SELECT, INSERT ON schooldb.student TO 'data_entry'@'localhost';Revoking Privileges#
Use REVOKE to remove permissions:
-- Revoke UPDATE permission from teacher_admin
REVOKE UPDATE ON schooldb.enrollment FROM 'teacher_admin'@'127.0.0.1';

-- Check remaining permissions
SHOW GRANTS FOR 'teacher_admin'@'127.0.0.1';Result after revoking UPDATE permission:
| Grants for teacher_admin@localhost |
|---|
GRANT USAGE ON . TO teacher_admin@127.0.0.1 |
GRANT SELECT ON schooldb.enrollment TO teacher_admin@127.0.0.1 |
Notice that teacher_admin now only has SELECT permission.
Deleting Users#
To remove users that are no longer needed:
DROP USER 'staff_viewer'@'127.0.0.1';
DROP USER 'teacher_admin'@'127.0.0.1';Principle of Least Privilege#
Principle of Least Privilege — Give users only the permissions necessary for their work, no more.
From our examples:
staff_viewerhas onlySELECTon required tables — cannot INSERT/UPDATE/DELETEteacher_adminhasSELECTandUPDATEon enrollment — but no INSERT or DELETE
This approach reduces risk in case of account compromise or user error.
Summary: Access Control determines who can access what, using user/role +
GRANT/REVOKE+ Principle of Least Privilege. Setting phpMyAdmin’sauth_type = 'cookie'enables logout/login functionality to test each user’s permissions hands-on.
8. Backup & Recovery#
Importance of Data Backup#
Data is valuable and fragile — hardware failure, software bugs, accidental deletion, or attacks can all cause data loss. Data backup is the last line of defense.
Backup Strategy#
Plan backup strategy appropriate to data importance: how often to back up, how many copies to keep, where to store (on-site + off-site/cloud), and periodically test recovery.
Full Backup and Incremental Backup#
- Full Backup — Back up everything at once. Simple but slow and uses more space.
- Incremental Backup — Back up only “changes” since last backup. Faster and space-efficient, but recovery is more complex.
Database Recovery Techniques#
Export/Import via phpMyAdmin is easy: Click Export tab to save database as .sql file (backup), and click Import tab to bring .sql file back in (recovery).
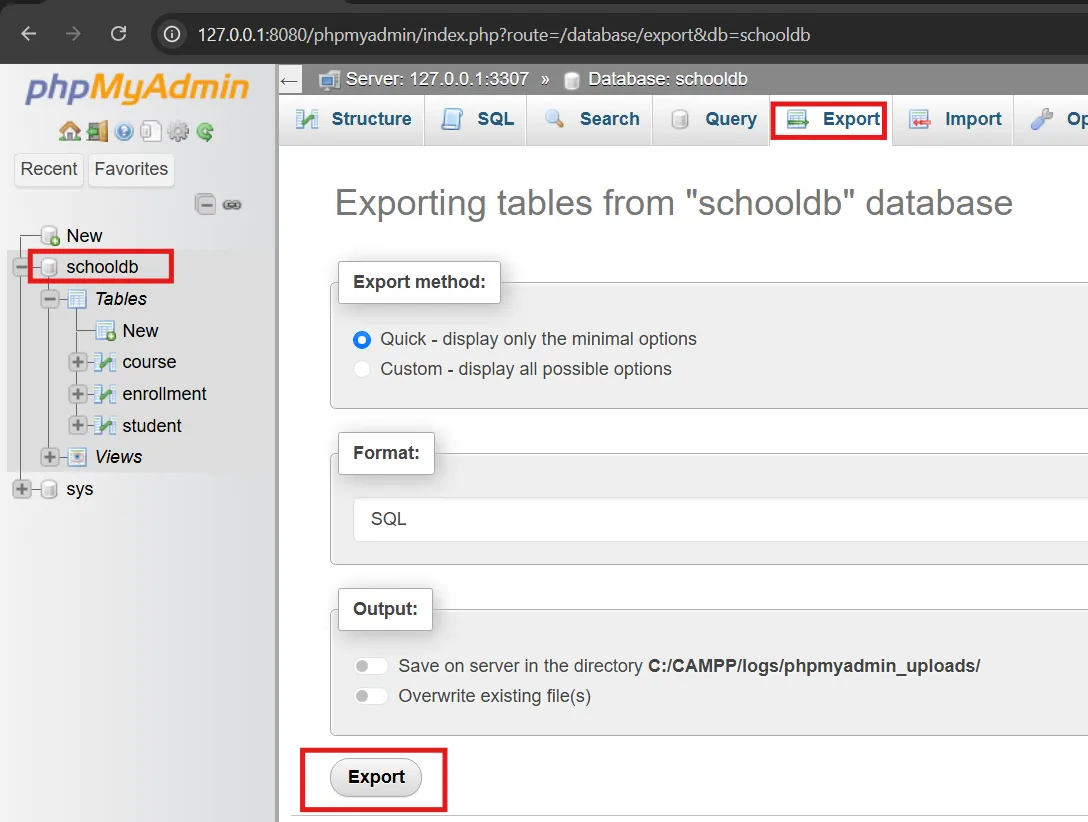
Or use mysqldump command in command line. mysql/mysqldump are in the runtime folder of CAMPP. Steps:
- Open Command Prompt (Windows) or Terminal (macOS/Linux)
cdinto thebinfolder containingmysql/mysqldump(underruntimeby installed version), e.g., on Windows:
cd \
cd CAMPP\runtime\mysql-8.4.0-winx64\binVersion folder name (like
mysql-8.4.0-winx64) may differ based on installed version — openC:\CAMPP\runtimeand enter thebinfolder of MySQL. On macOS/Linux it’s similar:cd /Applications/CAMPP/runtime/mysql-<version>/bin
- Run backup/recovery commands from this folder (backing up
schooldbdatabase we created in section 2):
# Backup data (full backup) to .sql file (store at C:\CAMPP)
mysqldump -u root -p -P 3307 schooldb > C:\CAMPP\schooldb_backup.sql

# Delete old database first, then create new one
mysql -u root -p -P 3307 -e "DROP DATABASE IF EXISTS schooldb;"
mysql -u root -p -P 3307 -e "CREATE DATABASE schooldb;"

# Recovery — import data back
mysql -u root -p -P 3307 schooldb < C:\CAMPP\schooldb_backup.sqlMeaning of each flag:
-u root— Login as userroot-p— System will prompt for password (typed without display on screen, more secure than putting password in command)-P 3307— MySQL port (Pis uppercase)>/<— File redirection:>writes to file (backup),<reads file for input (recovery)-e "..."— Run SQL command directly from command line (e.g., when dropping/creating database)
Disaster Recovery Planning#
Disaster Recovery Plan covers how fast to recover (RTO) and how much data loss is acceptable (RPO), keeping multiple backup copies in multiple locations, replication, and regular recovery drills.
Backup and Recovery#
DBMS has backup and recovery mechanisms. Regular data backup prevents permanent loss from hardware failure, accidental deletion, or system errors. Recovery processes restore databases from backup data, ensuring high availability and business continuity.
Summary: Backup & Recovery protects data from all situations. Plan your strategy (full/incremental), test recovery, and always have a disaster recovery plan.
9. Database Administration Best Practices#
Monitoring Database Health#
Monitor status with commands like SHOW STATUS, SHOW PROCESSLIST, and monitoring tools to check resource usage, slow queries, and locks.
Security Best Practices#
- Use Principle of Least Privilege (see section 8)
- Change passwords periodically and keep them secret
- Enable encryption for connections (TLS) and sensitive data
- Update DBMS to fix security vulnerabilities
Backup Scheduling#
Schedule automatic backups (e.g., cron job running mysqldump every night) and keep multiple copies in multiple locations per your strategy (see section 8).
Performance Optimization#
- Create indexes on columns used frequently for search/join/sort (see section 7)
- Analyze slow queries with
EXPLAINand adjust to use indexes - Limit rows with
LIMITand select only necessary columns (avoidSELECT *when not needed) - Use views or denormalize slightly when it helps read performance
Maintenance and Troubleshooting#
- Run
OPTIMIZE TABLE/ organize data periodically - Update index statistics so query optimizer works well
- Keep logs and test recovery to stay prepared for problems
Summary: Good database administration involves monitoring system health, maintaining security, regular backups, performance optimization, and consistent maintenance to keep systems fast, secure, and reliable.
Summary#
This article is the Next Step exploring advanced database topics:
- Database Design and ER Diagrams — Design data structure before creating tables
- Primary Key & Foreign Key — Identity and relationships with referential integrity
- Normalization (1NF–3NF) — Reduce redundancy and eliminate anomalies
- Views — Virtual tables reducing complexity and increasing security
- Indexes — Accelerate searches with trade-offs
- Access Control & Security — Control permissions by Principle of Least Privilege
- Backup & Recovery — Protect data and recover when incidents occur
- Database Administration — Best practices for fast, secure, reliable systems
Understanding both fundamentals and these advanced topics enables you to design and maintain robust databases supporting real work from small web applications to enterprise systems with confidence.