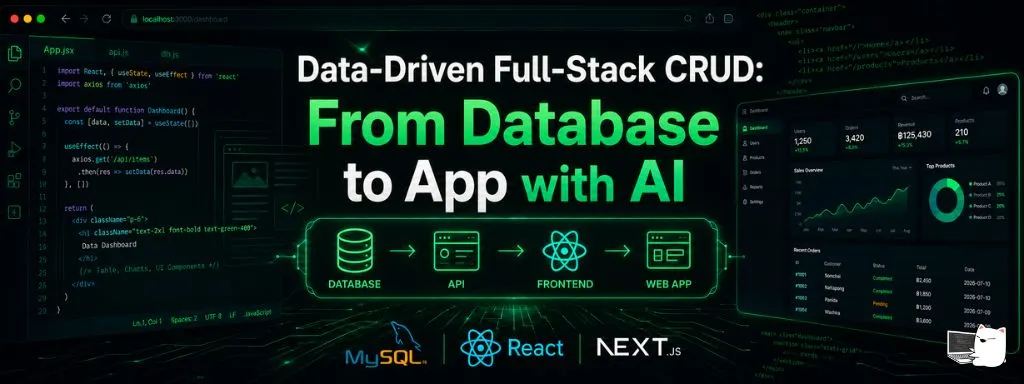
Data-Driven Full-Stack CRUD: From Database to App with AI
Learn to build Data-Driven Full-Stack CRUD applications — design your database with AI, then generate a web app with Next.js and MySQL.
Introduction#
Imagine you want to build an online store where customers can browse and order products, while the store owner can add, edit, and delete products — that’s exactly what we’ll build in this article, using AI as your coding assistant.
Don’t worry if you’ve never written code before — AI will write it for you, and we’ll explain every step in plain language.
What We’ll Build#
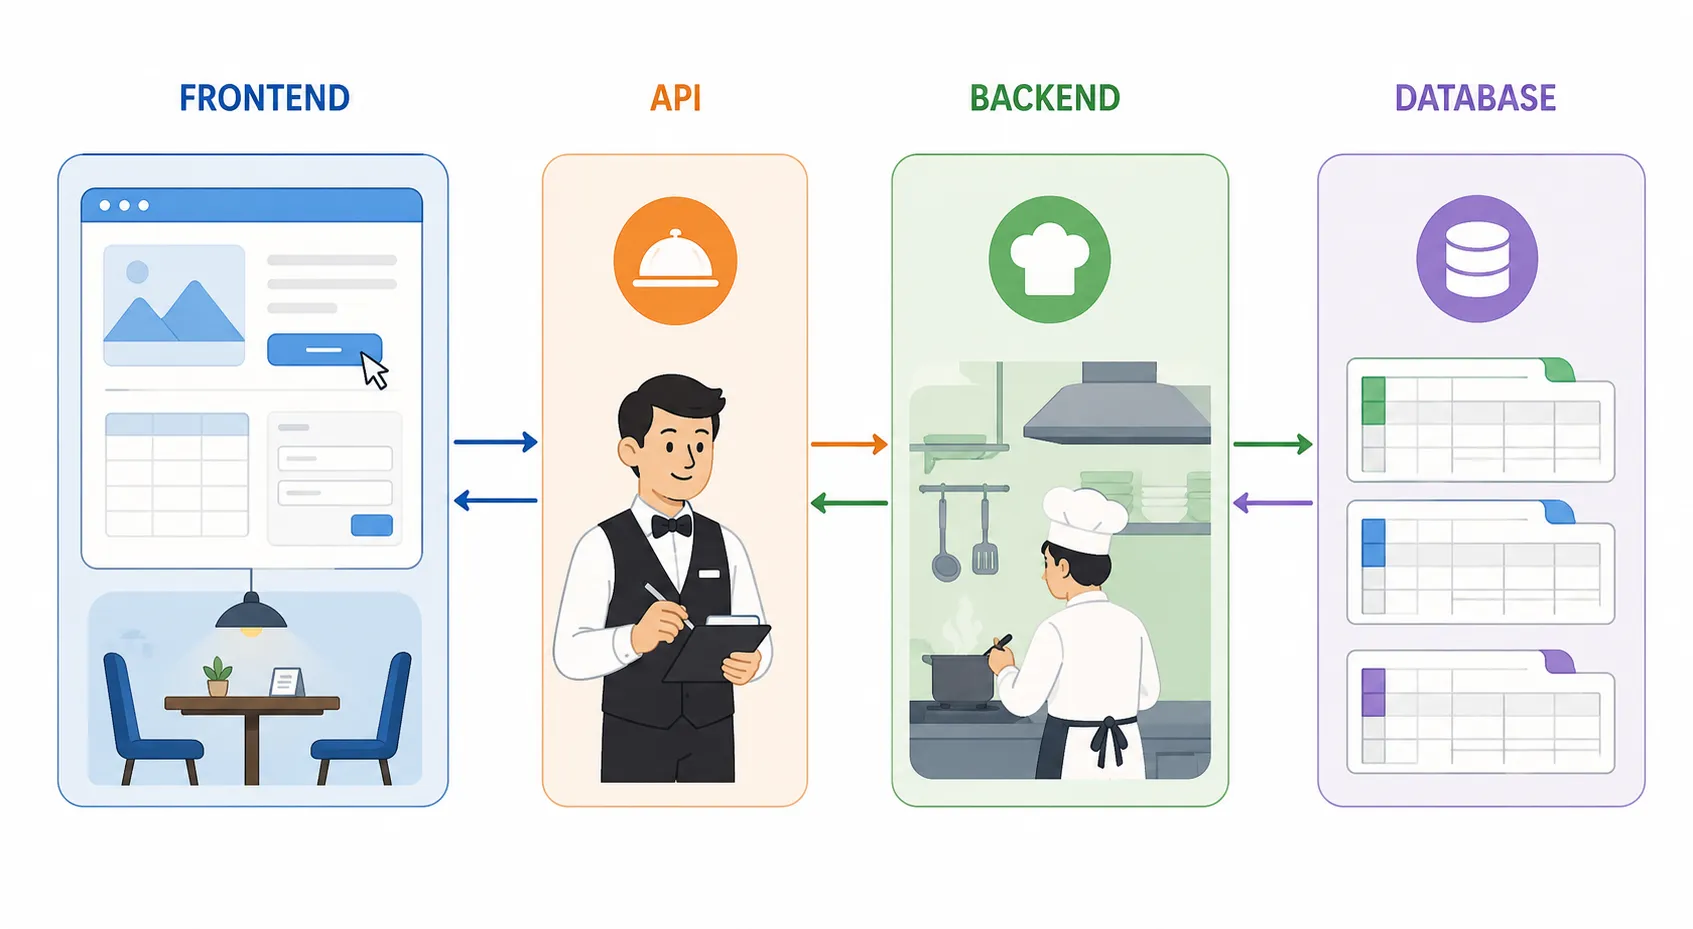
A “complete” web app — both the part users see and the part that runs behind the scenes. This structure is called Full-Stack:
| Term | Meaning | Restaurant Analogy |
|---|---|---|
| Frontend | The web page users see and click — buttons, tables, forms | The storefront + customer tables |
| Backend | The behind-the-scenes processing that handles requests and stores data | The kitchen |
| Database | Permanent storage for data, organized by category | An Excel file with many sheets |
| API | The go-between that lets the Frontend talk to the Backend | The waiter taking orders |
The Features: CRUD#
CRUD is the four basic data operations found in almost every system:
| Letter | Meaning | Example |
|---|---|---|
| Create | Add new | Add a new product to the store |
| Read | View | View the full product list |
| Update | Edit | Change a product’s price |
| Delete | Remove | Remove a discontinued product |
The Core Idea: Data-Driven (Start with the Data)#
The Data-Driven approach means “design the database first, then build the web app around that data structure.” Once you know exactly what data you’re storing, building the pages and APIs becomes far more focused and faster. And with an AI like ChatGPT or Claude, you can have the AI design the database and write the code in no time.
The Full Process#
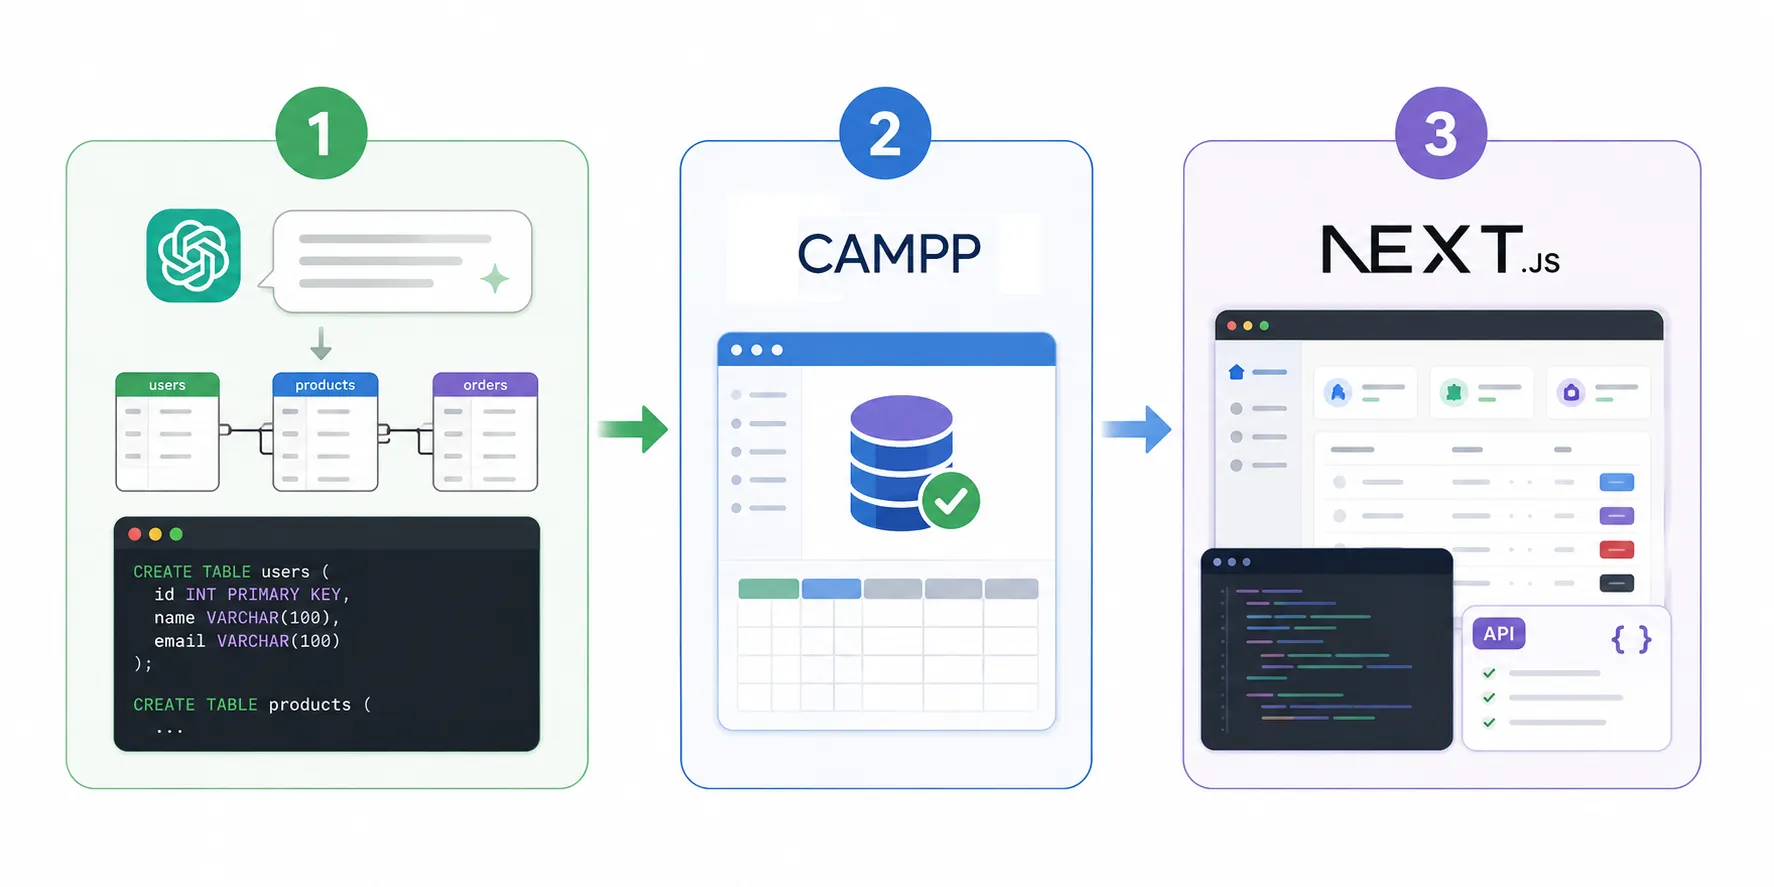
- Design the database with AI — tell the AI what data to store, and it writes the SQL to create the database.
- Create the database with CAMPP — run that SQL on your machine to build the real database.
- Generate the web app with Next.js + AI — let the AI write the Frontend and API code, ready to use.
Example system: a simple E-Commerce store with:
- Products
- Customers
- Orders
Before You Start: Install CAMPP and Open phpMyAdmin#
To build a web app, you need a program on your computer that acts as a “server” (a computer that serves the website and stores the database). Normally you’d install several separate programs, but CAMPP bundles everything into a single, easy-to-install, free package — like a “ready-to-use starter kit” with a web server, a database (MySQL/MariaDB), and a database management tool (phpMyAdmin).
Download and install CAMPP from https://campp.melivecode.com/ ↗

Once installed, open CAMPP and press Start to launch the services.
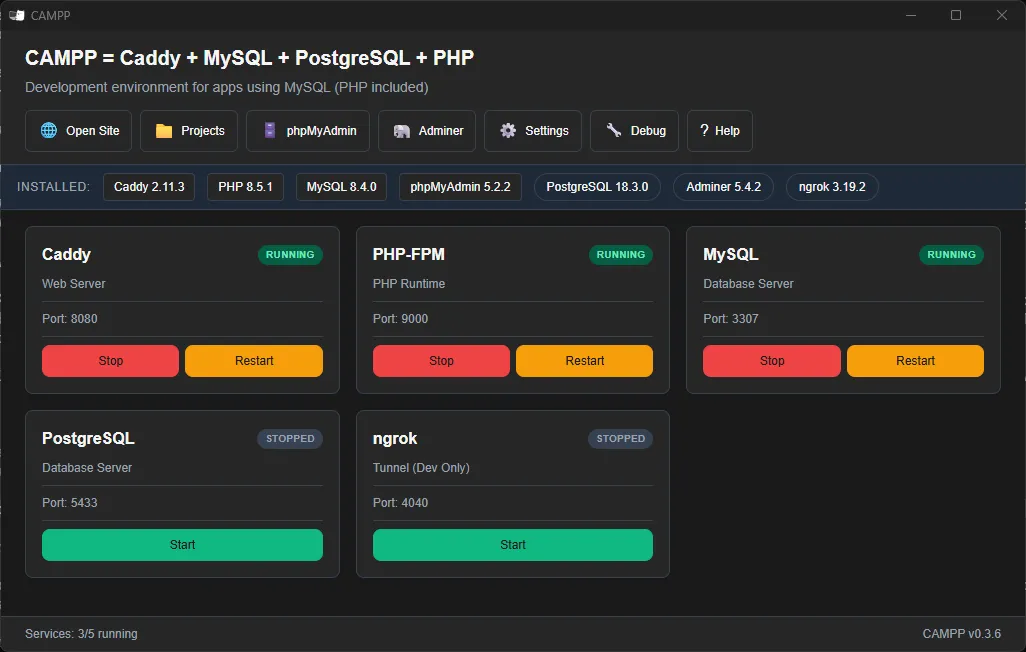
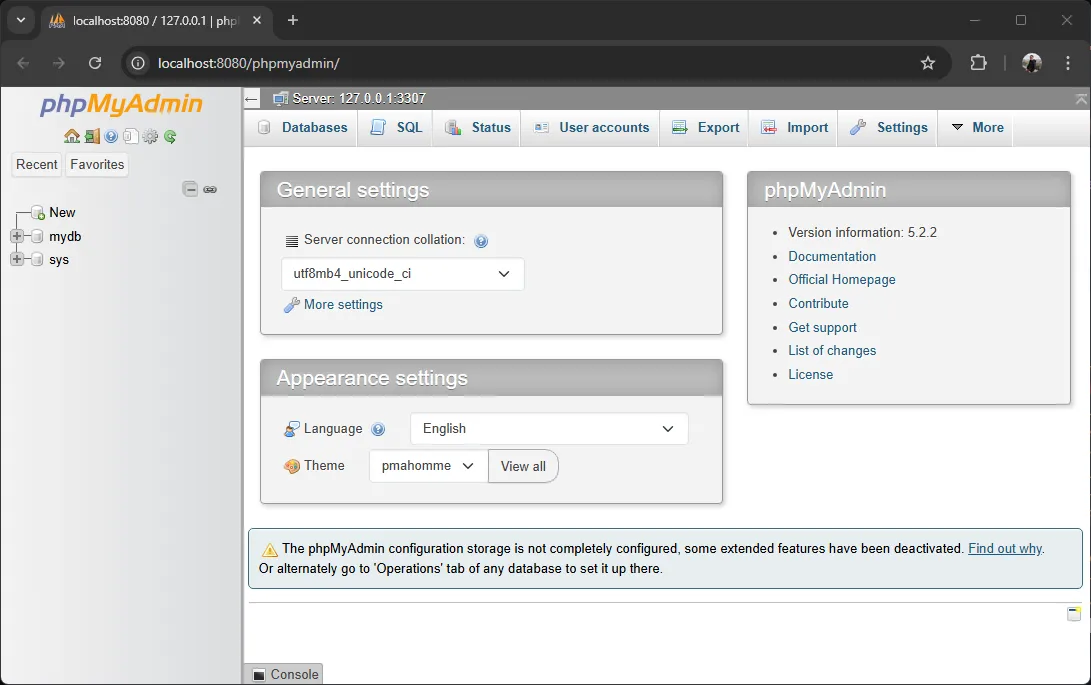
Then open phpMyAdmin by clicking the phpMyAdmin button on the CAMPP web page, or access it directly at http://127.0.0.1:8080/phpmyadmin/ ↗ to manage your database through a graphical user interface (GUI).
Before You Start: Install Node.js and VS Code#
Before building the web app in section 3, you need two more programs on your computer.
Install Node.js#
Node.js is the program that lets your computer “run” (execute) web apps written in JavaScript — much like you need to install Java before you can open certain file types.
Download and install Node.js LTS from https://nodejs.org/ ↗
We recommend the LTS (Long Term Support) version for stability.
After installing, check the versions in a Terminal or Command Prompt:
node --version
npm --versionWhat are npm and npx? npm is like an “App Store” for downloading ready-made code bundles (called packages) that other people have written and shared, so you don’t have to build everything from scratch. npx is a command for running programs hosted on npm directly.
Install VS Code#
VS Code (Visual Studio Code) is a program for writing and editing code (a text editor) — think of it as Microsoft Word, but built for writing code instead of typing documents.
Download and install it from https://code.visualstudio.com/ ↗
We also recommend installing the ESLint and Prettier extensions to help check and format your code automatically.
1. Design the Database with AI#
Tip: A Good Prompt Specifies the Data Clearly#
When asking AI to help design a database, the most important thing is to specify exactly what data you want to store. For example:
❌ Bad prompt:
Design a database for an E-Commerce system.→ You might get a structure that doesn’t match what you want, because the AI doesn’t know which fields you need.
✅ Good prompt:
Design a database for an E-Commerce system that stores:
- Products: name, price, stock quantity, description
- Customers: name, email, phone, address
- Orders: the customer who ordered, total, status, the items ordered
→ You get a structure that matches your needs, because the required fields are specified clearly.
Step 1: Use AI to Generate the SQL + Seed Data in One Go#
Open ChatGPT ↗ or Claude ↗ and use this prompt:
Design and write the SQL for an E-Commerce database with:

**Data to store:**
1. Products - product name, price, stock quantity, description
2. Customers - name, email, phone, address
3. Orders - the customer who ordered, total, status, order date
4. Order Items - the order, the product, quantity, price at time of order

**Relationships:**
- One customer can place many orders (1:N)
- One order contains many items (1:N)
- A product can appear in many orders (M:N via order_items)

**Requirements:**
1. Write SQL to create a database named ecommerce_db
2. Create all tables (products, customers, orders, order_items)
3. Set Primary Keys and Foreign Keys correctly
4. Add sample data (seed data) — 5-10 records per table

Combine everything into a single SQL file that runs on MySQL/MariaDB, with comments explaining each part.
The AI will generate complete, ready-to-use SQL:
-- Create the database
CREATE DATABASE IF NOT EXISTS ecommerce_db;
USE ecommerce_db;

-- Products table
CREATE TABLE products (
  id INT AUTO_INCREMENT PRIMARY KEY,
  name VARCHAR(255) NOT NULL,
  price DECIMAL(10,2) NOT NULL,
  stock INT DEFAULT 0,
  description TEXT,
  created_at TIMESTAMP DEFAULT CURRENT_TIMESTAMP
);

-- Customers table
CREATE TABLE customers (
  id INT AUTO_INCREMENT PRIMARY KEY,
  name VARCHAR(255) NOT NULL,
  email VARCHAR(255) UNIQUE,
  phone VARCHAR(50),
  address TEXT,
  created_at TIMESTAMP DEFAULT CURRENT_TIMESTAMP
);

-- Orders table
CREATE TABLE orders (
  id INT AUTO_INCREMENT PRIMARY KEY,
  customer_id INT,
  total DECIMAL(10,2) NOT NULL,
  status VARCHAR(50) DEFAULT 'pending',
  created_at TIMESTAMP DEFAULT CURRENT_TIMESTAMP,
  FOREIGN KEY (customer_id) REFERENCES customers(id)
);

-- Order items table
CREATE TABLE order_items (
  id INT AUTO_INCREMENT PRIMARY KEY,
  order_id INT,
  product_id INT,
  quantity INT NOT NULL,
  price DECIMAL(10,2) NOT NULL,
  created_at TIMESTAMP DEFAULT CURRENT_TIMESTAMP,
  FOREIGN KEY (order_id) REFERENCES orders(id),
  FOREIGN KEY (product_id) REFERENCES products(id)
);

-- Insert sample data
INSERT INTO products (name, price, stock, description) VALUES
('Laptop', 25000.00, 10, 'High-performance laptop'),
('Mouse', 350.00, 50, 'Wireless mouse'),
('Keyboard', 800.00, 30, 'Mechanical keyboard'),
('Monitor', 4500.00, 15, '24-inch LED monitor');

INSERT INTO customers (name, email, phone, address) VALUES
('John Smith', 'john@example.com', '555-0100', '123 Main St, New York'),
('Jane Doe', 'jane@example.com', '555-0101', '456 Oak Ave, Boston');

INSERT INTO orders (customer_id, total, status) VALUES
(1, 25350.00, 'completed'),
(2, 800.00, 'pending');

INSERT INTO order_items (order_id, product_id, quantity, price) VALUES
(1, 1, 1, 25000.00),
(1, 2, 1, 350.00),
(2, 3, 1, 800.00);Notice: One prompt does it all — design + SQL + seed data, ready to run in phpMyAdmin right away.
2. Create the Database with CAMPP#
Step 1: Create the Database#
- Open phpMyAdmin at http://127.0.0.1:8080/phpmyadmin/ ↗
- Click the SQL tab at the top.
- Paste the SQL you got from the AI and click Go.
Or you can create the database separately first:
CREATE DATABASE ecommerce_db;
USE ecommerce_db;Step 2: Run the SQL to Create the Tables#
Paste all the SQL the AI generated into the SQL tab and click Go.
phpMyAdmin will show all the tables in the left panel:
- customers
- products
- orders
- order_items
Step 3: Inspect the Relationships#
- Select the
ecommerce_dbdatabase. - Click the Designer tab at the top.
- phpMyAdmin will automatically draw an ER diagram from the tables and foreign keys.
To view the data in a table, click the table name and then the Browse tab.
3. Generate a Full-Stack Web App with Next.js + AI#
With the database ready, let’s build a Full-Stack web app with the Next.js App Router, which supports both Frontend pages and API Routes in a single project.
Step 1: Create a Next.js Project#
Open Command Prompt or Terminal (on Windows, search for “cmd” or open PowerShell), then run:
npx create-next-app@latest ecommerce-mysql-appWhen asked Would you like to use the recommended Next.js defaults?, choose:
- Yes, use recommended defaults
This gives you: TypeScript, ESLint, Tailwind CSS, and the App Router (no src/ directory).
cd ecommerce-mysql-app
npm install mysql2
npm install --save-dev @types/nodeCreate a .env.local file:
DB_HOST=localhost
DB_PORT=3307
DB_USERNAME=root
DB_PASSWORD=your-password
DB_DATABASE=ecommerce_dbNote: CAMPP uses port 3307 for MySQL.
Step 2: The AI Prompt for a Full-Stack Next.js App#
Open ChatGPT or Claude and use this prompt:
Build a Full-Stack E-Commerce CRUD app with Next.js App Router + TypeScript.

Here is the database structure (SQL):

[PASTE YOUR SQL STRUCTURE HERE]

**Project structure (TypeScript):**
ecommerce-mysql-app/
├── .env.local
├── lib/
│   └── db.ts (connect to MySQL with mysql2)
├── app/
│   ├── layout.tsx
│   ├── page.tsx (Home/Dashboard)
│   ├── customers/
│   │   └── page.tsx (Customers CRUD)
│   ├── products/
│   │   └── page.tsx (Products CRUD)
│   ├── orders/
│   │   └── page.tsx (Orders CRUD)
│   └── api/
│       ├── customers/
│       │   ├── route.ts (GET all, POST)
│       │   └── [id]/
│       │       └── route.ts (GET one, PUT, DELETE)
│       ├── products/
│       │   ├── route.ts (GET all, POST)
│       │   └── [id]/
│       │       └── route.ts (GET one, PUT, DELETE)
│       └── orders/
│           ├── route.ts (GET with JOIN to customer, POST as a transaction)
│           └── [id]/
│               └── route.ts (GET one with order_items)

**API endpoints:** RESTful CRUD for `/api/customers`, `/api/products`, `/api/orders` (each with an `[id]` route for GET / PUT / DELETE). Orders must JOIN the customer and run a transaction that decrements stock on creation.

**Frontend pages (Server Components):**
- Fetch data directly inside Server Components using async/await
- Use Client Components or Server Actions for add/edit forms
- Style with Tailwind CSS
- Include loading and error states

**Requirements:**
- lib/db.ts connects to MySQL using a mysql2 pool
- TypeScript interfaces for all types
- Parameterized queries everywhere (security)
- A transaction for creating an order (check stock → decrement stock → rollback on error)
- JSON responses for the API
- Complete error handling

Generate every file in full, including any extra npm install commands if needed.
Step 3: Copy the AI-Generated Code#
Open VS Code and open the project folder (File → Open Folder, then pick ecommerce-mysql-app). Create the files shown in the structure below, and paste the AI-generated code into each one:
ecommerce-mysql-app/
├── lib/
│   └── db.ts
├── app/
│   ├── layout.tsx
│   ├── page.tsx
│   ├── customers/
│   │   └── page.tsx
│   ├── products/
│   │   └── page.tsx
│   ├── orders/
│   │   └── page.tsx
│   └── api/
│       ├── customers/
│       │   ├── route.ts
│       │   └── [id]/route.ts
│       ├── products/
│       │   ├── route.ts
│       │   └── [id]/route.ts
│       └── orders/
│           ├── route.ts
│ └── [id]/route.tsStep 4: Test Locally#
npm run devOpen http://localhost:3000 ↗ in your browser.
Test the app:
- Open the Home page and navigate around.
- Customers page: add, edit, and delete customers.
- Products page: add, edit, and delete products.
- Orders page: create an order (verify that stock actually decreases).
If all of that works, you’ve successfully built a Full-Stack CRUD app!
4. Debug in VS Code with AI#
When you run the project and hit an error or the code doesn’t behave as expected, you can use AI to fix it easily with these techniques:
1. Copy the Error Message#
When the Terminal or browser shows an error, copy the entire error message.
2. Copy the Relative Path to Identify the File#
In VS Code, right-click the problem file in the Explorer panel (on the left) and choose Copy Relative Path (e.g., app/api/orders/route.ts).
Paste both pieces (the file name + the error) into ChatGPT or Claude so the AI can pinpoint and fix the problem more accurately.
Example prompt:
The file app/api/orders/route.ts throws this error:
[paste the error here]
Can you fix it?
5. Summary#
The Data-Driven development approach — starting from the database — helps you:
| Step | Tool |
|---|---|
| Design the database | AI (ChatGPT/Claude) |
| Create the database | CAMPP + phpMyAdmin |
| Generate the Full-Stack app | Next.js + AI |
Next steps:
- Add authentication with JWT
- Add pagination for large datasets
- Add search and filtering
- Add stricter validation
- Deploy to production
Tips for AI prompts:
- Specify your tech stack clearly.
- Provide a detailed project structure.
- State your security requirements.
- Ask for complete error handling.
- Ask for example request/response payloads.
Happy building!