
Claude Code + MCP: Build a Booking App and Deploy to a VPS
Build a restaurant table-booking app with Claude Code, then deploy it to a Hostinger VPS via Hostinger Connector (MCP), Docker Compose, MySQL and GitHub Actions
🛒 Interested in Hostinger for your website? 👉 https://hostinger.com/MELIVECODECONNECTOR ↗ 🎟️ Use code MELIVECODE to get a discount
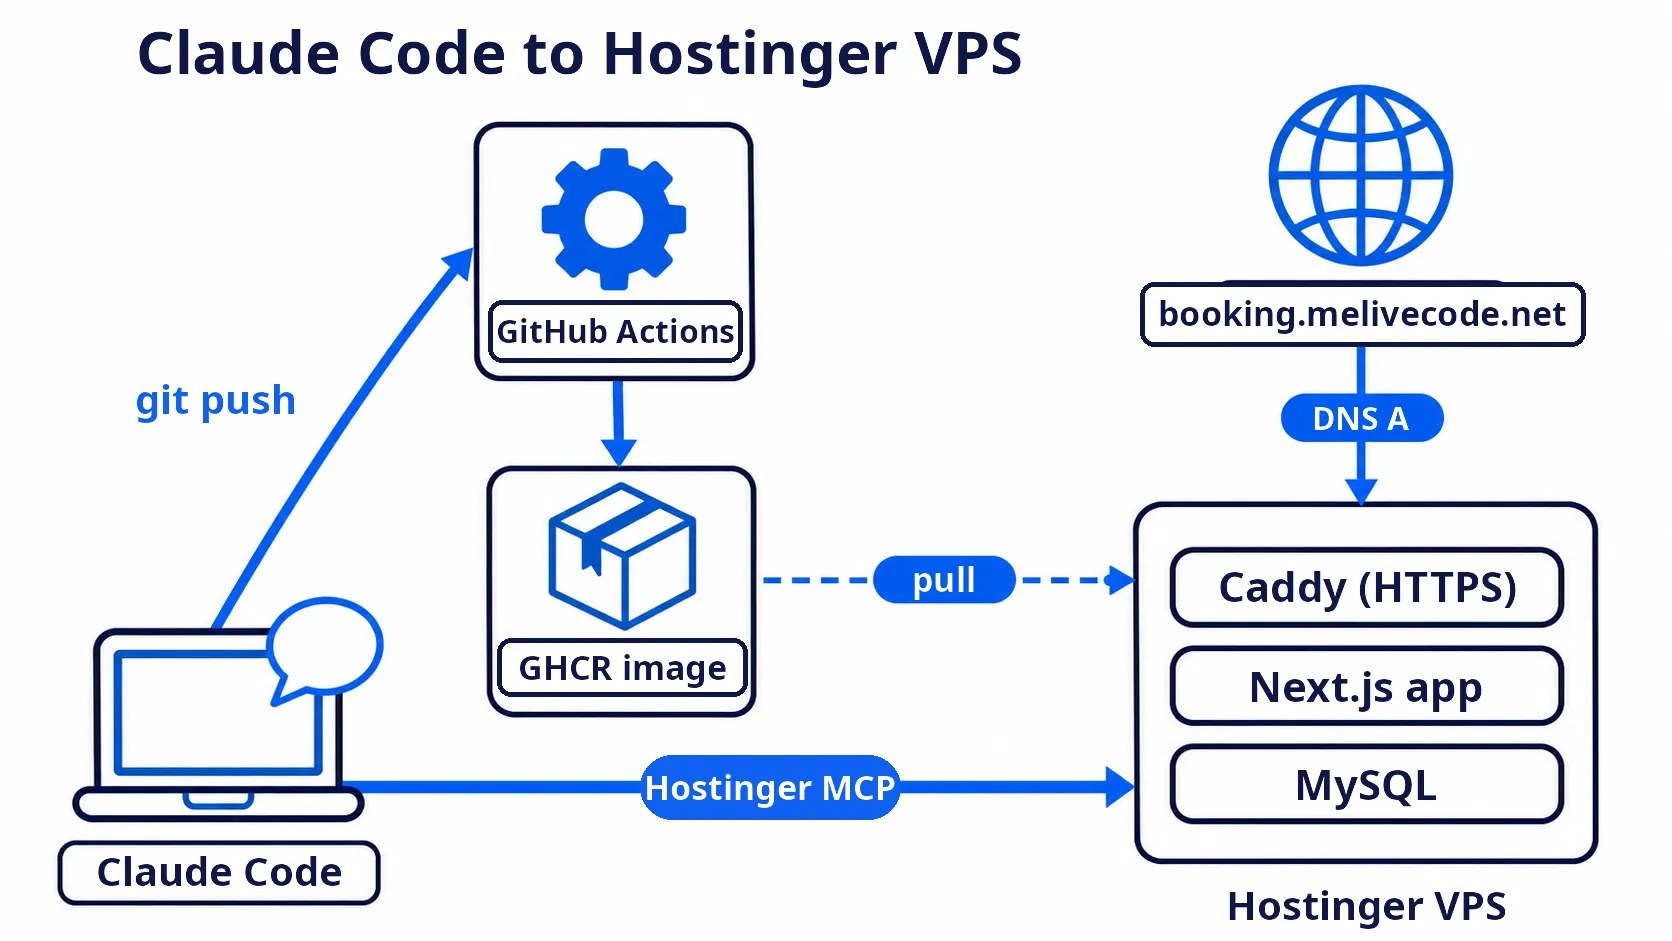
This article uses Claude Code to build a restaurant table-booking web app with Next.js and MySQL on your machine, then lets Claude Code deploy it to a Hostinger VPS by itself through Hostinger Connector: checking the VPS, switching the operating system to the Docker edition, checking available domains, all the way to running the app with Docker Compose and HTTPS at booking.melivecode.net, without SSHing into the server yourself.
| Step | Where | Result |
|---|---|---|
| Build the booking app | Claude Code + MySQL in CAMPP | App running at http://localhost:3000 ↗ |
| Prepare the Docker image | Claude Code + GitHub Actions | Image in GitHub Container Registry (GHCR) |
| Connect Hostinger | Hostinger Connector (MCP) | Claude Code can manage the VPS and DNS |
| Deploy | Claude Code through Hostinger Connector | Live site at https://booking.melivecode.net ↗ |
Before you start: you should be comfortable with the command line, Git and basic Next.js, and have a Claude account (Pro plan or higher, or the Anthropic API), a GitHub account and a Hostinger VPS. For a step-by-step, spec-first way of building the app, see Spec-Driven Development with Claude Code: Restaurant Booking (in Thai).
Deploying with AI: The Basics#
Before getting hands-on, here are the tools that let Claude Code manage a server.
MCP (Model Context Protocol) — a standard that lets AI call external tools, such as reading data or running actions through an API. Once a provider’s MCP server is connected, Claude Code can call those tools from plain-language prompts.
Hostinger Connector — Hostinger’s official MCP connector. It lets AI manage your Hostinger resources such as VPS, Docker, firewall, DNS and domains. It works with VS Code, Cursor, Claude Code and others, and you log in with OAuth, so no password passes through the editor. In Claude Code it shows up as an MCP server with two main tools: search (find the Hostinger API operation you need) and execute (run it).
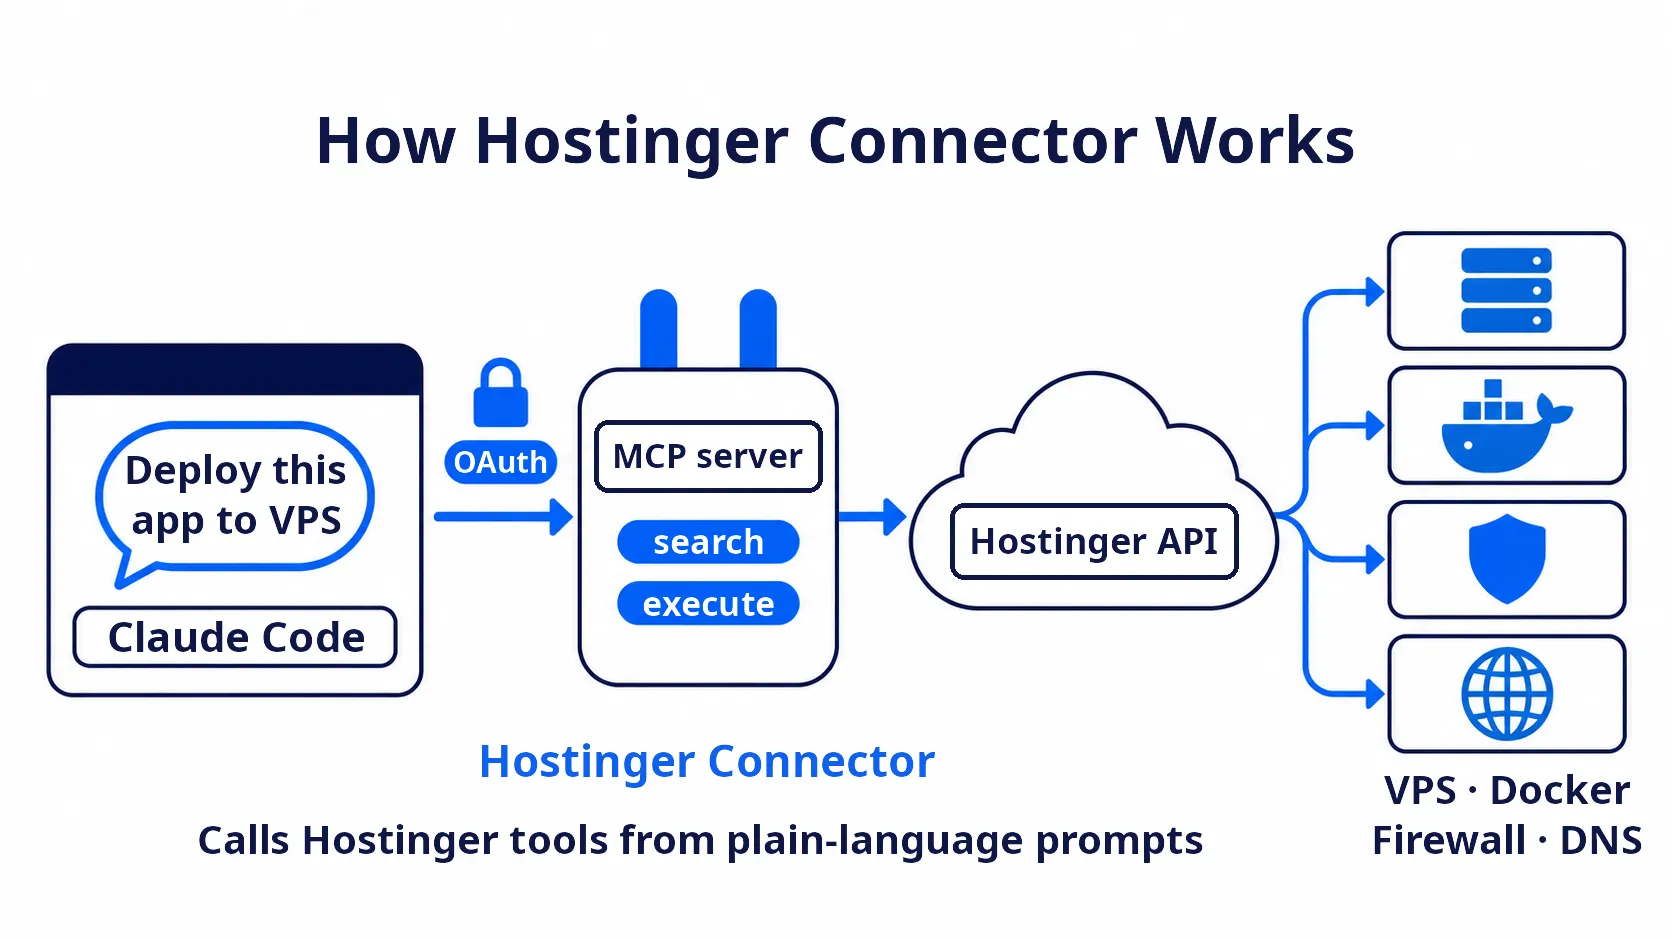
Docker Compose on the VPS — a Hostinger VPS installed with the Docker edition has Docker Manager, which takes a docker-compose.yml file and runs every container. The Connector can therefore deploy by sending the compose content together with environment values. Docker Manager pulls prebuilt images (it does not build from source on the VPS), so the image must be built beforehand with GitHub Actions.
GitHub Container Registry (GHCR) — GitHub’s Docker image registry. Image addresses look like ghcr.io/<username>/<image name>. Every time you push code, GitHub Actions builds a new image and stores it there.
Caddy — a web server that gets HTTPS certificates from Let’s Encrypt automatically; you only give it a domain and a target. It sits in front, receiving requests on ports 80 and 443 and forwarding them to the Next.js app.
1. Prepare the Tools#
1.1 Install CAMPP and Start MySQL#
For local development, use CAMPP to run a MySQL database and manage it on the web with phpMyAdmin. Download and install CAMPP from https://campp.melivecode.com/ ↗
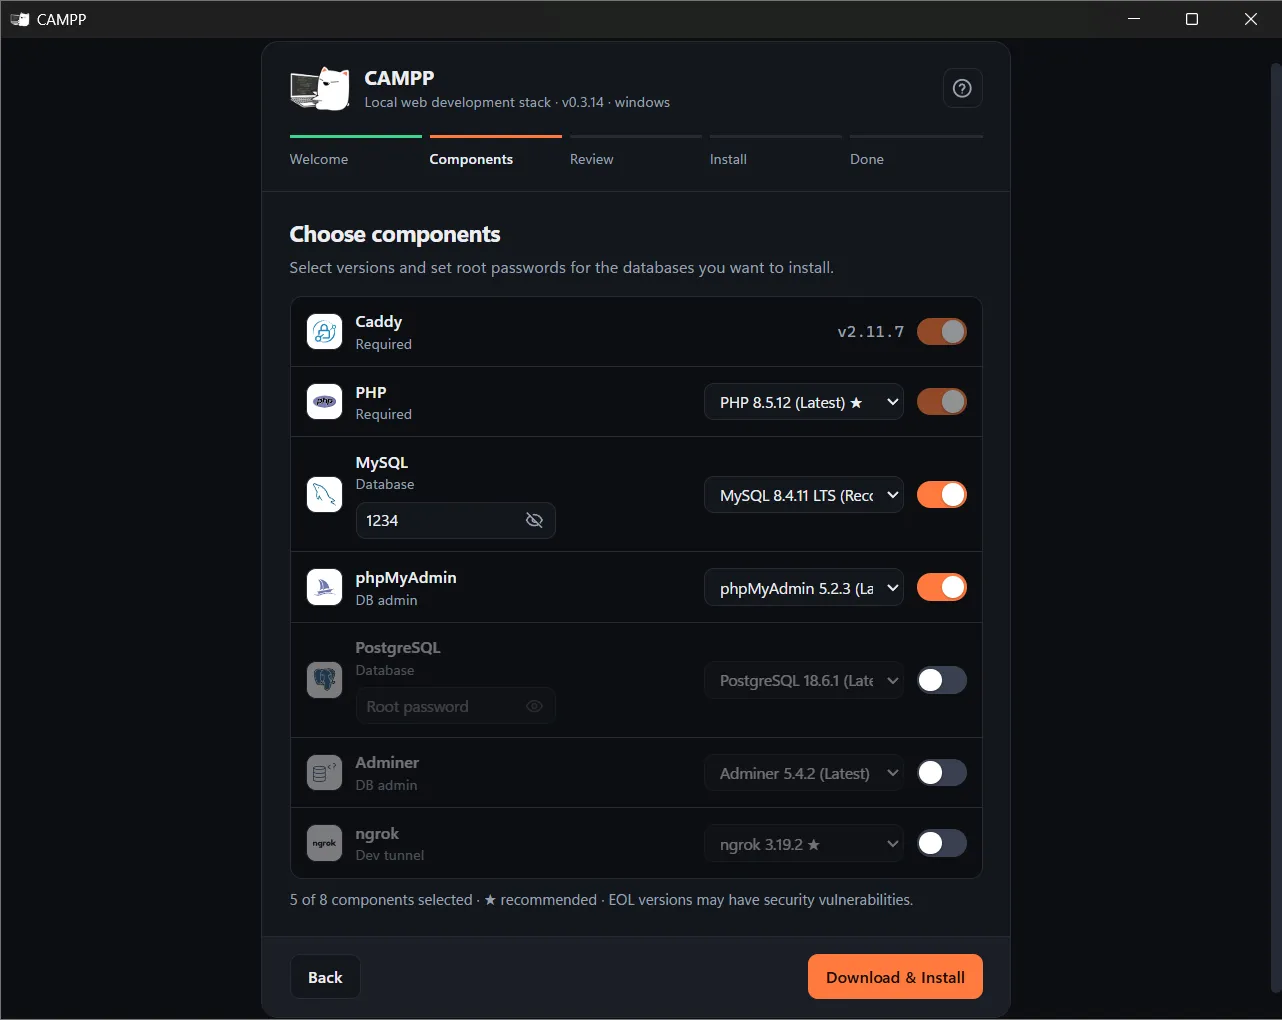
During installation, on the Choose components page, set a MySQL password for the root user in the box under MySQL. It must not be empty (the screenshot uses 1234). Keep this password for step 2.4.
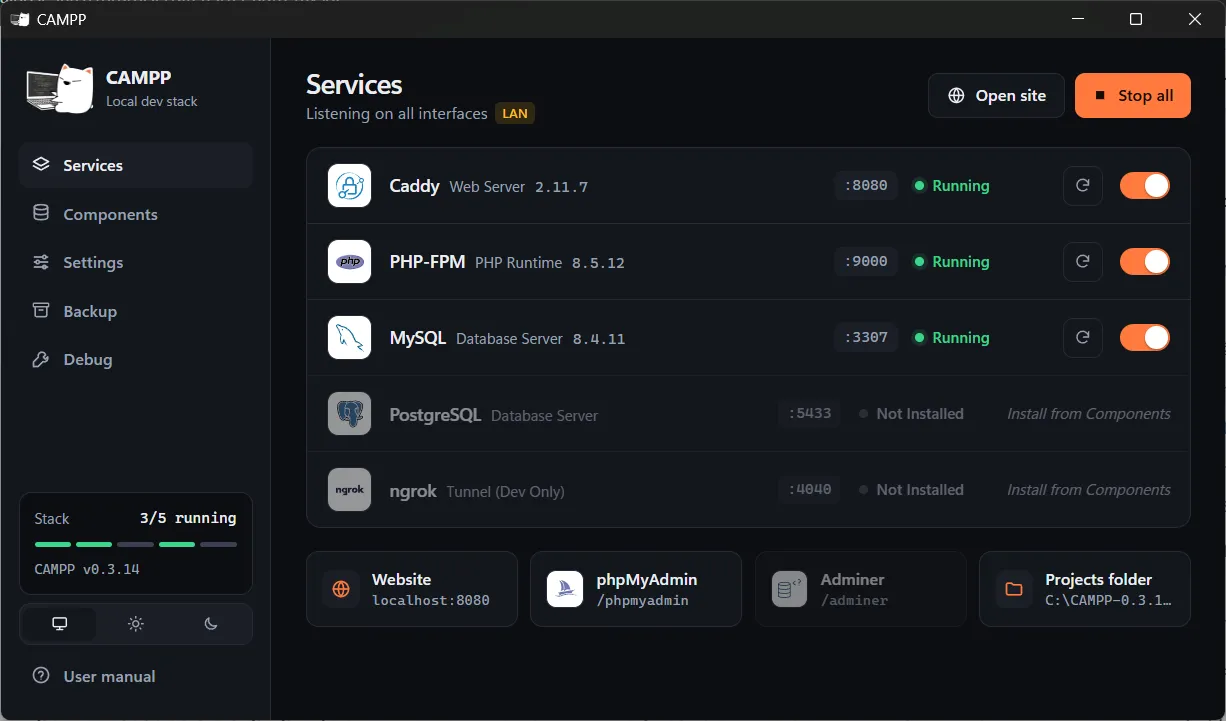
After installing, open CAMPP and press Start on the Services page. Check that MySQL shows Running on port 3307.
1.2 Create the booking_db Database with phpMyAdmin#
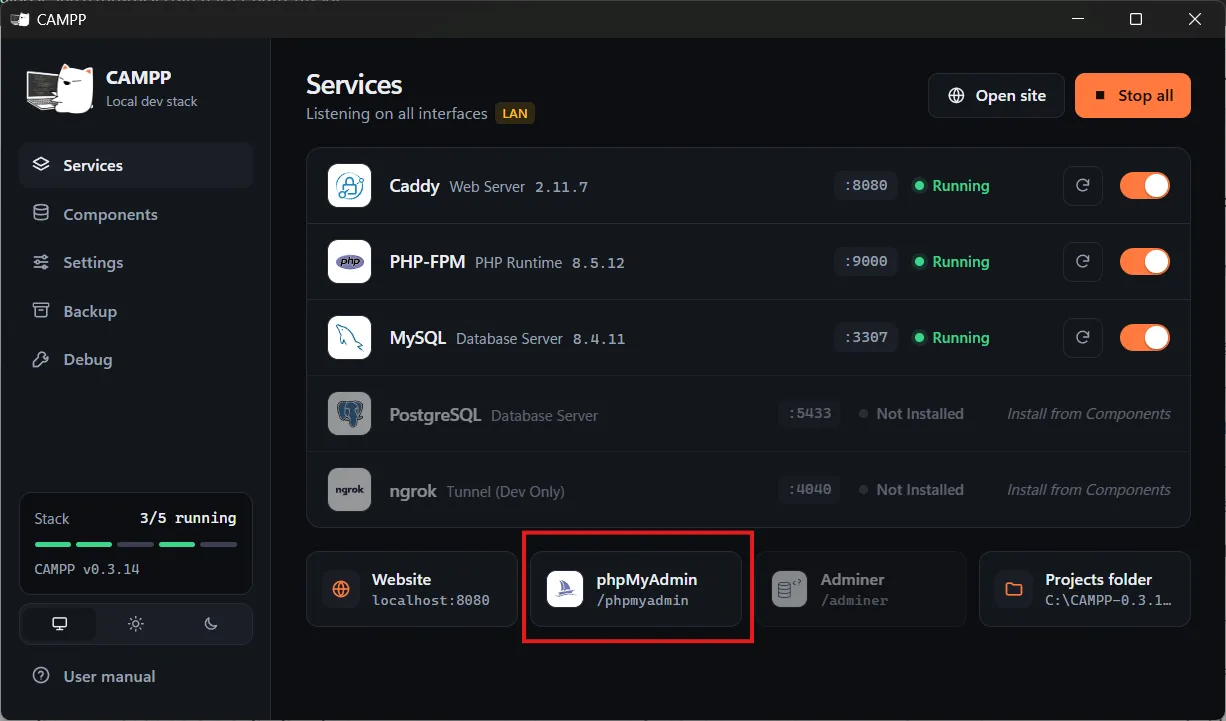
Click the phpMyAdmin button in the CAMPP app or open http://localhost:8080/phpmyadmin ↗, then log in with Username root and the password you set in step 1.1.
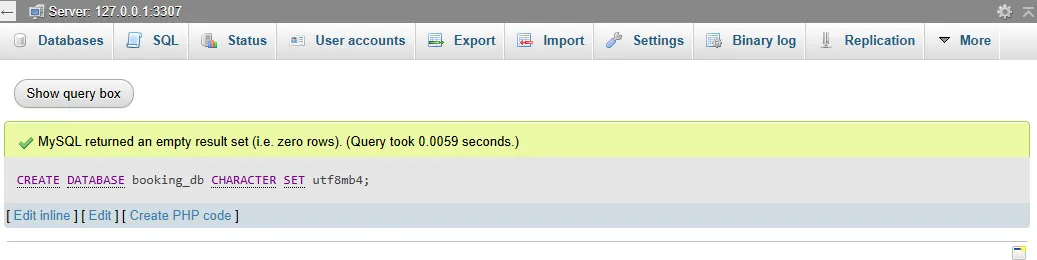
Click the SQL tab at the top, paste this statement and click Go:
CREATE DATABASE booking_db CHARACTER SET utf8mb4;utf8mb4 stores Thai customer names correctly. Create only the empty database for now; the app creates its tables itself when the server starts.
1.3 Node.js, Git, GitHub CLI and Claude Code#
This article does every step through Claude Code in the terminal; you never open a code editor. Install these tools first:
- Node.js (LTS) — the runtime for JavaScript. Install from nodejs.org ↗
- Git — version control for code. Install from git-scm.com ↗
- GitHub CLI (
gh) — lets Claude Code create repositories and push code to GitHub by itself. Install from cli.github.com ↗
Check that they are installed:
node --version
git --version
gh --versionLog in to GitHub CLI once (choose GitHub.com → HTTPS → Login with a web browser):
gh auth loginThen install Claude Code
macOS, Linux, WSL:
curl -fsSL https://claude.ai/install.sh | bashWindows PowerShell:
irm https://claude.ai/install.ps1 | iex1.4 Create a Docker Hostinger VPS#
🔥 Black Friday Sale (limited time): Hostinger is currently running its Black Friday sale with special discounts on VPS plans for a limited time, making it a great moment to get started with a VPS.
Sign up and pick a VPS plan through https://hostinger.com/MELIVECODECONNECTOR ↗ and enter the code MELIVECODE to get an extra discount.
At the operating system step, choose Ubuntu 26.04 with Docker (an OS with Docker preinstalled), because the Docker Manager that Hostinger Connector uses to deploy only supports VPSes running the Docker edition. If you already picked plain Ubuntu, you can switch through Claude Code in step 4.3.
2. Build the Booking App with Claude Code#
2.1 Open Claude Code in a New Folder#
Open a terminal (on Windows, Command Prompt or PowerShell), create an empty project folder and start Claude Code in it:
mkdir restaurant-booking
cd restaurant-booking
claudeFrom here on, everything happens through Claude Code: creating the project, writing code, testing, pushing to GitHub and deploying.
2.2 Create the Next.js Project#
Type in Claude Code:
Create a Next.js 16 project in this folder with the create-next-app defaults
(npx create-next-app@16 . --yes), then run npm run build and check that it passes
The create-next-app defaults are TypeScript, ESLint, Tailwind CSS, App Router and Cache Components. Claude Code asks for permission before running each command. When done it summarizes roughly like this:
Created a Next.js 16.4.6 project with the defaults, and npm run build passes with no errors
- The defaults include App Router, TypeScript, Tailwind, ESLint and Turbopack
- The build produced 2 pages (/ and /_not-found), both static
- create-next-app also initialized a git repo
Claude Code may also report warnings, such as npm reporting moderate vulnerabilities in dependencies, which do not affect following this article.
Note: a Next.js 16 project includes an
AGENTS.mdfile telling agents to read the Next.js docs innode_modules/next/dist/docs/before writing code, because this version changes many things. Claude Code readsCLAUDE.mdautomatically but does not readAGENTS.mdby itself, so the next prompt asks for it.
2.3 Build the App with Plan Mode#
Press Shift+Tab until the bottom corner of Claude Code shows plan mode, so Claude Code plans first and lets you review before editing any file. Then type this prompt:
Build a restaurant table-booking web app in this Next.js 16 App Router project (TypeScript).
Read AGENTS.md and the relevant docs in node_modules/next/dist/docs/ before writing code.

Requirements:
- The restaurant has four 2-seat tables, four 4-seat tables and two 6-seat tables
- Open Tuesday to Sunday (closed Monday), booked in 90-minute seatings: 11:00, 12:30, 14:00, 17:00, 18:30, 20:00
- Customers pick a date (up to 14 days ahead) and a party size of 1–6, and see only seatings that still have a table big enough
- They enter name, phone and email; the system picks the smallest table that fits and shows a booking code
- /admin uses the password from ADMIN_PASSWORD, shows the day's bookings grouped by seating, and can cancel or mark a booking as arrived

Technical:
- MySQL through the mysql2 library (connection pool), reading DB_HOST, DB_PORT, DB_USER, DB_PASSWORD, DB_NAME from the environment
- Tables restaurant_tables and reservations (utf8mb4) prevent double booking at the database level: the same table on the same date and seating can have only 1 non-cancelled booking, and the API returns 409 when that seating has no free table left
- Create the tables (CREATE TABLE IF NOT EXISTS) and insert the table data if missing when the server starts, via instrumentation.ts, so it runs right away both locally and on the VPS
- Validate input on both the page and the API; UI text is in Thai
- Check with npx tsc --noEmit, npm run lint and npm run build until all pass

Design (restaurant name "ครัวพี่หมี" (Krua Pee Mee), contemporary Thai food, warm tone):
- Define the color theme as tokens in @theme of app/globals.css (Tailwind CSS v4) and use only token names in components, never raw color values in classes
  canvas #fbf6ef (cream background), surface #ffffff (cards), surface-soft #fdf3ea, line #f2dfcc (borders)
  ink #2b1d14 (main text), ink-soft #5a4335, muted #7a6050 (labels)
  primary #c2521d (brick, main buttons), primary-hover #a8441a, primary-strong #8a3614, primary-soft #f9e1cb
  hero #2b1d14 with hero-ink #fdf3ea and hero-glow #d9622b (header band)
  success #1f7a4d / success-soft #dcf2e6, danger #b42318 / danger-soft #fdecea, disabled #efe9e3 / disabled-ink #a8998c
- Fonts Noto Sans Thai and Noto Serif Thai (restaurant name and headings) through next/font/google
- Home page: a dark header band with a hero-glow radial light, the restaurant name, a description and an opening-hours badge, then a white rounded form card overlapping the header, and an opening-hours info box beside it (stacked below on mobile)
- The form has 3 numbered steps: pick date and party size (− / + buttons), pick a seating (seating buttons show available/full), customer details
- A successful booking shows a large booking code in a dashed ticket-style frame, with the date in Thai, the seating and the table
- /admin: a login card centered on the hero background, then a summary of bookings, guests and arrived, plus a list grouped by seating with status badges colored by token
- White text on primary must pass WCAG AA contrast
Claude Code reads the Next.js docs and proposes a plan. An excerpt of the plan it gave:
What I found in the code and the Next 16 docs:
- next.config.ts already turns on cacheComponents.
  A server component that calls new Date() while the page is being pre-built
  makes the build fail. So "today" will be worked out in the browser.
- mysql2 isn't on Next's default list of packages kept out of the bundle,
  so I'll add serverExternalPackages: ['mysql2'].

Main points of the plan:
- Blocking double bookings in MySQL: a generated column
  active = IF(status='cancelled', NULL, 1) and a
  UNIQUE(table_id, booking_date, slot_time, active) key.
- Picking a table: try the smallest table that fits first. If MySQL rejects it
  as a duplicate, try the next table. When none are left, the API returns 409.
- Admin: an httpOnly cookie holding an HMAC of ADMIN_PASSWORD.
- Contrast: white text on primary is about 4.65:1 (WCAG AA).

Shall I go ahead and build it according to this plan?
Check that the plan has a UNIQUE key against double booking, creates the tables on server start, and includes every color token you asked for. If you want changes, type them. When the plan is right, approve it to start coding, for example:
Plan approved, go ahead and build it according to the planClaude Code writes the code and tests it itself until it passes. When done it summarizes roughly like this:
The Krua Pee Mee booking app is done according to the plan. npx tsc --noEmit, npm run lint and npm run build all pass
- On server start the system creates the tables and inserts the 10 tables by itself
- Fired 3 simultaneous bookings for 6 people (only two 6-seat tables): two got 201 and one got 409
- A duplicate INSERT straight into the database is rejected with Duplicate entry … uniq_active_slot
- Admin page: 401 without login, 401 with a wrong password; "arrived" and "cancel" both work
Color theme — defining colors as tokens named by role (such as primary, surface, ink) in @theme makes Tailwind generate classes like bg-primary, text-ink, border-line automatically. To change the restaurant’s color tone, edit just one file, app/globals.css:
@theme {
  /* backgrounds and cards */
  --color-canvas: #fbf6ef;
  --color-surface: #ffffff;
  --color-line: #f2dfcc;

  /* text */
  --color-ink: #2b1d14;
  --color-muted: #7a6050;

  /* main brand color (white text on it ≈ 4.65:1) */
  --color-primary: #c2521d;
  --color-primary-hover: #a8441a;

  /* ...other tokens from the prompt... */
}Example of the files it produced (full code at https://github.com/KarnYong/restaurant-booking ↗):
| File | Purpose |
|---|---|
lib/db.ts | MySQL connection pool (mysql2), creates the tables, the 10 tables’ data, and picks a table |
lib/booking.ts | Booking rules and validation (seatings, closed day, 14 days ahead), shared by the page and the API |
lib/admin-auth.ts | Checks the ADMIN_PASSWORD password and the admin cookie |
instrumentation.ts | Creates the tables once when the server starts |
app/api/availability/route.ts | GET seatings that still have a free table for the date and party size |
app/api/reservations/route.ts | POST books the smallest table that fits, returns 409 when full |
app/api/admin/session/route.ts | Admin login/logout (sets an httpOnly cookie) |
app/api/admin/reservations/** | Lists the day’s bookings and changes status to arrived or cancelled |
app/globals.css | The restaurant’s color theme (color tokens in @theme) |
app/layout.tsx | Noto Sans Thai and Noto Serif Thai fonts |
app/page.tsx, app/booking-form.tsx | Booking page and the 3-step form |
app/admin/page.tsx, app/admin/admin-panel.tsx | Admin page |
File names may differ a little from run to run, because Claude Code designs the structure itself according to the plan.
Preventing double booking in MySQL — MySQL cannot create a conditional unique index (such as “only for bookings that are not cancelled”). Claude Code therefore uses a generated column named active that is 1 while a booking is active and NULL once it is cancelled, and includes it in the UNIQUE key. Because MySQL allows repeated NULL values, a cancelled booking frees the table for others immediately:
active TINYINT GENERATED ALWAYS AS (IF(status = 'cancelled', NULL, 1)) STORED,
UNIQUE KEY uniq_active_slot (table_id, booking_date, slot_time, active)Cache Components: Next.js 16 tries to prerender pages ahead of time, but “today” must be read when the user opens the page. Once Claude Code has read
AGENTS.mdand the docs, it knows this from the planning step. If you still hit the errorNext.js encountered the unstable value new Date()duringnpm run build, give the error to Claude Code to fix.
2.4 Set Up .env.local and Test Locally#
Ask Claude Code to create .env.local (replace <CAMPP password> with the MySQL password set in step 1.1) and start the development server:
Create a .env.local file for connecting to CAMPP's MySQL on this machine:
DB_HOST=127.0.0.1, DB_PORT=3307, DB_USER=root, DB_PASSWORD=<CAMPP password>,
DB_NAME=booking_db, ADMIN_PASSWORD=change-me
Then run npm run dev in the background and check that http://localhost:3000/api/availability responds
Example output:
/api/availability responds. npm run dev is running in the background at http://localhost:3000
and connects to CAMPP's MySQL (port 3307, database booking_db)
- .env.local: created with the values given. It is in .gitignore, so it is not committed to git
- Database: on server start the log shows [db] schema ready. booking_db now has the tables
  restaurant_tables and reservations, with all 10 tables
- GET /api/availability?date=2026-11-17&party=2 returns 200 with all 6 seatings available (11:00–20:00)
.env.local is only used locally and is not committed, because create-next-app’s .gitignore already excludes .env* files. When Claude Code reports the server is ready, open http://localhost:3000 ↗ in the browser and test:
| Test | Expected result |
|---|---|
| Pick a Monday | No seatings, because the restaurant is closed |
| Pick a date and 4 people | Only seatings that still have a free 4- or 6-seat table |
| Fill in the form and book | A booking code, and the booking appears in the reservations table in phpMyAdmin |
| Open http://localhost:3000/admin ↗ | After entering the password, bookings grouped by seating |
If something goes wrong, describe the symptom to Claude Code to fix (Claude Code can read the dev server log itself), then test again until everything passes.
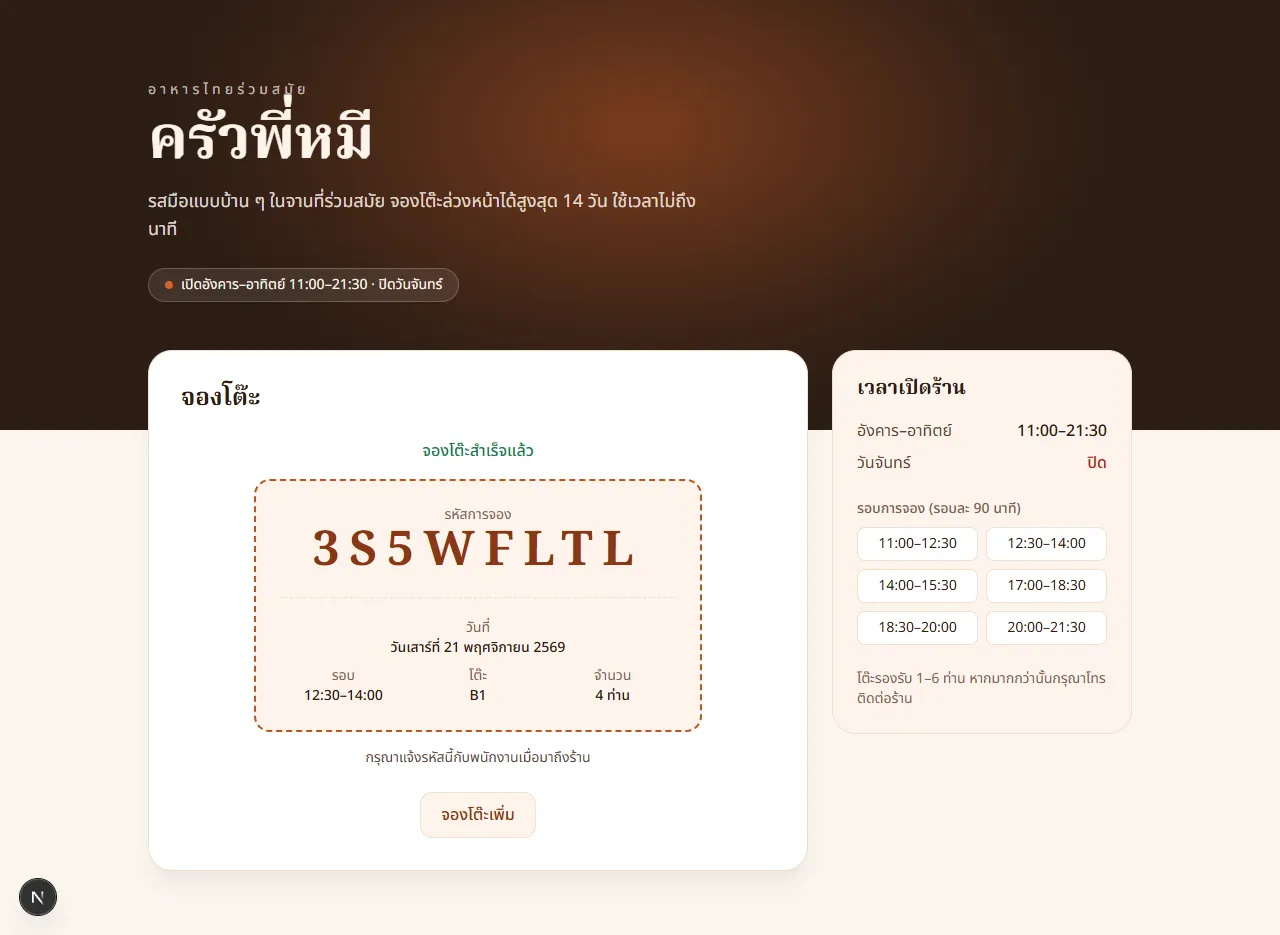
Customer page — pick a date, party size and seating, then fill in the customer details (the N button in the bottom-left corner is the Next.js dev indicator, shown only while running npm run dev). The app UI is in Thai, as the prompt asked.
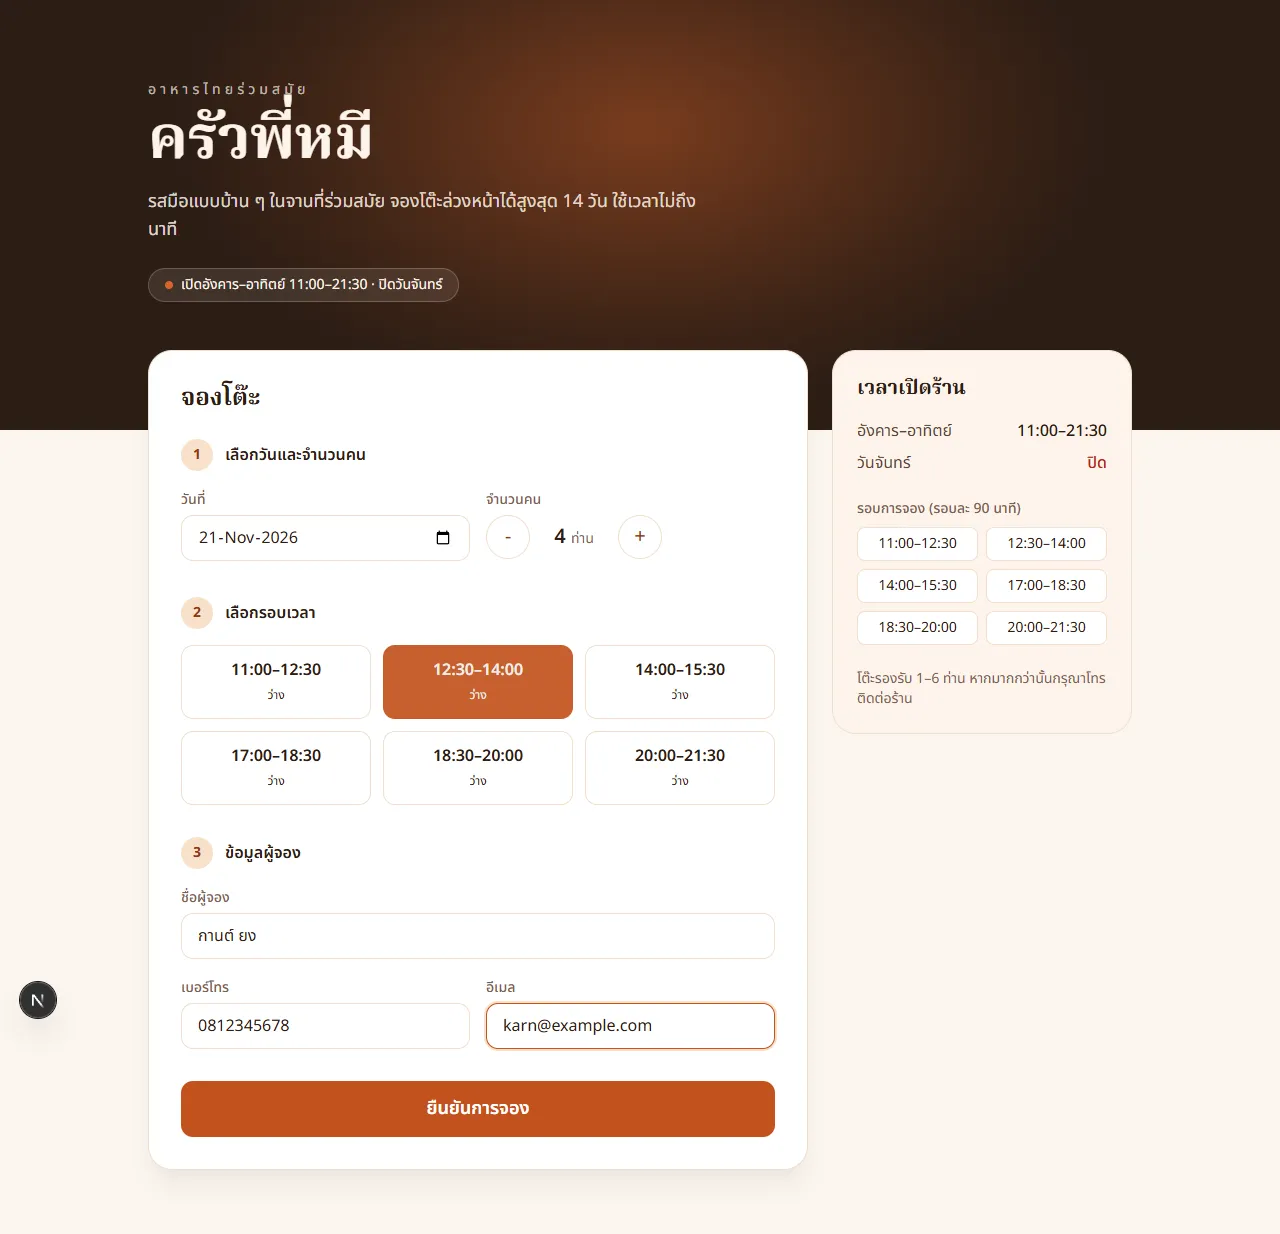
After pressing ยืนยันการจอง (confirm booking) you get a booking code and the table the system chose. In this example 4 people got table B1 (4 seats), the smallest table that fits.
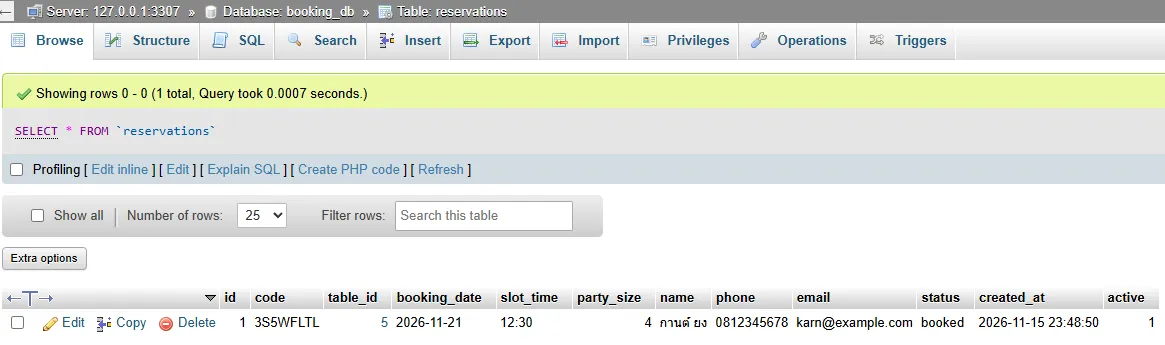
The booking is saved in the reservations table of the booking_db database on CAMPP. View it in phpMyAdmin by clicking booking_db → reservations in the left panel.
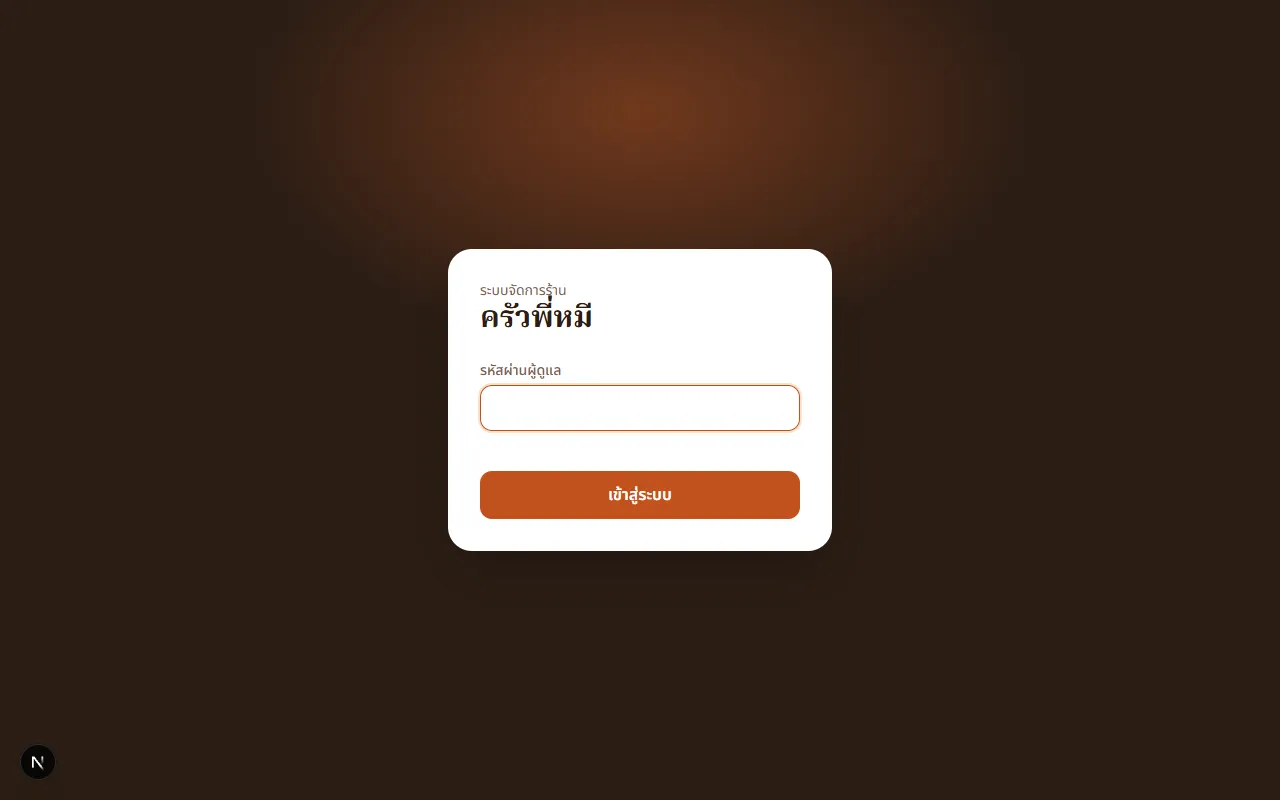
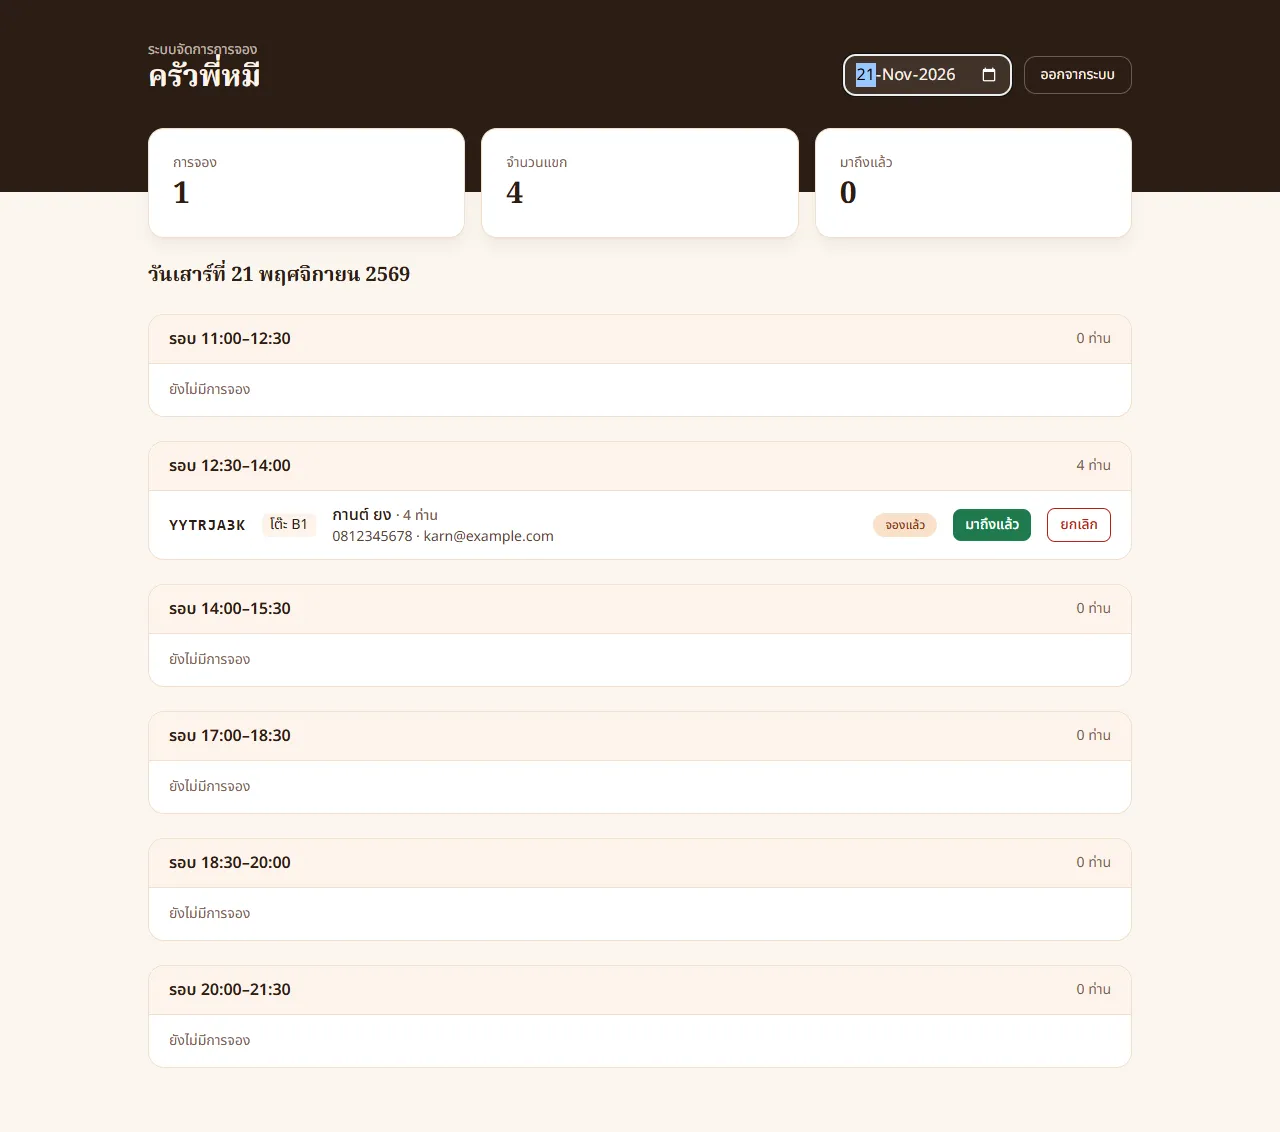
Admin page — open http://localhost:3000/admin ↗ and enter the password from ADMIN_PASSWORD in .env.local (change-me).
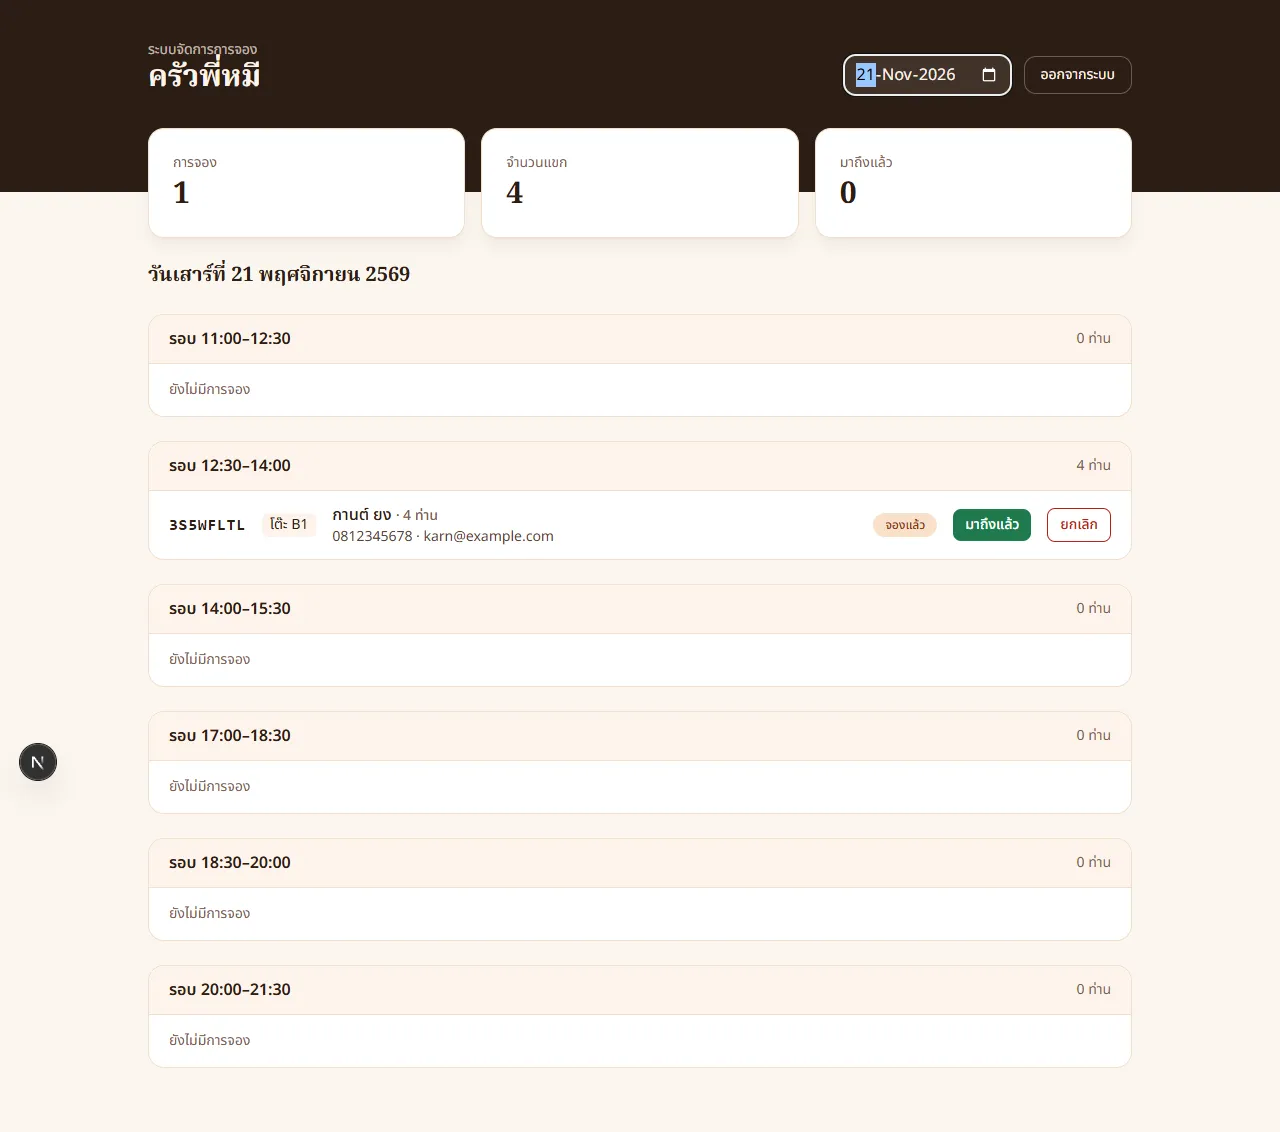
After logging in you see the number of bookings, guests and the list grouped by seating, with มาถึงแล้ว (arrived) and ยกเลิก (cancel) buttons.
3. Prepare the App for Docker#
Docker Manager on the VPS pulls prebuilt images, so in this step Claude Code prepares the Dockerfile, docker-compose.yml and a GitHub Actions workflow to build the image.
3.1 Create the Dockerfile and docker-compose.yml#
You don’t write the Docker files yourself; tell Claude Code what each service must do. Type in Claude Code:
Prepare this project for deploying with Docker on a VPS:
1. Set output: "standalone" in next.config and create a multi-stage Dockerfile for Node.js 24 that runs the app on port 3000, plus a .dockerignore that excludes node_modules, .next and .env*
2. Create a docker-compose.yml with 4 services:
   - db: MySQL 8.4 that creates the booking_db database and the booking user automatically, stores data in a volume and has a healthcheck
   - app: uses the image ghcr.io/<lowercase GitHub username from gh>/restaurant-booking:latest, starts after db is ready, and passes DB_* and ADMIN_PASSWORD to the app
   - caddy: reverse proxy to app with automatic HTTPS for the domain in the DOMAIN variable, opening ports 80 and 443
   - save-passwords: runs once and exits, saving DB_PASSWORD and ADMIN_PASSWORD to a file in /opt/restaurant-booking on the VPS that only root can read, to look up later over SSH
3. Passwords and the domain come from the DB_PASSWORD, ADMIN_PASSWORD and DOMAIN variables sent at deploy time; never put real passwords in any project file
4. Check the files with docker compose config if docker is available locally, and make npm run build pass
Claude Code reads your GitHub username from gh itself and creates all the files. Example output:
The Docker deployment files are ready. npm run build (including tsc and lint) passes
- next.config.ts: added output: "standalone"
- Dockerfile: 3 stages on node:24-alpine: install dependencies → build → the final stage
  runs node server.js on port 3000 as the node user (not root)
- docker-compose.yml has 4 services: db, app, caddy and save-passwords
- Passwords and domain: taken only from variables at deploy time. If DB_PASSWORD, ADMIN_PASSWORD
  or DOMAIN is missing, compose stops with an error

One extra fix I wasn't asked for: behind Caddy the app sees requests as plain HTTP, so the admin
cookie was not set as Secure. I changed app/api/admin/session/route.ts to check the X-Forwarded-Proto header
A machine without Docker skips the docker compose config check, which is fine because Docker Manager on the VPS checks the file again at deploy time. Example of the resulting docker-compose.yml (the file may differ a little each time):
services:
  db:
    image: mysql:8.4
    restart: unless-stopped
    environment:
      MYSQL_DATABASE: booking_db
      MYSQL_USER: booking
      MYSQL_PASSWORD: ${DB_PASSWORD:?DB_PASSWORD is required}
      MYSQL_RANDOM_ROOT_PASSWORD: "yes"
    volumes:
      - db_data:/var/lib/mysql
    healthcheck:
      test: ["CMD-SHELL", "MYSQL_PWD=\"$$MYSQL_PASSWORD\" mysqladmin ping -h 127.0.0.1 -u booking --silent"]
      interval: 5s
      retries: 20

  app:
    image: ghcr.io/karnyong/restaurant-booking:latest
    restart: unless-stopped
    depends_on:
      db:
        condition: service_healthy
    environment:
      DB_HOST: db
      DB_PORT: "3306"
      DB_USER: booking
      DB_PASSWORD: ${DB_PASSWORD:?DB_PASSWORD is required}
      DB_NAME: booking_db
      ADMIN_PASSWORD: ${ADMIN_PASSWORD:?ADMIN_PASSWORD is required}

  caddy:
    image: caddy:2
    restart: unless-stopped
    command: ["caddy", "reverse-proxy", "--from", "${DOMAIN:?DOMAIN is required}", "--to", "app:3000"]
    ports:
      - "80:80"
      - "443:443"
    volumes:
      - caddy_data:/data

  save-passwords:
    image: alpine:3
    restart: "no"
    environment:
      DB_PASSWORD: ${DB_PASSWORD:?DB_PASSWORD is required}
      ADMIN_PASSWORD: ${ADMIN_PASSWORD:?ADMIN_PASSWORD is required}
    volumes:
      - /opt/restaurant-booking:/out
    command:
      - sh
      - -c
      - |
        umask 077
        printf 'DB_PASSWORD=%s\nADMIN_PASSWORD=%s\n' "$$DB_PASSWORD" "$$ADMIN_PASSWORD" > /out/passwords.txt

volumes:
  db_data:
caddy_data:| Part | Description |
|---|---|
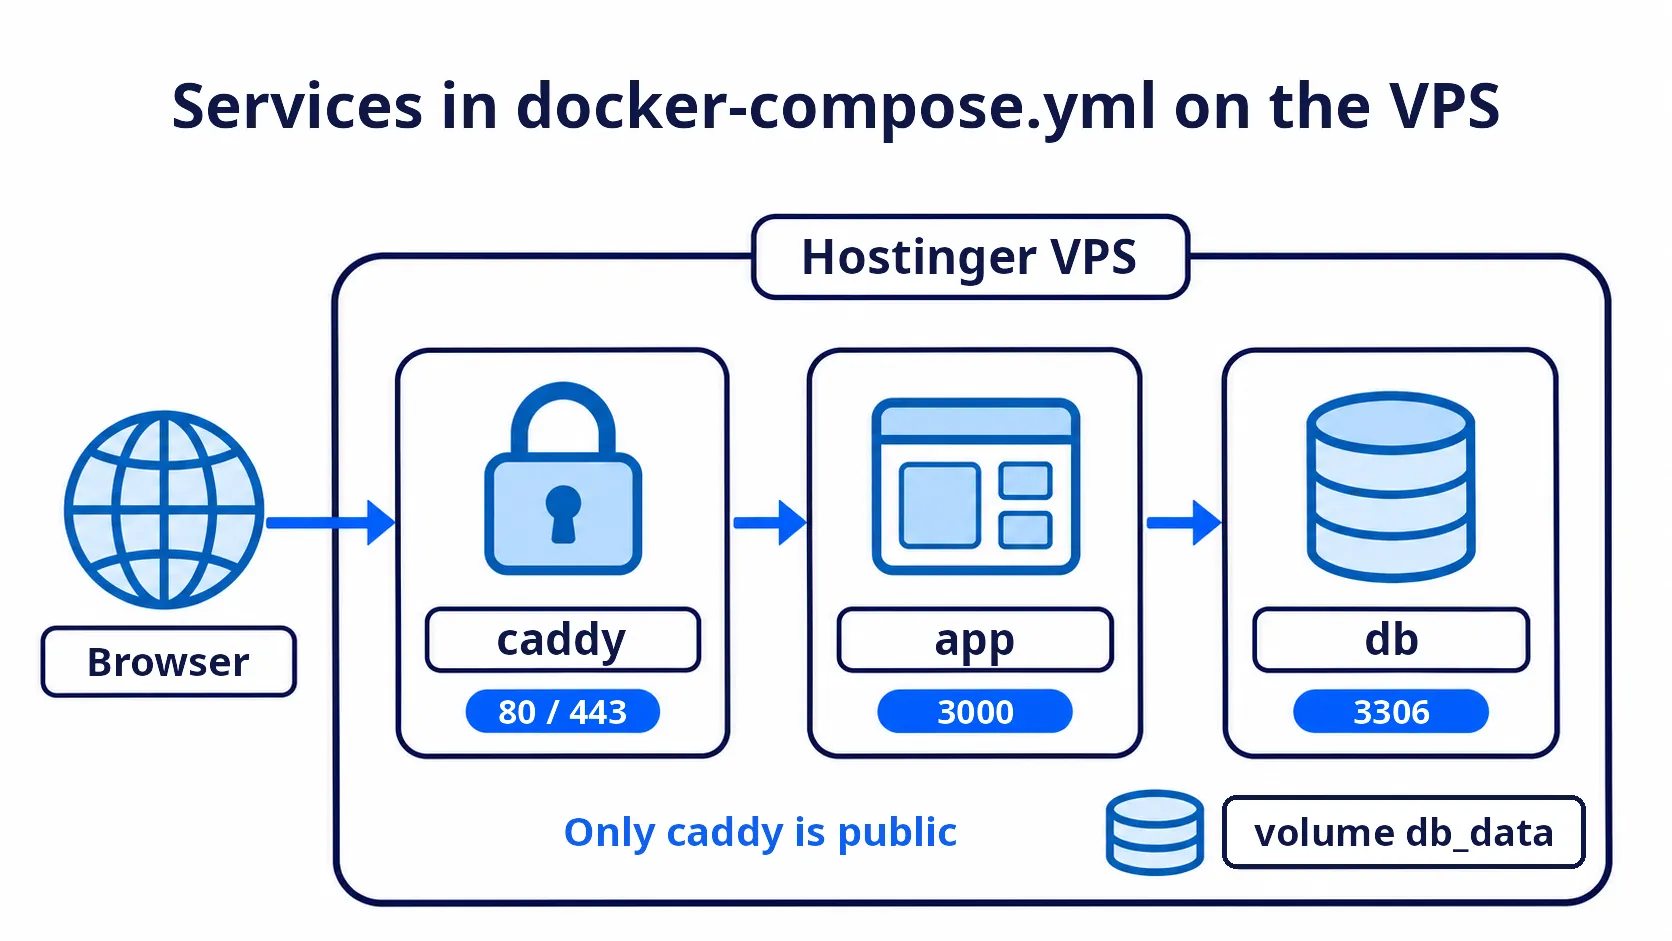
db | MySQL 8.4 on the VPS creates the booking_db database and the booking user automatically. Data lives in the db_data volume, so it survives when the container is recreated, and the healthcheck makes the app start only after MySQL is ready |
app | Pulls the app image from GHCR and connects to the database through the service name db on port 3306 inside Docker |
caddy | Receives requests on ports 80/443, gets an HTTPS certificate for ${DOMAIN} automatically, and forwards to app:3000 |
save-passwords | Runs once at deploy time and writes DB_PASSWORD and ADMIN_PASSWORD to /opt/restaurant-booking/passwords.txt on the VPS (umask 077 makes it readable only by root). $$ writes a literal $ in compose so the shell inside the container substitutes the value |
${DB_PASSWORD:?...} | No real value is written into the file; the real values are sent to the VPS at deploy time in step 5.3, and :? stops the deploy immediately if a value is missing |
Note that the app does not expose a port to the outside itself. Only Caddy opens ports 80 and 443, and the database is reachable only inside Docker.
3.2 Build the Image to GHCR with GitHub Actions#
Type in Claude Code:
Create a GitHub Actions workflow at .github/workflows/docker.yml named Build and push image
that builds the Docker image and pushes it to GHCR with the same image name as in docker-compose.yml (tag latest)
on every push to the main branch
Example output:
Created .github/workflows/docker.yml named "Build and push image"
On every push to the main branch the workflow builds the image from the Dockerfile and pushes it to
ghcr.io/karnyong/restaurant-booking:latest, which matches the name in docker-compose.yml. It logs in to GHCR
with GITHUB_TOKEN, which has packages: write, so no extra secret is needed

Two extras I added that weren't asked for:
- a label linking the image to the repo
- GitHub Actions cache so later builds are faster
The key parts of the resulting file:
name: Build and push image

on:
  push:
    branches: [main]

permissions:
  contents: read
  packages: write

jobs:
  build:
    runs-on: ubuntu-latest
    steps:
      - uses: actions/checkout@v4
      - uses: docker/setup-buildx-action@v3
      - uses: docker/login-action@v3
        with:
          registry: ghcr.io
          username: ${{ github.actor }}
          password: ${{ secrets.GITHUB_TOKEN }}
      - uses: docker/build-push-action@v6
        with:
          context: .
          push: true
tags: ghcr.io/karnyong/restaurant-booking:latest3.3 Push the Code to GitHub#
Type in Claude Code:
Create a public GitHub repository named restaurant-booking with gh,
then commit all files and push to the main branch.
Then wait until the Build and push image workflow in GitHub Actions finishes and report the result
Claude Code uses gh repo create to create the repository, renames the branch from master to main, pushes the code, and waits until the workflow finishes (about 2–3 minutes). Example output:
The "Build and push image" workflow passed
- Created the public repo https://github.com/KarnYong/restaurant-booking
- Committed all files, renamed the branch from master to main and pushed
- .env.local was not committed because it is in .gitignore
- Image: pushed ghcr.io/karnyong/restaurant-booking:latest successfully
- The image can be pulled without logging in: an anonymous pull test returned 200
If the image push fails with
permission_denied: write_package: your account has arestaurant-bookingpackage on GHCR from an old repository you deleted. Delete the old package under Packages →restaurant-booking→ Package settings → Delete this package, then ask Claude Code to rerun the workflow.
The VPS must be able to pull the image without logging in, so the image must be Public. When the repository is Public and the image is pushed from that repository’s GitHub Actions, the image follows the repository and is Public. Check it on your GitHub profile → Packages tab → restaurant-booking. If it is still Private, go to Package settings → Change visibility → Public.
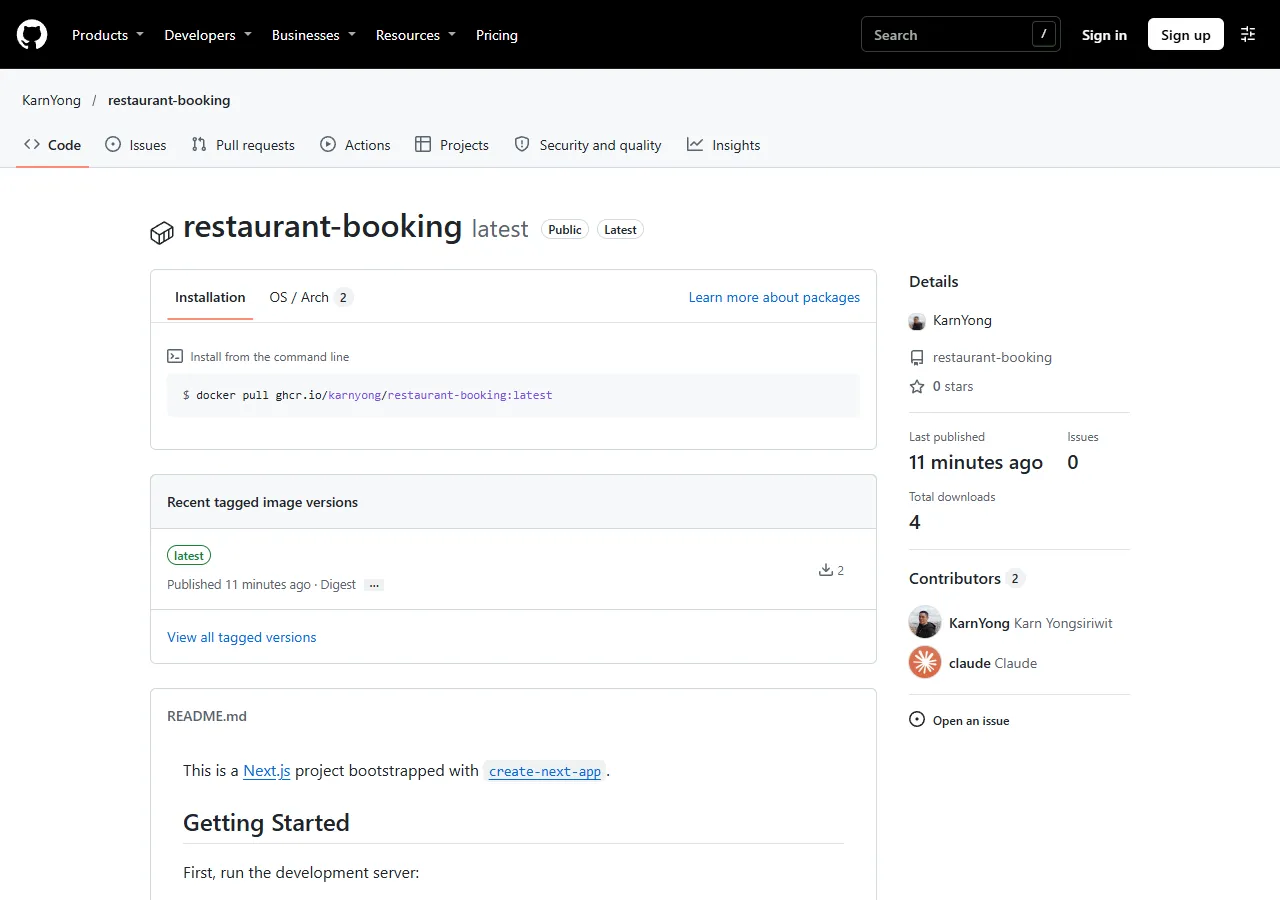
Note: a Public image contains only the built code and no secrets, because
.dockerignoreexcludes.env*files and the real passwords are sent to the VPS only at deploy time.
4. Connect Claude Code to Hostinger Connector#
4.1 Add the Hostinger MCP Server to Claude Code#
Exit Claude Code first (type /exit), then run this command in the terminal to add the remote Hostinger MCP server:
claude mcp add --transport http hostinger https://mcp.hostinger.comStart Claude Code again, type /mcp and choose hostinger to log in through the browser with your Hostinger account (OAuth). When it succeeds, the status becomes connected.
You can also check the status from the terminal:
claude mcp listThe output should have a hostinger line showing ✔ Connected:
hostinger: https://mcp.hostinger.com (HTTP) - ✔ Connected4.2 Test the Connection#
List all VPSes in my Hostinger account with IP, operating system and status,
and check whether the domain melivecode.net is in this account
Claude Code searches for and calls Hostinger tools such as vps_virtual-machines_list and domains_portfolio_list, asking for confirmation before each call. Example output:
This Hostinger account has 2 VPSes, both running,
and the domain melivecode.net is in this account with status active

| ID      | IPv4           | Operating system         | Plan                     | Status  |
| 1381325 | 76.13.190.218  | Ubuntu 26.04 with Docker | KVM 2 (2 CPU, 8 GB RAM)  | running |
| 1569506 | 187.127.215.16 | Ubuntu 26.04 LTS         | KVM 2 (2 CPU, 8 GB RAM)  | running |

For deploying the booking app, 1381325 (76.13.190.218) is the better fit because Docker is already installed
Check that you can see the VPS created in step 1.4. This article uses VPS ID 1381325 with IP 76.13.190.218, and its operating system is already Ubuntu 26.04 with Docker, so step 4.3 can be skipped.
4.3 Switch the Operating System to Docker (If Needed)#
If the VPS runs plain Ubuntu, deploying with Docker Manager fails with this error:
[VPS:2044] Currently installed operating system does not support Docker Manager.Ask Claude Code to reinstall the system with the Docker edition:
Reinstall the operating system of VPS 1381325 as Ubuntu 26.04 with Docker
Don't set a root password (let the system generate one)
Claude Code calls vps_templates_list to find the template named Ubuntu 26.04 with Docker, then calls vps_virtual-machines_recreate. The VPS status becomes recreating for about 5–10 minutes and then returns to running. The VPS keeps its IP.
Warning:
vps_virtual-machines_recreatedeletes all data on the VPS and cannot be undone. Use it only on a new VPS or one without important data. When no password is sent, the system generates a new root password that nobody sees, so the old root password no longer works. Set a new one on the VPS page in hPanel before SSHing in step 5.5 (optional).
5. Deploy to the VPS with Claude Code#
Point the domain at the VPS first, then deploy through Claude Code, because Caddy needs the domain to point at the VPS before it can request an HTTPS certificate.
5.1 Check Available Domains with Claude Code#
Hostinger Connector also manages domains, for example checking whether a domain is available and listing the domains in your account. Type in Claude Code:
Check whether the domain kruapeemee is available in .com, .net and .online,
and list the domains in my Hostinger account
Claude Code calls domains_availability_check and domains_portfolio_list. Example output:
kruapeemee is available in all 3 extensions, and none of them is a premium domain
I only checked; I haven't registered any domain

| Domain            | Status    |
| kruapeemee.com    | available |
| kruapeemee.net    | available |
| kruapeemee.online | available |

Domains in the account: melivecode.net (active, expires 12 Nov 2027)
Free domain credits not yet linked to a domain name (pending_setup): 9
VPS plans of 12 months or longer include a free domain for 1 year, which appears in domains_portfolio_list as a free_domain entry with status pending_setup. You can ask Claude Code to claim this free domain directly (the domains_portfolio_claim-free tool costs nothing, but the account needs domain owner (WHOIS) details first). This article uses the booking subdomain of the existing melivecode.net.
5.2 Point booking.melivecode.net at the VPS with Claude Code#
Add an A record for the booking subdomain pointing at the VPS IP through Hostinger Connector. Type in Claude Code:
Add an A record named booking for the domain melivecode.net pointing at the IP of VPS 1381325 (TTL 14400)
Check it with dns_records_validate first, then save it. Don't change any other record
Then check that booking.melivecode.net points at the VPS
Claude Code reads the VPS IP itself, then calls dns_records_validate (check the record before saving) and dns_records_update (save), asking for confirmation before saving. Example output:
Added the A record booking for melivecode.net. booking.melivecode.net now points at VPS 1381325 (76.13.190.218)

Steps:
1. dns_records_validate passed ("Request accepted") with overwrite: false,
   so the new record is added without deleting or replacing existing records
2. dns_records_update saved booking  A  76.13.190.218  TTL 14400
3. Read the zone again; the other records are unchanged:

| Name    | Type  | Value           | TTL   |
| @       | A     | 2.57.91.91      | 50    |
| www     | CNAME | melivecode.net. | 300   |
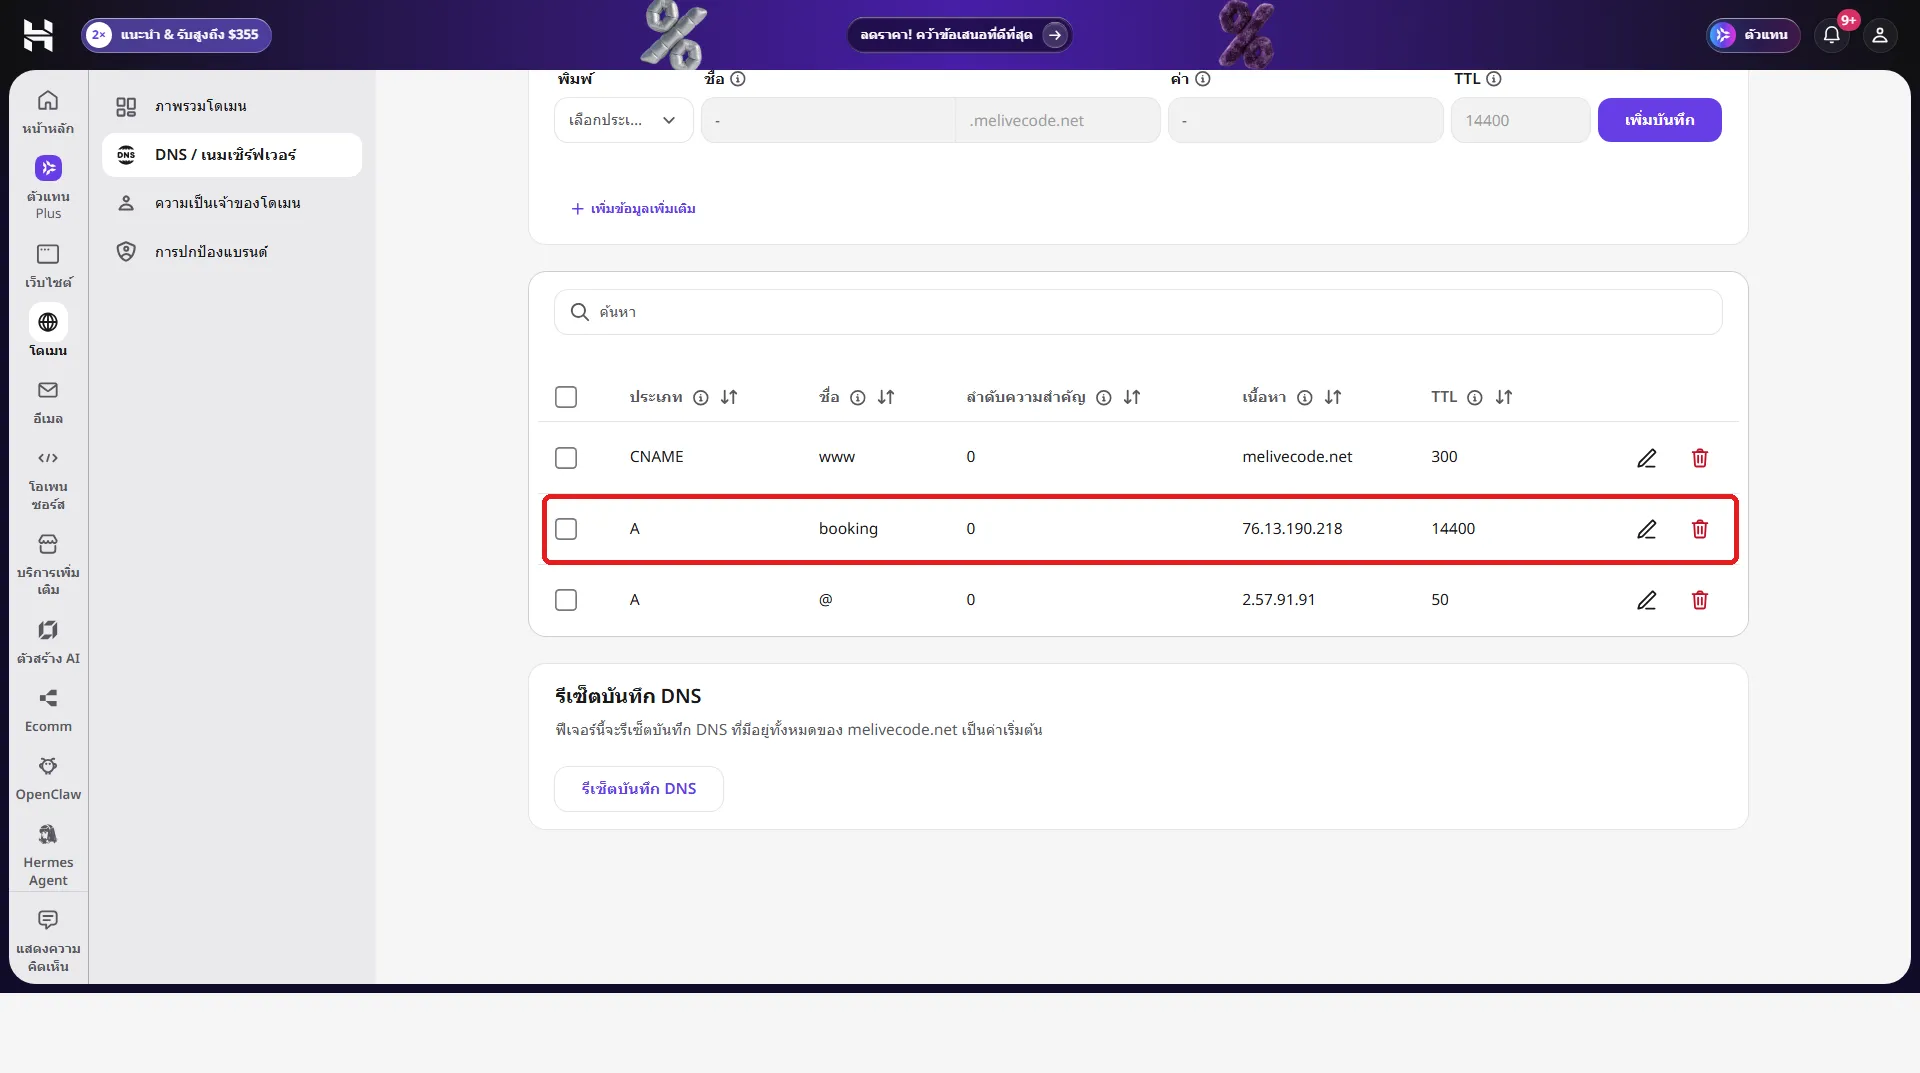
| booking | A     | 76.13.190.218   | 14400 |

Checking that it points at the VPS:
- The domain's name servers (byte.dns-parking.com, pixel.dns-parking.com) answer 76.13.190.218
- Public DNS 1.1.1.1 and 8.8.8.8 already answer 76.13.190.218
Check
overwritebefore confirming every time: the default ofdns_records_updateisoverwrite = true, which deletes records with the same name and type and creates new ones, suitable for changing the IP of an existing record.overwrite = falseappends records, suitable for adding a new record as in this example, but if that name already has an A record you end up with two A values. Neither mode touches records with other names.
Check again from your own machine with:
nslookup booking.melivecode.netThe output should include Address: 76.13.190.218. If your network still caches the old value, wait a little.
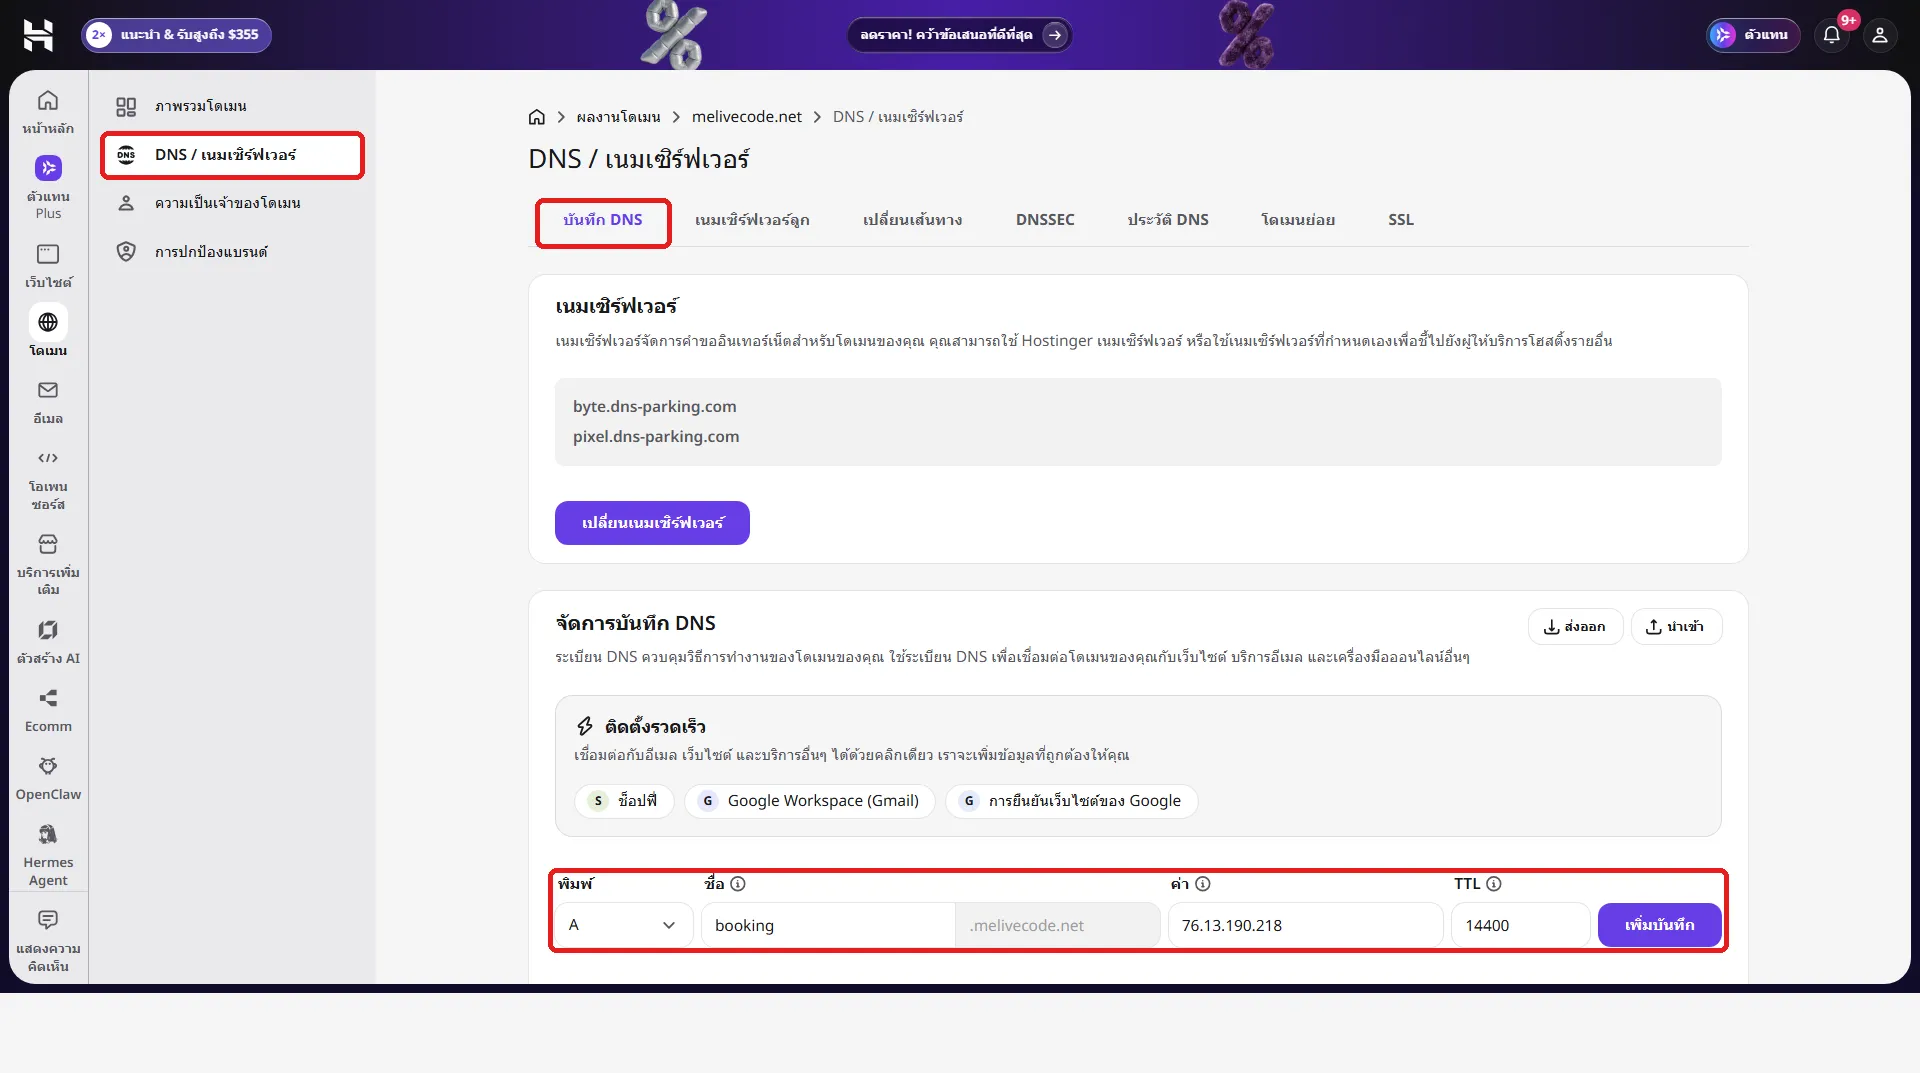
Alternative: add it in hPanel — go to Domains → melivecode.net → DNS / Nameservers → the DNS records tab. In Manage DNS records, enter type A, name booking, value 76.13.190.218 and TTL 14400, then click Add record. (The screenshots below show hPanel in Thai.)
After adding it, the DNS list has the booking A record next to the domain’s existing records.
5.3 Deploy with Docker Compose#
Type in Claude Code:
Deploy a Docker project named restaurant-booking to VPS 1381325
- content: use the content of docker-compose.yml in this project
- environment: generate DB_PASSWORD and ADMIN_PASSWORD, 24 characters each (letters and digits), and DOMAIN=booking.melivecode.net
- Don't write the passwords to any project file. In your answer show only ADMIN_PASSWORD, not DB_PASSWORD
- Wait until the deploy finishes, then check that https://booking.melivecode.net opens
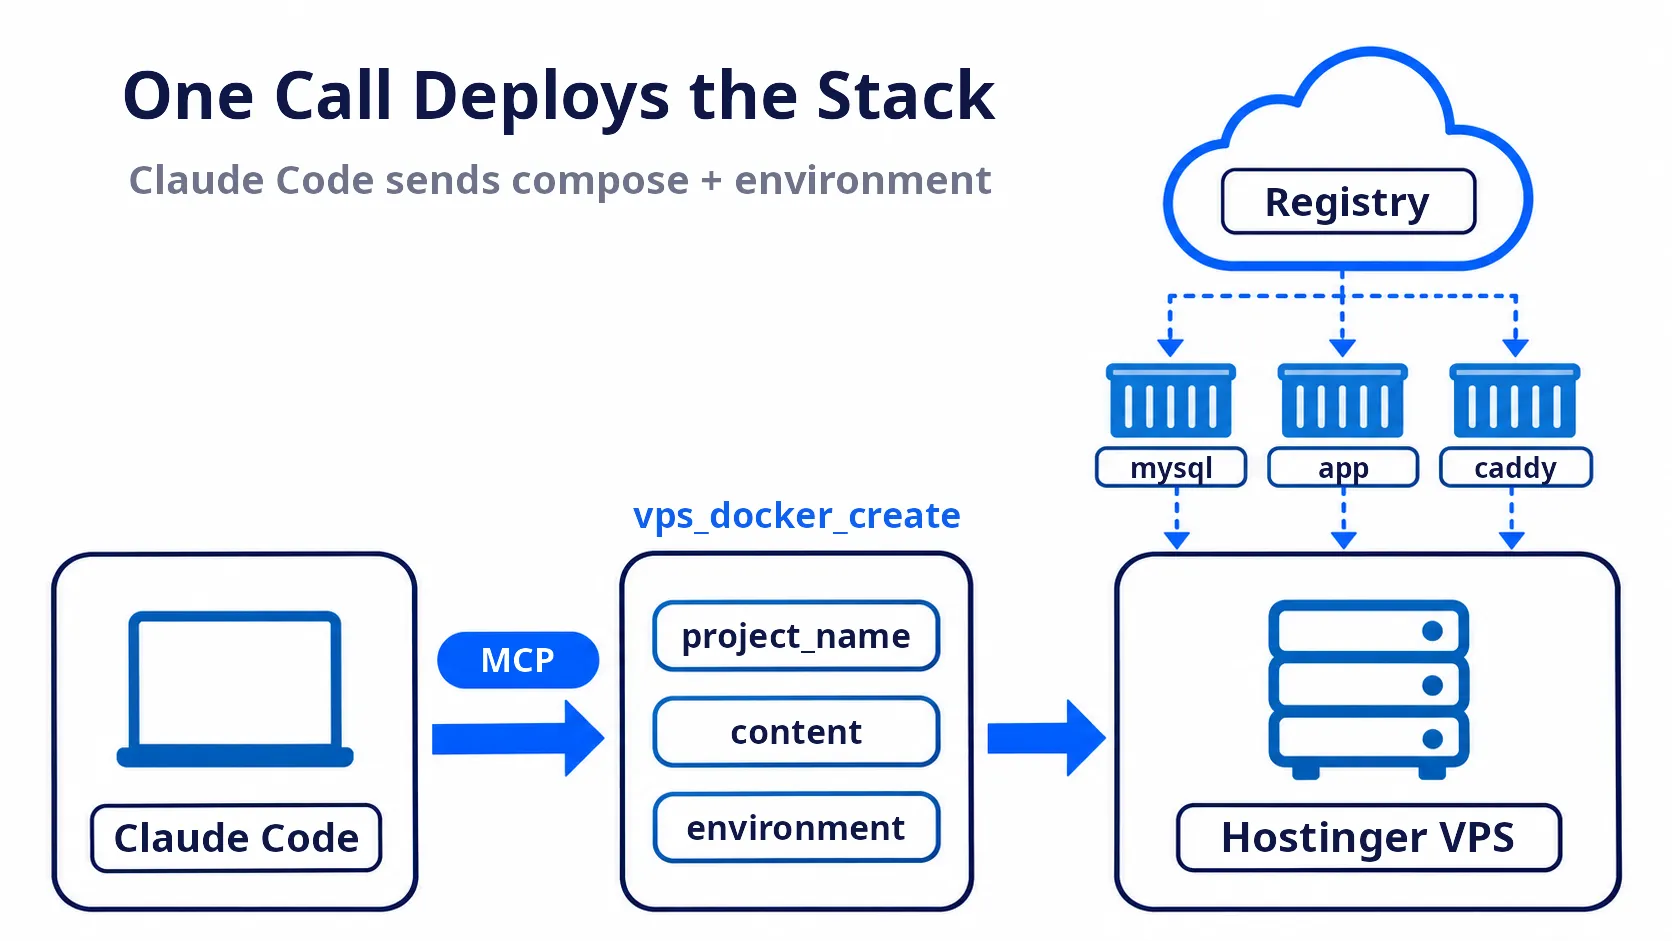
Claude Code calls vps_docker_create, which takes 3 main values:
| Parameter | Value |
|---|---|
project_name | restaurant-booking (letters, digits, - and _ only) |
content | The content of docker-compose.yml (or the file’s URL) |
environment | DB_PASSWORD, ADMIN_PASSWORD and DOMAIN, which fill the ${...} in the compose file |
When done, Claude Code checks the live site and reports the admin password. Example output:
Deploy finished. https://booking.melivecode.net opens and the Let's Encrypt HTTPS certificate works

ADMIN_PASSWORD: ••••••••••••••••••••••••
Use it to log in at https://booking.melivecode.net/admin. This password and DB_PASSWORD were not written to any project file

Status on VPS 1381325 (project restaurant-booking):
- db: running, passed the healthcheck, created the booking_db database and the booking user
- app: running, the log shows [db] schema ready, so the tables and table data were created
- caddy: running, got a certificate for booking.melivecode.net and redirects HTTP to HTTPS automatically
- save-passwords: finished, saved the passwords to /opt/restaurant-booking/passwords.txt on the VPS

External checks:
- The home page returns 200 with the title "ครัวพี่หมี — จองโต๊ะออนไลน์"
- /api/availability returns 200 with all 6 seatings available, so the app reaches the database
- /admin: 401 with a wrong password, 200 with the right one, with a Secure; HttpOnly cookie
Keep the admin password to log in at step 5.4 (the real value is hidden in this example).
Note: the admin password stays in Claude Code’s chat history, and the values sent to the MCP tool appear in the details of the command Claude Code asks you to confirm. If you accidentally share your screen or logs with someone, deploy again with a new password. The database password is not shown; you can read it from the file on the VPS in step 5.5.
Why not pass the GitHub repository URL:
contentaccepts a repository URL, but it only readsdocker-compose.yamlfrom themasterbranch, while this project usesdocker-compose.ymlon themainbranch. Sending the file content directly is clearer.
5.4 Check and Test#
Show the container status and the latest logs of the restaurant-booking projectClaude Code calls vps_docker_list and vps_docker_logs. Example output:
All containers of restaurant-booking on VPS 1381325 are running normally, with no errors in the logs

| Container          | Image                                      | Status      | Health  | Port                   |
| app-1              | ghcr.io/karnyong/restaurant-booking:latest | running     | –       | 3000 (internal)        |
| caddy-1            | caddy:2                                    | running     | –       | 80, 443 public         |
| db-1               | mysql:8.4                                  | running     | healthy | 3306 (internal)        |
| save-passwords-1   | alpine:3                                   | exited (0)  | –       | –                      |

save-passwords-1 being stopped is normal, because it is designed to run once and exit with code 0
- deploy: pulled all 4 images; db passed the healthcheck before app and caddy started; ended with "Project deployed successfully"
- app: Next.js 16.4.6 is ready and shows [db] schema ready
- caddy: got a Let's Encrypt certificate for booking.melivecode.net in about 7 seconds| Log line | Meaning |
|---|---|
Project deployed successfully | Docker Manager pulled all images and created the containers |
[db] schema ready | The app created the tables and table data in MySQL on the VPS (from instrumentation.ts) |
certificate obtained successfully | Caddy got an HTTPS certificate from Let’s Encrypt for booking.melivecode.net |
Then open https://booking.melivecode.net ↗ and test in the same order as locally. Opening it with http:// redirects to https:// automatically. Also try booking a group of 6 in the same seating 3 times: the third must get the message “no free table left for this seating”, because the restaurant has only two 6-seat tables.
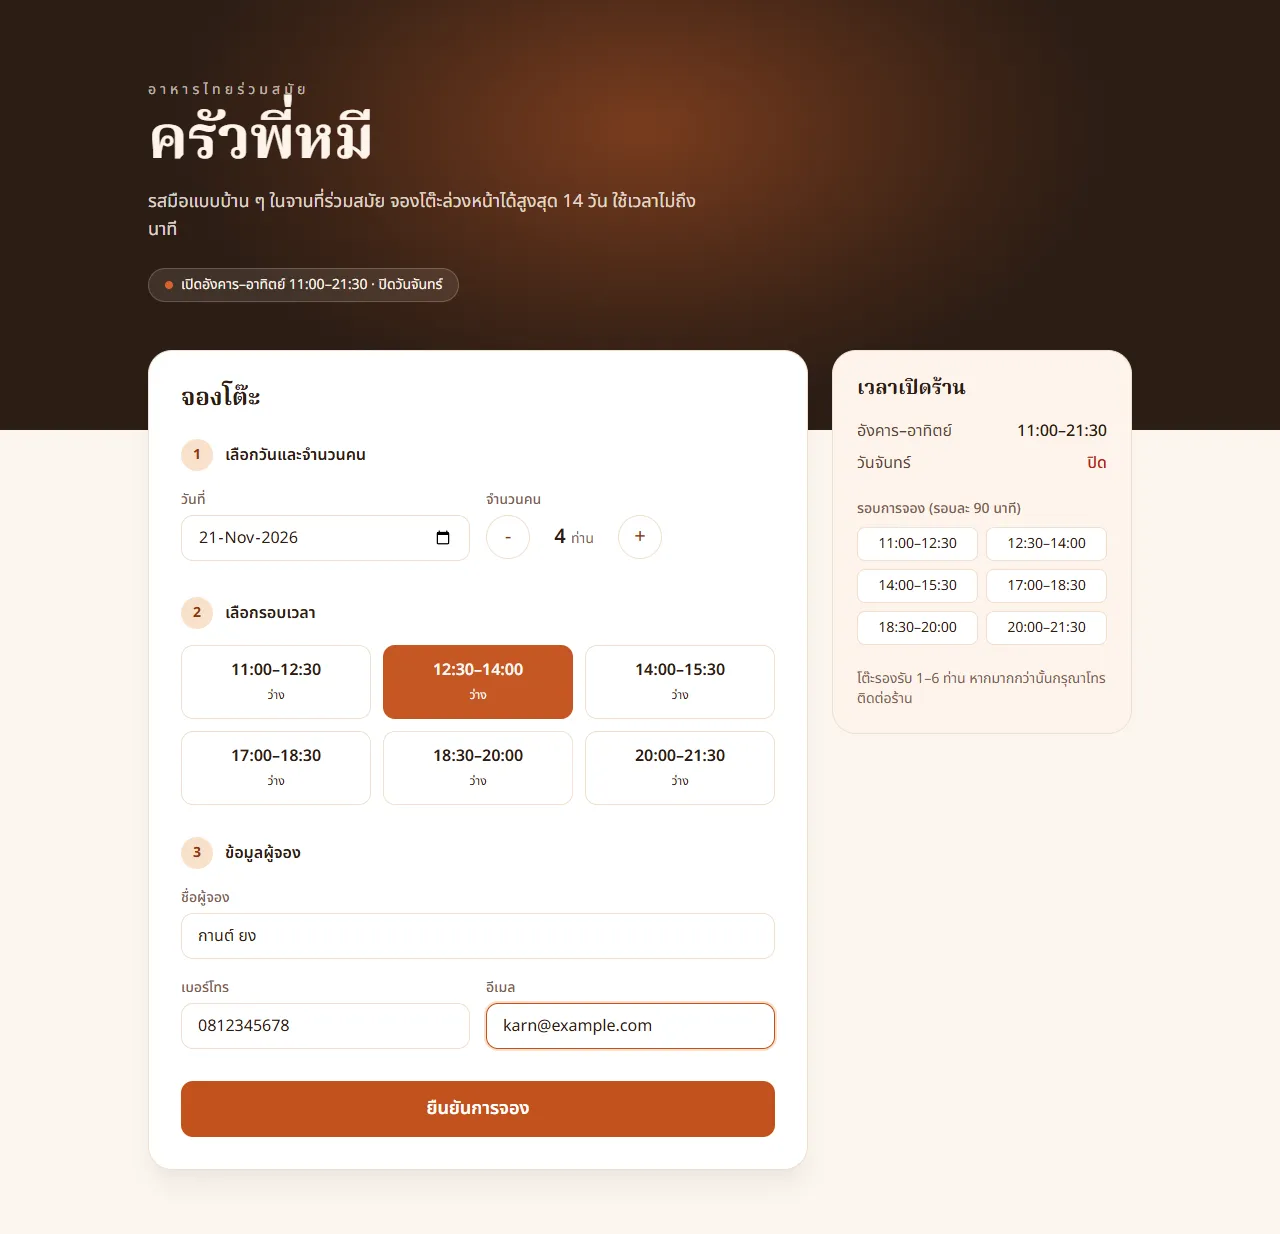
Make a real booking as a customer:
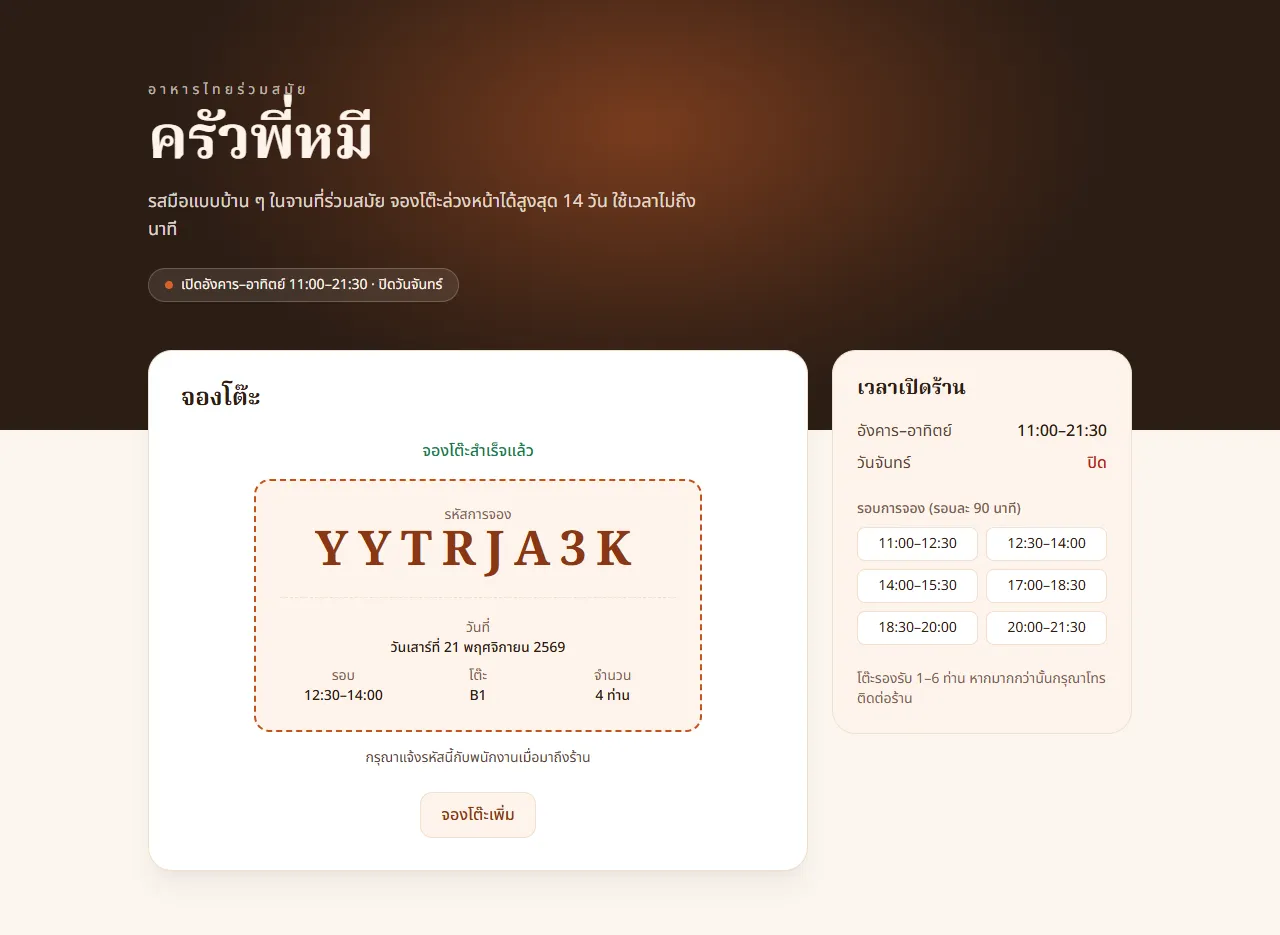
Then open https://booking.melivecode.net/admin ↗ and log in with the admin password Claude Code reported in step 5.3. You will see the booking you just made.
| Problem | Common cause | Fix |
|---|---|---|
app shows ECONNREFUSED and keeps restarting | The database is not ready yet | Wait for the db healthcheck or restart the project |
Can’t pull the image (denied, not found) | The GHCR image is still Private, or the username is not lowercase | Make the package Public and check the image name in the compose file |
| The site shows an invalid certificate | DNS doesn’t point at the VPS yet, or ports 80/443 are blocked by a firewall | Check with nslookup and the VPS firewall (if enabled), then restart the project |
5.5 Look Up the Passwords Later over SSH (Optional)#
If you forget the admin password or need the database password, SSH into the VPS from your own terminal. If you just reinstalled the system in step 4.3, first set a root password in hPanel under VPS → Settings → Change root password.
ssh root@76.13.190.218
cat /opt/restaurant-booking/passwords.txtThis file is readable only by root (mode 600) and contains both DB_PASSWORD and ADMIN_PASSWORD.
6. Update the Site After Deploying#
When Claude Code has finished changing the code, follow up in a single message:
Commit and push to main, wait until GitHub Actions finishes building the image,
then update the Docker project restaurant-booking on the VPS to the latest image and show the logs
Claude Code calls vps_docker_update, which pulls the latest image and recreates the containers. The database data stays intact because it lives in the db_data volume.
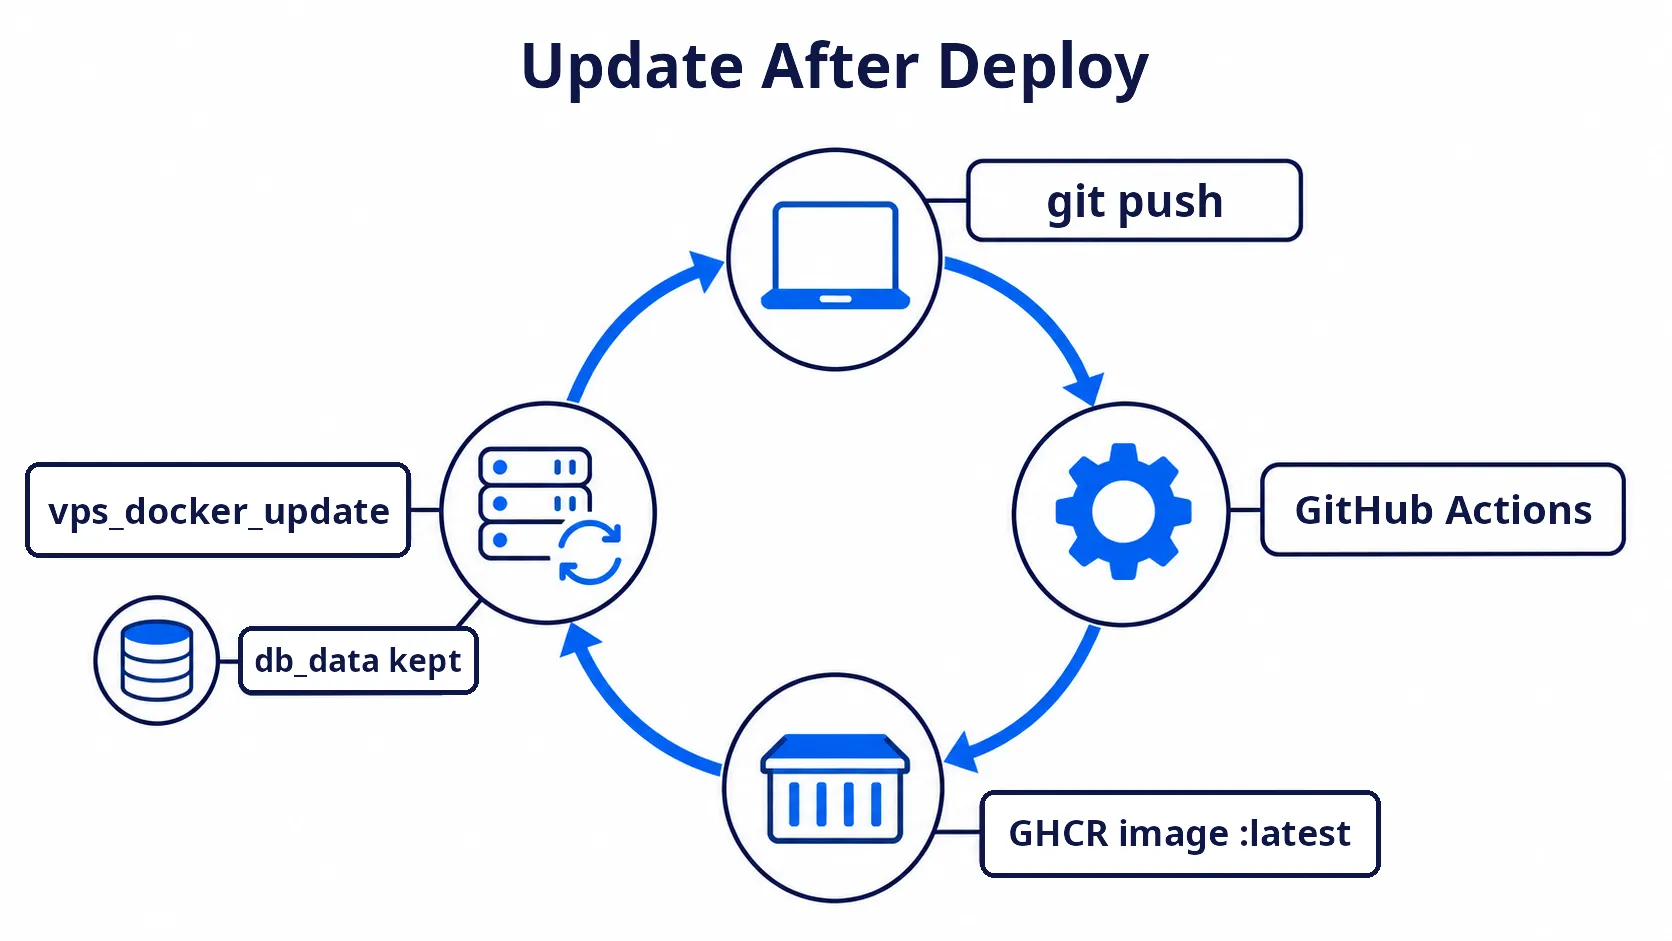
Warning: deleting the project with
vps_docker_deleteremoves all containers, networks, images and volumes, including the booking data indb_data. Use it only when you really want to wipe everything.
Summary#
| Step | Tools | Result |
|---|---|---|
| Build the app | Claude Code (plan mode) + MySQL in CAMPP | A booking app that prevents double booking with a UNIQUE constraint |
| Prepare the image | Claude Code creates the Dockerfile, compose and GitHub Actions | ghcr.io/<github-user>/restaurant-booking:latest |
| Connect Hostinger | claude mcp add + OAuth | Claude Code can manage the VPS and DNS |
| Check domains | domains_availability_check, domains_portfolio_list | Know which domains are available and whether the account has free domains |
| Point the domain and prepare the VPS | dns_records_validate, dns_records_update, vps_virtual-machines_recreate | booking.melivecode.net points at a VPS running Ubuntu 26.04 with Docker |
| Deploy and update | vps_docker_create, vps_docker_update | A live site at https://booking.melivecode.net ↗ |
Key Takeaways#
- Hostinger Connector lets Claude Code manage VPS, Docker, firewall and DNS from plain-language prompts through MCP
- Docker Manager on the VPS pulls prebuilt images, so the image must be built first, for example with GitHub Actions to GHCR
- Claude Code generates the passwords at deploy time and shows only the admin password, while
save-passwordsstores all passwords on the VPS to look up later over SSH - Caddy issues HTTPS automatically once the domain points at the VPS and ports 80/443 are open
- Review every command the AI is about to send before confirming, especially ones that overwrite or delete, such as DNS
overwrite = trueandvps_docker_delete