
พื้นฐานการออกแบบและพัฒนา RESTful API ด้วย Node.js, Express
พื้นฐานการออกแบบและพัฒนา RESTful API สำหรับจัดการข้อมูล ผู้ใช้งาน สินค้า และ คำสั่งซื้อ โดยใช้ Node.js และ Express พร้อมทดสอบด้วย Postman
บทความนี้จะแนะนำขั้นตอนการออกแบบและพัฒนา RESTful API สำหรับจัดการข้อมูล ผู้ใช้งาน (Users), สินค้า (Products), และ คำสั่งซื้อ (Orders) โดยใช้ Node.js และ Express พร้อมทดสอบด้วย Postman
0. API คืออะไร?#
API (Application Programming Interface) คือตัวกลางที่เชื่อมต่อระหว่าง Software Applications ต่างๆ ให้สามารถสื่อสารและแลกเปลี่ยนข้อมูลกันได้
0.1 ทำความเข้าใจ API ด้วยตัวอย่างง่ายๆ#
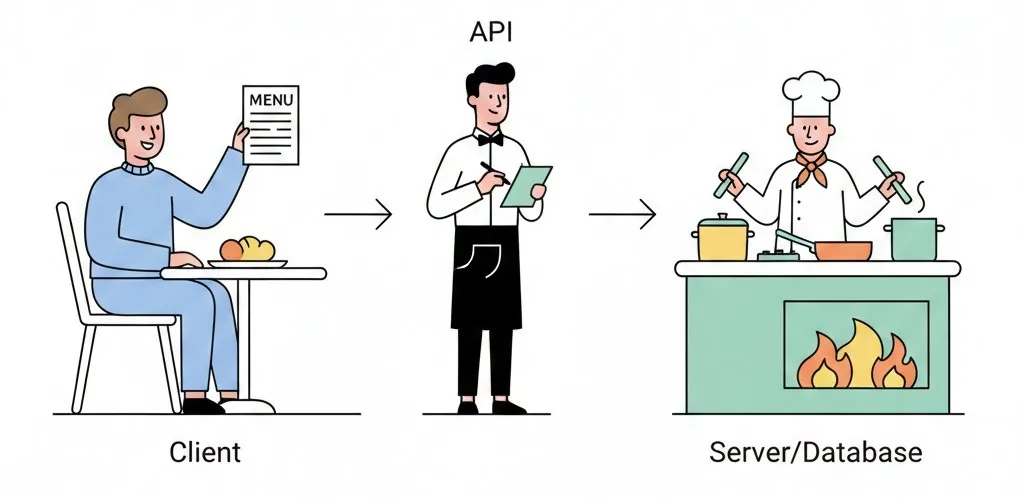
ลองนึกถึง ร้านอาหาร เปรียบเทียบกับ API:
| ร้านอาหาร | API |
|---|---|
| ลูกค้า = ผู้ใช้งาน (Client) | แอปพลิเคชัน/เว็บไซต์ |
| พนักงานเสิร์ฟ = API | API |
| ครัว = Server/Database | Server/Database |
| เมนูอาหาร = Documentation | API Documentation |
| สั่งอาหาร = Request | HTTP Request |
| อาหารที่ได้ = Response | HTTP Response |
การทำงาน:
- ลูกค้าดูเมนู → Client ดู API Documentation
- ลูกค้าสั่งอาหาร → Client ส่ง HTTP Request
- พนักงานเสิร์ฟส่งคำสั่งยังครัว → API ส่งคำขอไปยัง Server
- ครัวทำอาหาร → Server ประมวลผล/ดึงข้อมูล
- เสิร์ฟอาหาร → API ส่ง HTTP Response กลับ
0.2 ประเภทของ API#
| ประเภท | คำอธิบาย | ตัวอย่าง |
|---|---|---|
| REST API | ใช้ HTTP Methods (GET, POST, PUT, DELETE) | /users, /products |
| GraphQL | Query ข้อมูลตามที่ต้องการได้ | Facebook API, GitHub API |
| SOAP | XML-based สำหรับ Enterprise | ระบบธนาคารเก่า |
| WebSocket | Real-time สองทิศทาง | Chat, Stock trading |
0.3 ทำไมต้องใช้ API?#
- แยก Frontend และ Backend - พัฒนาได้อย่างอิสระ
- ใช้งานได้หลายแพลตฟอร์ม - API เดียวรองรับ Web, Mobile, IoT
- Integration ง่าย - เชื่อมต่อกับบริการอื่นๆ ได้ (Google, Facebook, Payment)
- Scalability - ขยายระบบได้ง่าย
0.4 ส่วนประกอบของ REST API#
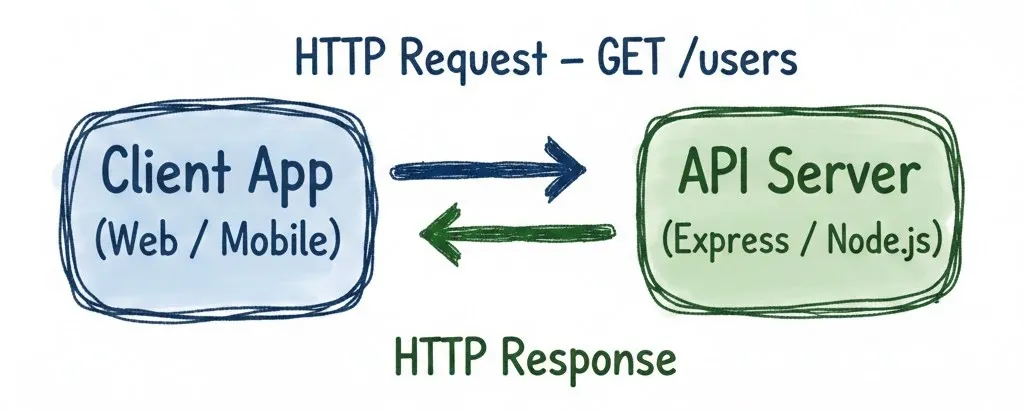
- Client - ผู้ร้องขอ (Browser, Mobile App, Postman)
- Request - คำขอ HTTP (Method + URL + Headers + Body)
- Server - ผู้ให้บริการ (Express, Django, Laravel)
- Response - ผลลัพธ์ (Status Code + JSON Data)
1. วัตถุประสงค์#
ออกแบบพัฒนา RESTful API ที่รองรับการดำเนินการ CRUD สำหรับทรัพยากรที่เกี่ยวข้องกัน 3 ประเภท:
- Users (ผู้ใช้งาน)
- Products (สินค้า)
- Orders (คำสั่งซื้อ)
และการพัฒนา API สำหรับทรัพยากรแบบซ้อน (Nested Resources) เพื่อแสดงข้อมูลคำสั่งซื้อทั้งหมดของผู้ใช้งาน และสินค้าทั้งหมดที่อยู่ในคำสั่งซื้อ
2. หลักการออกแบบ URI สำหรับ RESTful API#
2.1 ใช้คำนาม ไม่ใช้คำกริยา
URI ควรแสดงถึง “ทรัพยากร” (Resource) ไม่ใช่ “การกระทำ” (Action)
✅ ถูกต้อง:
/users- ทรัพยากรผู้ใช้/orders/123- ทรัพยากรคำสั่งซื้อรหัส 123/products- ทรัพยากรสินค้า
❌ ไม่ถูกต้อง:
/getUsers- ใช้คำกริยา/createOrder- ใช้คำกริยา/deleteProduct- ใช้คำกริยา
เหตุผล: HTTP Method (GET, POST, PUT, DELETE) คือสิ่งที่บอกการกระทำอยู่แล้ว
| HTTP Method | ตัวอย่าง URI | ความหมาย |
|---|---|---|
| GET | /users | ดึงข้อมูลผู้ใช้ทั้งหมด |
| GET | /users/123 | ดึงข้อมูลผู้ใช้รหัส 123 |
| POST | /users | สร้างผู้ใช้ใหม่ |
| PUT | /users/123 | แก้ไขข้อมูลผู้ใช้รหัส 123 |
| DELETE | /users/123 | ลบผู้ใช้รหัส 123 |
2.2 ใช้โครงสร้างแบบลำดับชั้น (Hierarchical)
แสดงความสัมพันธ์ของทรัพยากรผ่าน path
✅ ถูกต้อง:
/users/123/orders→ รายการคำสั่งซื้อทั้งหมดของผู้ใช้รหัส 123/orders/456/items→ รายการสินค้าในคำสั่งซื้อรหัส 456/categories/10/products→ รายการสินค้าในหมวดหมู่รหัส 10
❌ ไม่ค่อยดี:
/getUserOrder?userId=123→ ข้อมูลเดียวกัน แต่แบบบนสะอาดและ RESTful กว่า
URI แบบลำดับชั้นแสดงถึง “ความสัมพันธ์ของทรัพยากร” อย่างชัดเจน:
usersคือ ทรัพยากรหลักordersคือ ทรัพยากรย่อย (sub-resource) ที่ขึ้นอยู่กับ user คนหนึ่ง
1.3 ใช้คำนามพหูพจน์สำหรับข้อมูลหลายรายการ
✅ ถูกต้อง:
/products→ หมายถึงหลายรายการ/users→ หมายถึงหลายรายการ/orders→ หมายถึงหลายรายการ
❌ ไม่ถูกต้อง:
/product→ เหมือนแค่ 1 รายการ/user→ เหมือนแค่ 1 รายการ
1.4 ใช้ Query String สำหรับการกรอง/เรียงข้อมูล
✅ ถูกต้อง:
/products?sort=price&limit=10→ เรียงตามราคา แสดง 10 รายการ/users?role=admin&active=true→ กรองผู้ใช้ที่เป็น admin และ active/orders?status=pending&date=2024-01-01→ กรองคำสั่งซื้อตามสถานะและวันที่
1.5 หลีกเลี่ยงข้อผิดพลาดทั่วไป
❌ สิ่งที่ควรหลีกเลี่ยง:
- ใช้ตัวพิมพ์ใหญ่:
/Users→ ควรใช้/users - ใส่นามสกุลไฟล์:
/users.json→ ควรใช้/users - ใช้ underscore:
/user_orders→ ควรใช้/user-ordersหรือ/users/123/orders
✅ แนวทางที่ดี:
- ใช้ตัวพิมพ์เล็กทั้งหมด
- ใช้ hyphen (-) แทน underscore (_)
- ใช้ version ที่เริ่มต้นของ URI:
/v1/users,/v2/products
3. HTTP Status Code ที่ควรรู้#
เมื่อ Client เรียก HTTP request ไปยัง API Server จะได้รับ HTTP Response พร้อม Status Code (รหัส 3 หลัก) เพื่อบอกผลลัพธ์ว่า ✅ สำเร็จ ❌ ล้มเหลว หรือ ℹ️ มีสถานะอื่น
3.1 Status Code ที่พบบ่อย
| Code | Category | ความหมาย | เมื่อไหร่ใช้ |
|---|---|---|---|
| 200 | OK | สำเร็จ มีข้อมูลตอบกลับ | GET, PUT สำเร็จ |
| 201 | Created | สำเร็จ มีการสร้าง resource ใหม่ | POST สำเร็จ |
| 204 | No Content | สำเร็จ ไม่มีข้อมูลตอบกลับ | DELETE สำเร็จ |
| 400 | Bad Request | คำขอไม่ถูกต้อง | ข้อมูลไม่ครบหรือรูปแบบผิด |
| 401 | Unauthorized | ไม่มีสิทธิ์ใช้งาน | ต้องยืนยันตัวตน (เช่น token) |
| 403 | Forbidden | ห้ามเข้าถึง | มี token แต่ไม่มีสิทธิ์ |
| 404 | Not Found | ไม่พบ resource ที่ร้องขอ | ไม่มีข้อมูลตาม ID ที่ระบุ |
| 409 | Conflict | ข้อมูลขัดแย้ง | เช่น email ซ้ำ |
| 422 | Unprocessable Entity | ข้อมูลไม่ผ่าน validation | รูปแบบถูกแต่ไม่ผ่านเงื่อนไข |
| 500 | Server Error | เซิร์ฟเวอร์เกิดข้อผิดพลาด | ข้อผิดพลาดที่ไม่คาดคิด |
2.2 สรุปหมวดหมู่ Status Code
- ✅ 2xx → สำเร็จ (Success)
- ℹ️ 3xx → เปลี่ยนเส้นทาง (Redirection)
- ⚠️ 4xx → ฝั่ง client ผิดพลาด (Client Error)
- 🛠️ 5xx → ฝั่ง server ผิดพลาด (Server Error)
4. เริ่มต้นพัฒนา RESTful API ด้วย Node.js, Express#
4.1 ติดตั้งโปรแกรม#
- Node.js Node.js ↗ ดาวน์โหลดเวอร์ชัน LTS
- Postman Postman Downloads ↗
4.2 ตั้งค่าโปรเจค#
mkdir demo-api
cd demo-api
npm init -y
npm install express cors body-parser
code .สร้างไฟล์ index.js
// Import required modules
const express = require('express');        // Framework for creating web server
const bodyParser = require('body-parser'); // JSON data parser from request body
const cors = require('cors');              // Allow access from other domains

// Create Express application
const app = express();
const port = 5000; // Define the port where server will run

// Install Middleware (middleware that runs before route handler)
app.use(cors());                    // Enable CORS for all routes
app.use(bodyParser.json());         // Parse JSON in request body to JavaScript object

// Main route - test if server is working
app.get('/', (req, res) => {
  res.status(200).send('Hello! RESTful API is ready');
});

// Start server and listen for requests
app.listen(port, () => {
  console.log(`Server running at http://localhost:${port}`);
});คำอธิบายโค้ด:
- require() - นำเข้า library ที่ต้องใช้
- express() - สร้าง Express application instance
- app.use() - ติดตั้ง middleware ที่จะทำงานกับทุก request
- app.get() - กำหนด route สำหรับ HTTP GET method
- res.status().send() - ส่ง response กลับพร้อม status code
- app.listen() - เริ่มเซิร์ฟเวอร์และรอรับ request
4.3 เริ่มต้นเซิร์ฟเวอร์#
node index.jsเปิดเว็บเบราว์เซอร์ไปที่ http://localhost:5000 จะเห็นข้อความ “Hello! RESTful API is ready”
5. ทรัพยากรผู้ใช้ (User Resource)#
ข้อมูลตัวอย่างผู้ใช้
let users = [
  {
    id: 1,
    fname: "Karn",
    lname: "Yong",
    username: "karn.yong",
    email: "karn.yong@melivecode.com",
    avatar: "https://www.melivecode.com/users/1.png"
  }, {
    id: 2,
    fname: "Parkpoom",
    lname: "Chaisiriprasert",
    username: "parkpoom",
    email: "parkpoom@melivecode.com",
    avatar: "https://www.melivecode.com/users/2.png"
  }
];Endpoints
5.1. Read All Users#
app.get('/users', (req, res) => {
  res.status(200).json(users);
});คำอธิบายโค้ด:
app.get('/users', ...)- สร้าง route สำหรับ GET request ที่ path/users(req, res) => {...}- Function ที่จะทำงานเมื่อมี request เข้ามาreq- Request object ที่มีข้อมูลจาก clientres- Response object สำหรับส่งข้อมูลกลับres.status(200)- กำหนด HTTP status code 200 (OK).json(users)- ส่งข้อมูล users กลับในรูปแบบ JSON
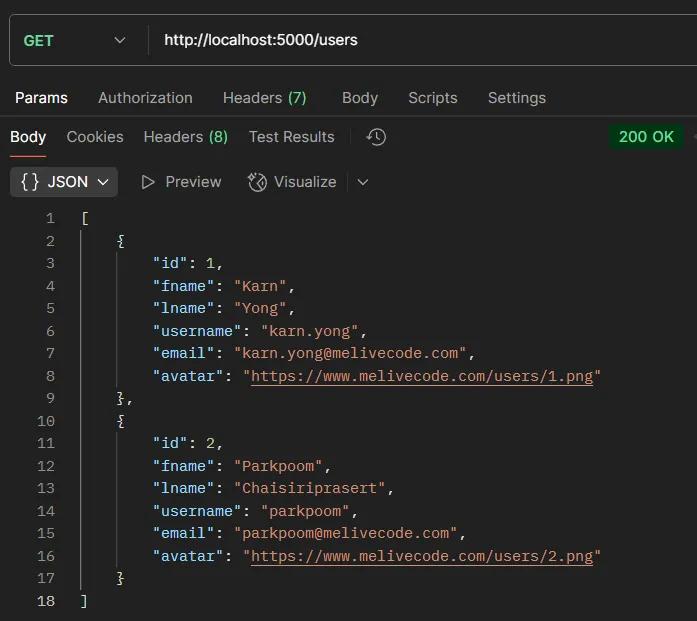
ทดสอบด้วย Postman:
- Method:
GET - URL:
http://localhost:5000/users - Headers: ไม่จำเป็น
- Body: ไม่จำเป็น
- ผลลัพธ์ที่คาดหวัง: รายการผู้ใช้ทั้งหมด (Array)
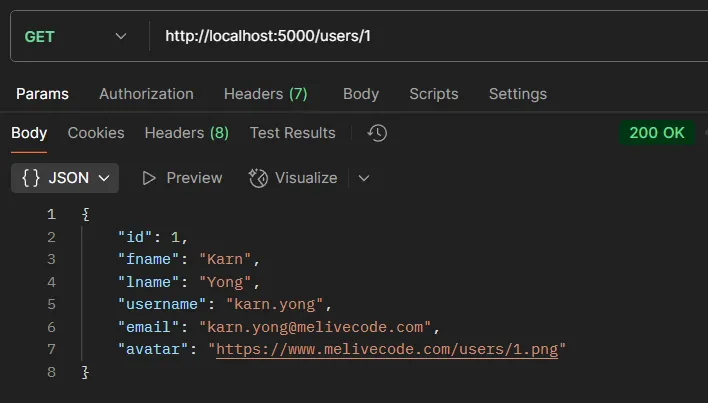
5.2. Read One User#
app.get('/users/:id', (req, res) => {
  const id = parseInt(req.params.id);
  const user = users.find(u => u.id === id);

  if (!user) {
    return res.status(404).json({ message: 'User not found' });
  }

  res.status(200).json(user);
});คำอธิบายโค้ด:
:id- URL parameter ที่รับค่าแบบ dynamic (เช่น/users/1,/users/123)req.params.id- ดึงค่า parameter จาก URLparseInt()- แปลงข้อความเป็นตัวเลขusers.find()- ค้นหาผู้ใช้ที่ตรงเงื่อนไข (id เท่ากัน)if (!user)- ตรวจสอบกรณีไม่พบข้อมูลreturn- หยุดการทำงานของ function ทันทีstatus(404)- HTTP status code สำหรับ “Not Found”
ทดสอบด้วย Postman:
- Method:
GET - URL:
http://localhost:5000/users/1 - Headers: ไม่จำเป็น
- Body: ไม่จำเป็น
- ผลลัพธ์ที่คาดหวัง: ข้อมูลผู้ใช้รหัส 1
5.3. Create User#
app.post('/users', (req, res) => {
  const newUser = req.body;
  users.push(newUser);
  res.status(201).json(newUser);
});คำอธิบายโค้ด:
app.post()- สร้าง route สำหรับ POST request (สำหรับสร้างข้อมูลใหม่)req.body- ข้อมูลที่ส่งมาใน request body (ผ่าน bodyParser.json())users.push()- เพิ่มข้อมูลเข้าไปใน arraystatus(201)- HTTP status code สำหรับ “Created” (สร้างสำเร็จ)
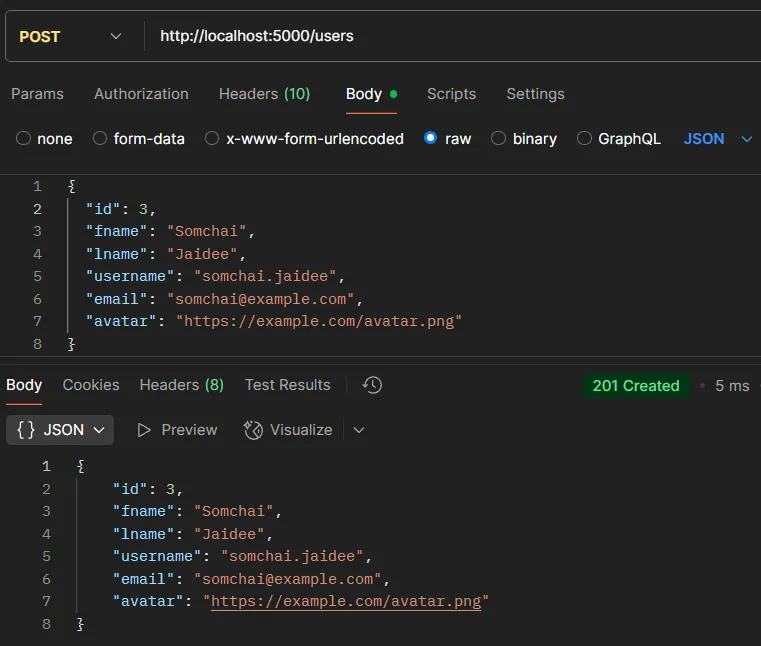
ทดสอบด้วย Postman:
- Method:
POST - URL:
http://localhost:5000/users - Headers:
Content-Type: application/json - Body (JSON):
{
  "id": 3,
  "fname": "Somchai",
  "lname": "Jaidee",
  "username": "somchai.jaidee",
  "email": "somchai@example.com",
  "avatar": "https://example.com/avatar.png"
}- ผลลัพธ์ที่คาดหวัง: ข้อมูลผู้ใช้ใหม่ที่สร้างพร้อม ID
5.4. Update User#
app.put('/users/:id', (req, res) => {
  const id = parseInt(req.params.id);
  const index = users.findIndex(u => u.id === id);

  if (index === -1) {
    return res.status(404).json({ message: 'User not found' });
  }

  // Update data by combining old and new data together
  users[index] = { ...users[index], ...req.body };
  res.status(200).json(users[index]);
});คำอธิบายโค้ด:
app.put()- สร้าง route สำหรับ PUT request (สำหรับอัปเดตข้อมูล)findIndex()- หา index ของ element ที่ตรงเงื่อนไข (คืนค่า -1 ถ้าไม่พบ){ ...users[index], ...req.body }- Object spread syntax...users[index]- กระจายข้อมูลเก่าทั้งหมด...req.body- กระจายข้อมูลใหม่ (จะเขียนทับข้อมูลเก่าที่ชื่อเดียวกัน)
users[index] =- อัปเดตข้อมูลใน array ที่ตำแหน่ง index นั้น
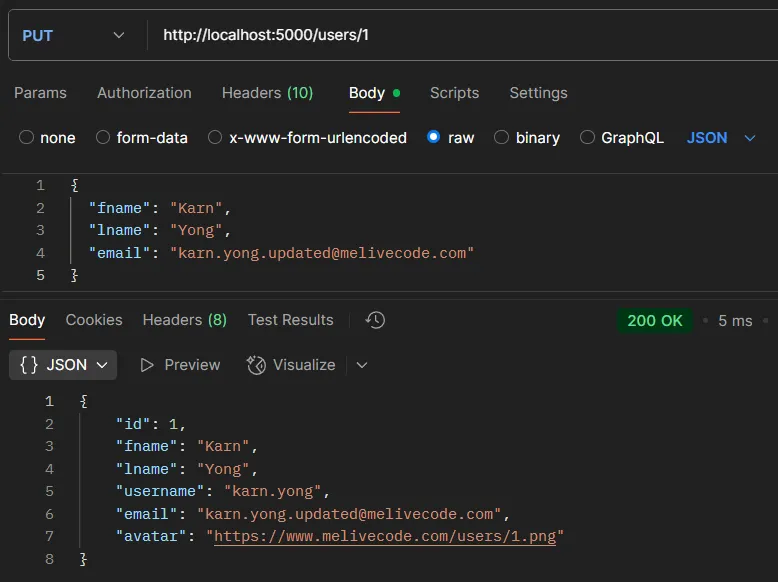
ทดสอบด้วย Postman:
- Method:
PUT - URL:
http://localhost:5000/users/1 - Headers:
Content-Type: application/json - Body (JSON):
{
  "fname": "Karn",
  "lname": "Yong",
  "email": "karn.yong.updated@melivecode.com"
}- ผลลัพธ์ที่คาดหวัง: ข้อมูลผู้ใช้ที่อัปเดตแล้ว
5.5. Delete User#
app.delete('/users/:id', (req, res) => {
  const id = parseInt(req.params.id);
  const index = users.findIndex(u => u.id === id);

  if (index === -1) {
    return res.status(404).json({ message: 'User not found' });
  }

  users.splice(index, 1);
  res.status(200).json({ message: `User with ID ${id} deleted successfully` });
});คำอธิบายโค้ด:
app.delete()- สร้าง route สำหรับ DELETE request (สำหรับลบข้อมูล)splice(index, 1)- ลบ element ออกจาก arrayindex- ตำแหน่งที่จะเริ่มลบ1- จำนวน element ที่จะลบ (ลบ 1 ตัว)
- Template literal -
${id}ใช้แทรกตัวแปรในข้อความ
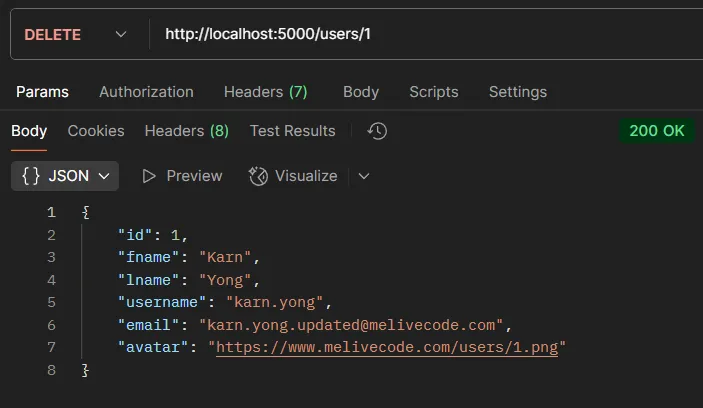
ทดสอบด้วย Postman:
- Method:
DELETE - URL:
http://localhost:5000/users/1 - Headers: ไม่จำเป็น
- Body: ไม่จำเป็น
- ผลลัพธ์ที่คาดหวัง: ข้อความยืนยันการลบ
6. ทรัพยากรสินค้า (Product Resource)#
ข้อมูลตัวอย่างสินค้า
let products = [
  { id: 1, name: "Laptop", price: 39999 },
  { id: 2, name: "Smartphone", price: 19999 },
  { id: 3, name: "Monitor", price: 7999 }
];Endpoints
การดำเนินการ CRUD สำหรับสินค้าจะเป็นรูปแบบเดียวกับผู้ใช้
6.1. Read All Products#
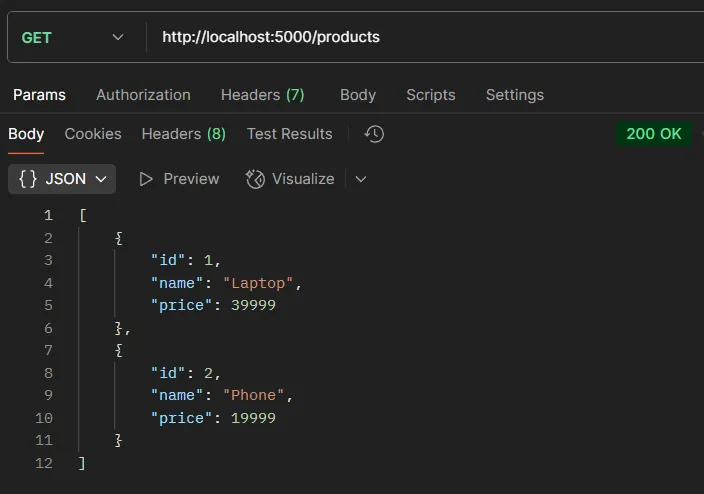
app.get('/products', (req, res) => {
  res.status(200).json(products);
});ทดสอบด้วย Postman:
- Method:
GET - URL:
http://localhost:5000/products - Headers: ไม่จำเป็น
- Body: ไม่จำเป็น
- ผลลัพธ์ที่คาดหวัง: รายการสินค้าทั้งหมด (Array)
6.2. Read One Product#
app.get('/products/:id', (req, res) => {
  const id = parseInt(req.params.id);
  const product = products.find(p => p.id === id);

  if (!product) {
    return res.status(404).json({ message: 'ไม่พบสินค้า' });
  }

  res.status(200).json(product);
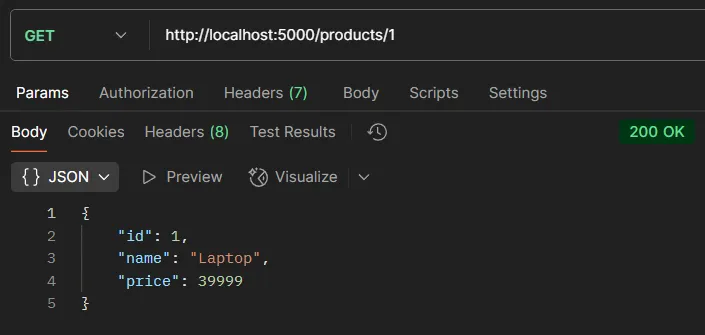
});ทดสอบด้วย Postman:
- Method: GET
- URL:
http://localhost:5000/products/1 - Headers:
Content-Type: application/json - ผลลัพธ์ที่คาดหวัง: ข้อมูลสินค้า ID 1 (Status 200)
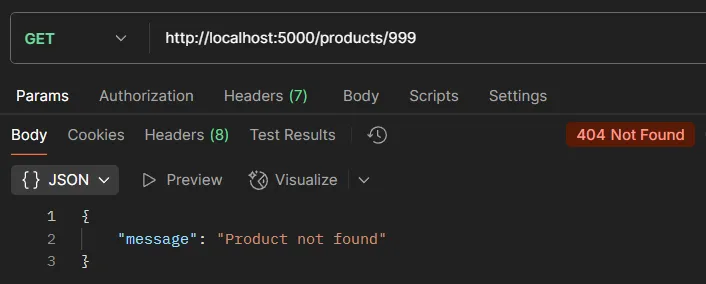
- ทดสอบ Error: ใช้ URL
http://localhost:5000/products/999เพื่อทดสอบกรณีไม่พบสินค้า (Status 404)
6.3. Create Product#
app.post('/products', (req, res) => {
  const newProduct = req.body;
  products.push(newProduct);
  res.status(201).json(newProduct);
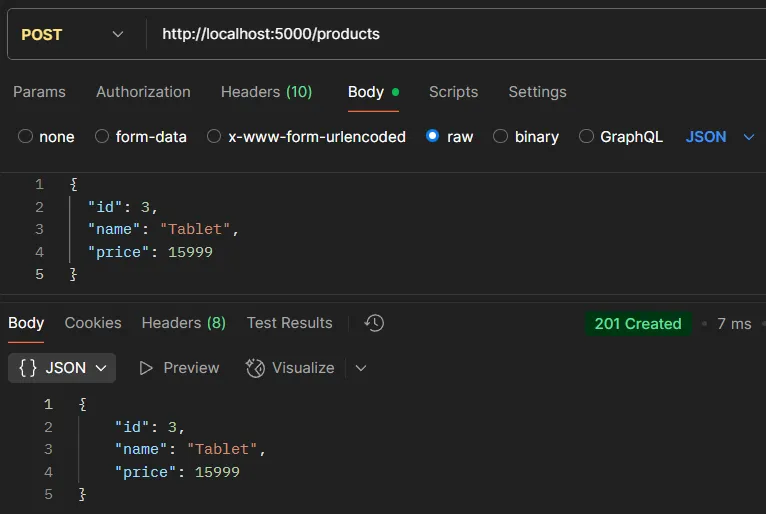
});ทดสอบด้วย Postman:
- Method: POST
- URL:
http://localhost:5000/products - Headers:
Content-Type: application/json - Body (JSON):
{
  "id": 4,
  "name": "Tablet",
  "price": 15999
}- ผลลัพธ์ที่คาดหวัง: สินค้าใหม่ที่มี ID (Status 201)
- ทดสอบ Error: ส่ง Body เป็น
{}เพื่อทดสอบข้อมูลไม่ถูกต้อง (Status 400)
6.4. Update Product#
app.put('/products/:id', (req, res) => {
  const id = parseInt(req.params.id);
  const index = products.findIndex(p => p.id === id);

  if (index === -1) {
    return res.status(404).json({ message: 'ไม่พบสินค้า' });
  }

  products[index] = { ...products[index], ...req.body };
  res.status(200).json(products[index]);
});ทดสอบด้วย Postman:
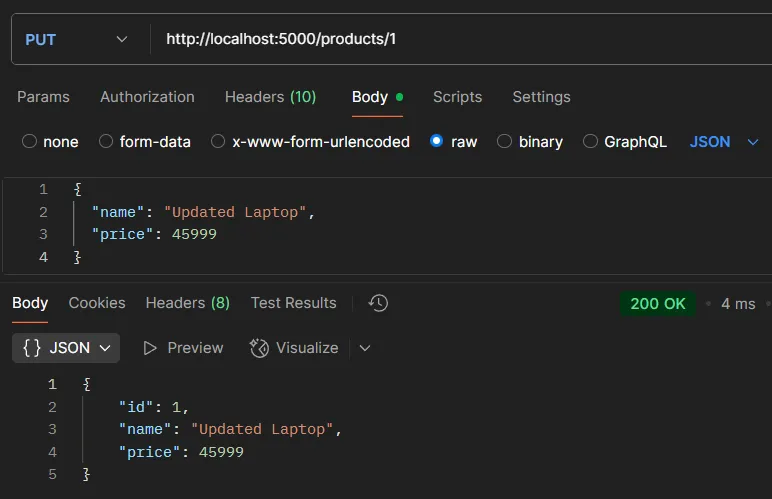
- Method: PUT
- URL:
http://localhost:5000/products/3 - Headers:
Content-Type: application/json - Body (JSON):
{
  "name": "Updated Laptop",
  "price": 45999
}- ผลลัพธ์ที่คาดหวัง: ข้อมูลสินค้าที่อัปเดต (Status 200)
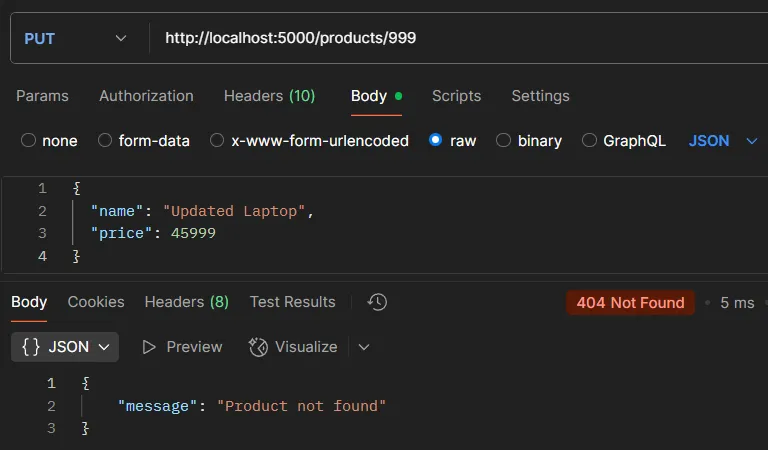
- ทดสอบ Error: ใช้ URL
http://localhost:5000/products/999เพื่อทดสอบกรณีไม่พบสินค้า (Status 404)
6.5. Delete Product#
app.delete('/products/:id', (req, res) => {
  const id = parseInt(req.params.id);
  const index = products.findIndex(p => p.id === id);

  if (index === -1) {
    return res.status(404).json({ message: 'ไม่พบสินค้า' });
  }

  products.splice(index, 1);
  res.status(200).json({ message: `ลบสินค้ารหัส ${id} เรียบร้อย` });
});ทดสอบด้วย Postman:
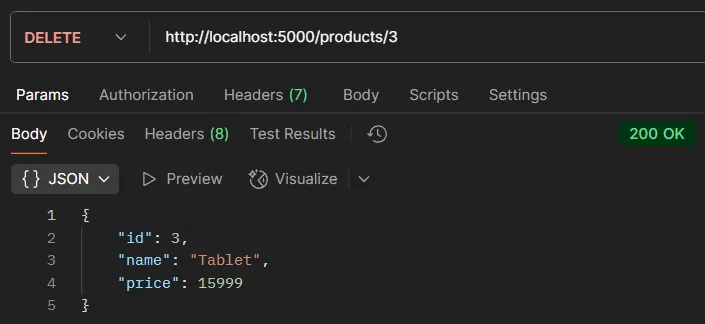
- Method: DELETE
- URL:
http://localhost:5000/products/3 - Headers:
Content-Type: application/json - Body: ไม่จำเป็น
- ผลลัพธ์ที่คาดหวัง: ข้อความยืนยันการลบ (Status 200)
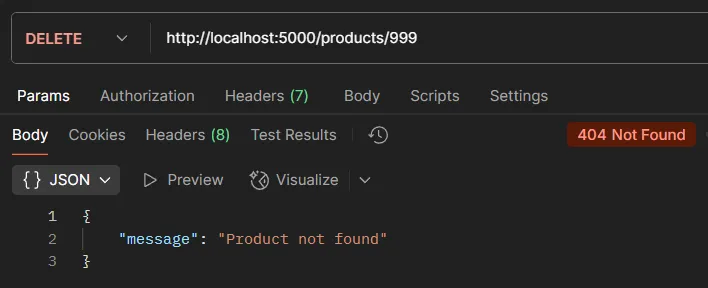
- ทดสอบ Error: ใช้ URL
http://localhost:5000/products/999เพื่อทดสอบกรณีไม่พบสินค้า (Status 404)
7. ทรัพยากรคำสั่งซื้อ (Order Resource)#
ข้อมูลตัวอย่างคำสั่งซื้อ
let orders = [
  { id: 1, userId: 1, productIds: [1, 2] },
  { id: 2, userId: 2, productIds: [2] },
  { id: 3, userId: 1, productIds: [2, 3] }
];Endpoints
7.1. Read All Orders#
app.get('/orders', (req, res) => {
  // สร้างข้อมูลคำสั่งซื้อที่มีรายละเอียดครบถ้วน
  const detailedOrders = orders.map(order => {
    // หาข้อมูลผู้ใช้ที่สั่งซื้อ
    const user = users.find(u => u.id === order.userId);

    // หาข้อมูลสินค้าทั้งหมดในคำสั่งซื้อ
    const productsInOrder = order.productIds.map(pid =>
      products.find(p => p.id === pid)
    );

    // ส่งคืนข้อมูลที่จัดรูปแบบใหม่
    return {
      id: order.id,
      user: user,
      products: productsInOrder
    };
  });

  res.status(200).json(detailedOrders);
});คำอธิบายโค้ด:
orders.map()- แปลง array ของคำสั่งซื้อเป็นรูปแบบใหม่users.find(u => u.id === order.userId)- หาผู้ใช้จาก userId ในคำสั่งซื้อorder.productIds.map()- วนลูปผ่าน productIds ทั้งหมดproducts.find(p => p.id === pid)- หาข้อมูลสินค้าจาก productId แต่ละตัวreturn { ... }- สร้าง object ใหม่ที่มีข้อมูลครบถ้วน
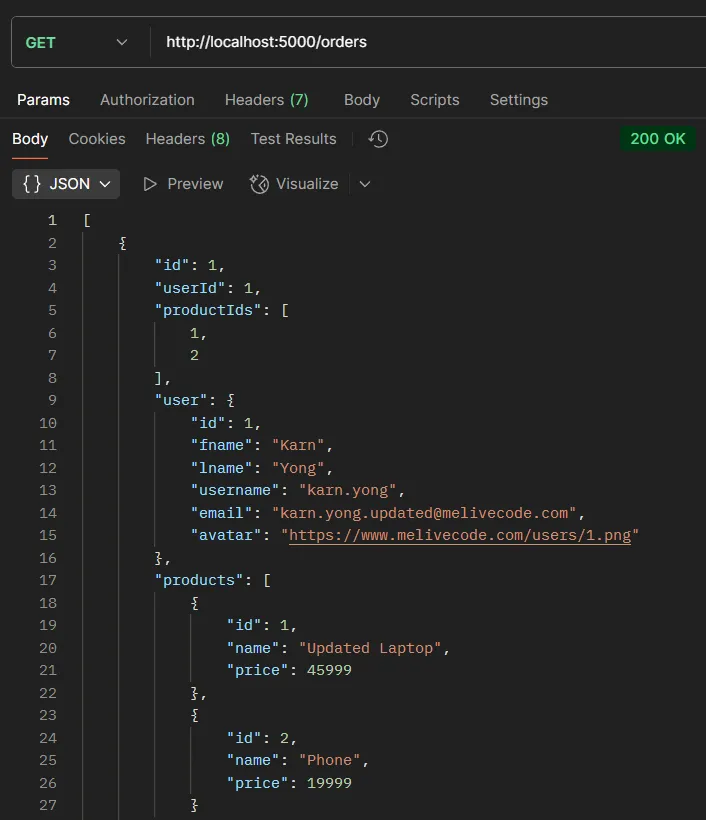
ทดสอบด้วย Postman:
- Method: GET
- URL:
http://localhost:5000/orders - Headers:
Content-Type: application/json - Body: ไม่จำเป็น
- ผลลัพธ์ที่คาดหวัง: รายการคำสั่งซื้อทั้งหมดพร้อมข้อมูลผู้ใช้และสินค้า (Status 200)
7.2. Read One Order#
app.get('/orders/:id', (req, res) => {
  const id = parseInt(req.params.id);
  const order = orders.find(o => o.id === id);

  if (!order) {
    return res.status(404).json({ message: 'ไม่พบคำสั่งซื้อ' });
  }

  const user = users.find(u => u.id === order.userId);
  const productsInOrder = order.productIds.map(pid =>
    products.find(p => p.id === pid)
  );

  res.status(200).json({
    id: order.id,
    user: user,
    products: productsInOrder
  });
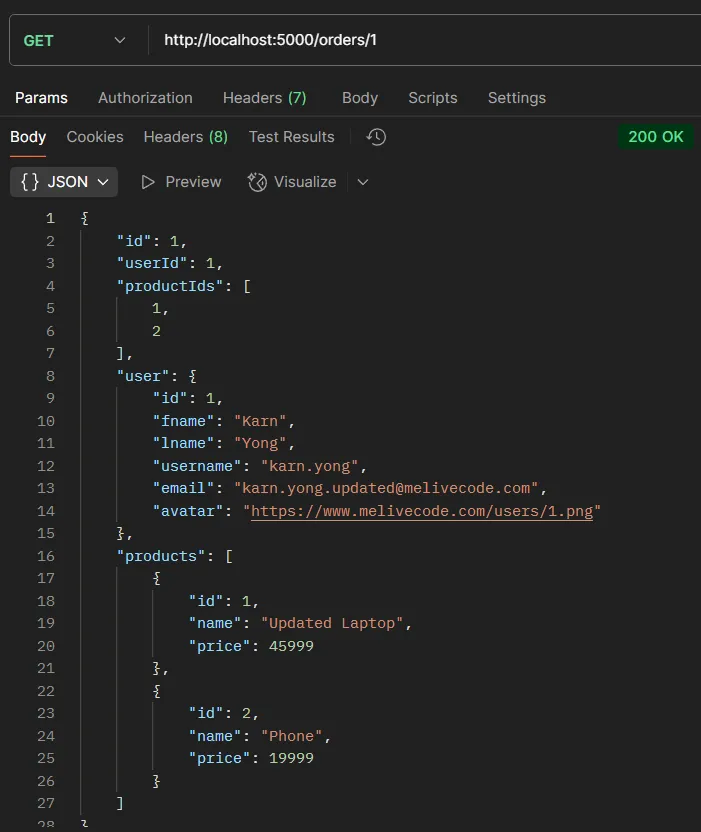
});ทดสอบด้วย Postman:
- Method: GET
- URL:
http://localhost:5000/orders/1 - Headers:
Content-Type: application/json - Body: ไม่จำเป็น
- ผลลัพธ์ที่คาดหวัง: ข้อมูลคำสั่งซื้อ ID 1 พร้อมข้อมูลผู้ใช้และสินค้า (Status 200)
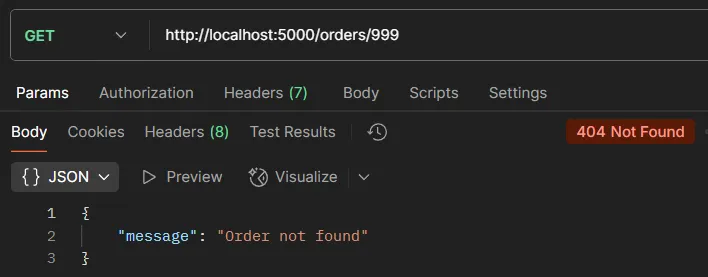
- ทดสอบ Error: ใช้ URL
http://localhost:5000/orders/999เพื่อทดสอบกรณีไม่พบคำสั่งซื้อ (Status 404)
7.3. Create Order#
app.post('/orders', (req, res) => {
  const newOrder = req.body;

  orders.push(newOrder);
  res.status(201).json(newOrder);
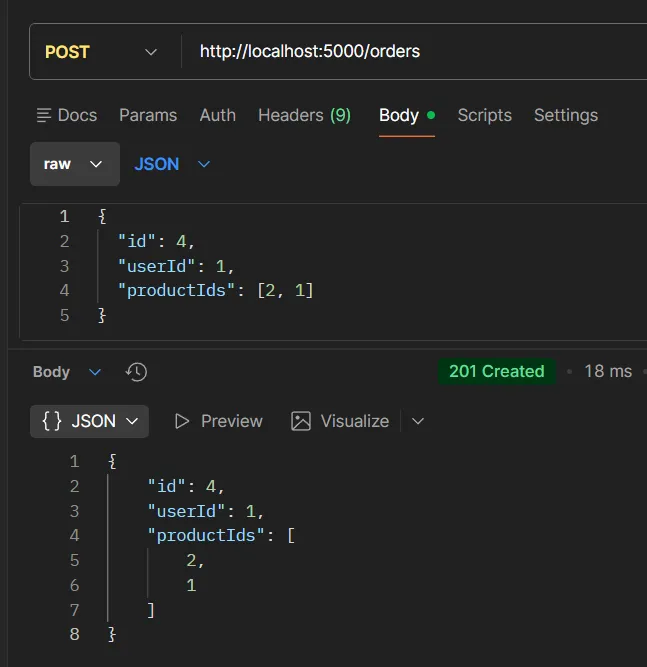
});ทดสอบด้วย Postman:
- Method: POST
- URL:
http://localhost:5000/orders - Headers:
Content-Type: application/json - Body (JSON):
{
  "id": 4,
  "userId": 1,
  "productIds": [2, 1]
}- ผลลัพธ์ที่คาดหวัง: คำสั่งซื้อใหม่ที่มี ID (Status 201)
7.4. Update Order#
app.put('/orders/:id', (req, res) => {
  const id = parseInt(req.params.id);
  const index = orders.findIndex(o => o.id === id);

  if (index === -1) {
    return res.status(404).json({ message: 'ไม่พบคำสั่งซื้อ' });
  }

  orders[index] = { ...orders[index], ...req.body };
  res.status(200).json(orders[index]);
});ทดสอบด้วย Postman:
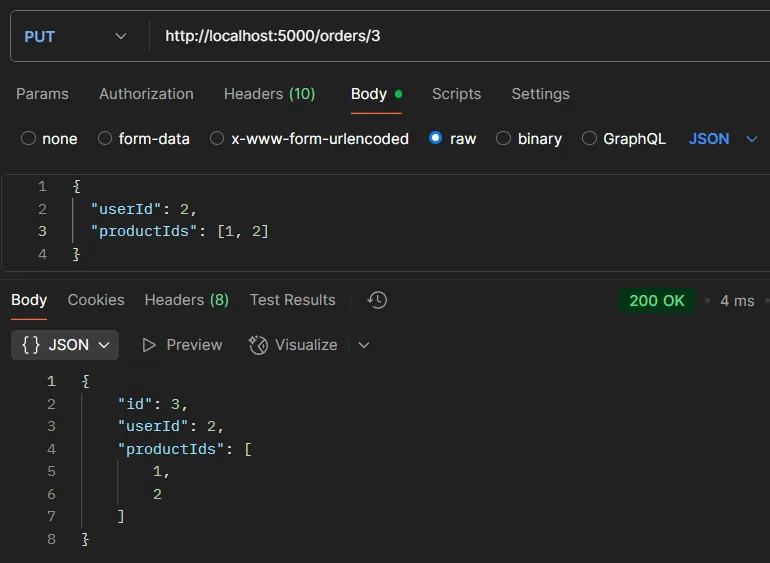
- Method: PUT
- URL:
http://localhost:5000/orders/3 - Headers:
Content-Type: application/json - Body (JSON):
{
  "userId": 2,
  "productIds": [1, 2]
}- ผลลัพธ์ที่คาดหวัง: ข้อมูลคำสั่งซื้อที่อัปเดต (Status 200)
- ทดสอบ Error: ใช้ URL
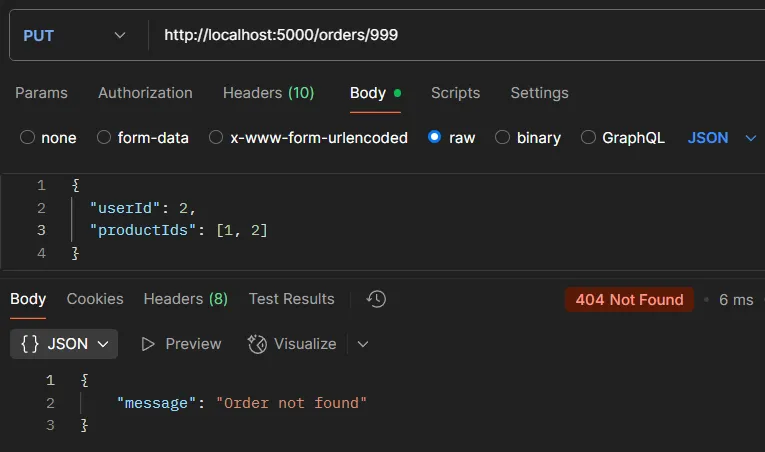
http://localhost:5000/orders/999เพื่อทดสอบกรณีไม่พบคำสั่งซื้อ (Status 404)
7.5. Delete Order#
app.delete('/orders/:id', (req, res) => {
  const id = parseInt(req.params.id);
  const index = orders.findIndex(o => o.id === id);

  if (index === -1) {
    return res.status(404).json({ message: 'ไม่พบคำสั่งซื้อ' });
  }

  orders.splice(index, 1);
  res.status(200).json({ message: `ลบคำสั่งซื้อรหัส ${id} เรียบร้อย` });
});ทดสอบด้วย Postman:
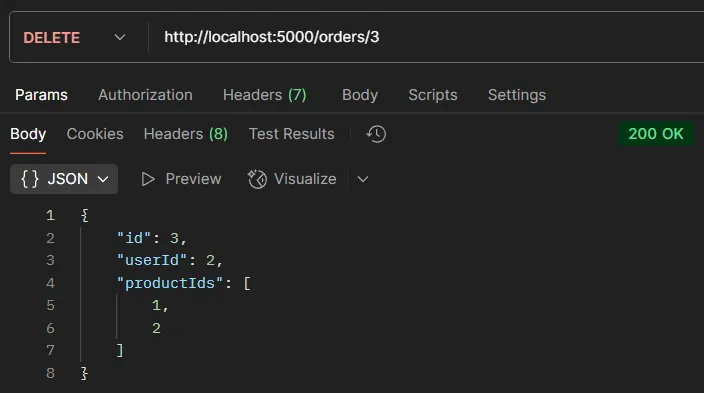
- Method: DELETE
- URL:
http://localhost:5000/orders/3 - Headers:
Content-Type: application/json - Body: ไม่จำเป็น
- ผลลัพธ์ที่คาดหวัง: ข้อความยืนยันการลบ (Status 200)
- ทดสอบ Error: ใช้ URL
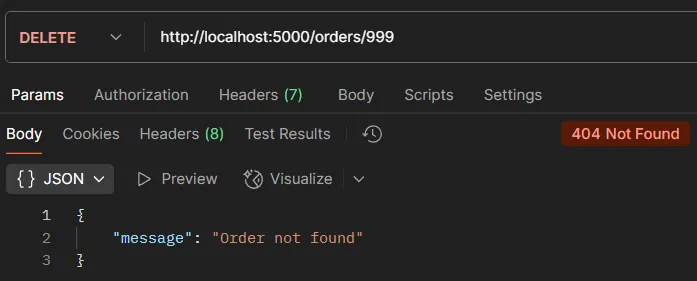
http://localhost:5000/orders/999เพื่อทดสอบกรณีไม่พบคำสั่งซื้อ (Status 404)
8. ทรัพยากรแบบซ้อน (Nested Resources)#
8.1. Get Orders by User#
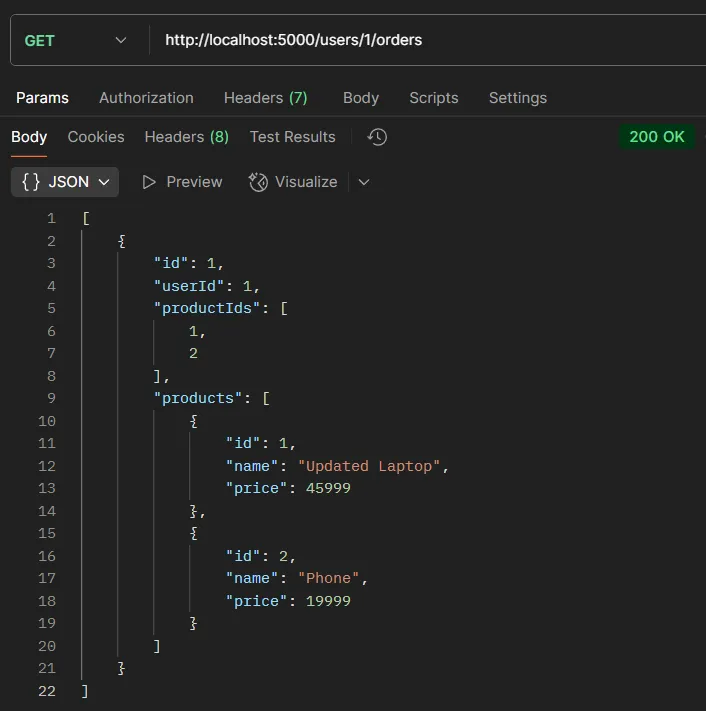
app.get('/users/:id/orders', (req, res) => {
  const userId = parseInt(req.params.id);
  const user = users.find(u => u.id === userId);

  if (!user) {
    return res.status(404).json({ message: 'ไม่พบผู้ใช้' });
  }

  // กรองคำสั่งซื้อที่เป็นของผู้ใช้คนนี้เท่านั้น
  const userOrders = orders.filter(order => order.userId === userId);
  res.status(200).json(userOrders);
});คำอธิบายโค้ด:
- Nested Resource Pattern -
/users/:id/ordersแสดงความสัมพันธ์ที่ “orders เป็นของ user” filter()- กรองข้อมูลตามเงื่อนไข (คืนค่า array ใหม่ที่มีแค่ข้อมูลที่ตรงเงื่อนไข)order.userId === userId- เงื่อนไขในการกรอง (คำสั่งซื้อที่ userId ตรงกัน)
ทดสอบด้วย Postman:
- Method: GET
- URL:
http://localhost:5000/users/1/orders - Headers:
Content-Type: application/json - Body: ไม่จำเป็น
- ผลลัพธ์ที่คาดหวัง: รายการคำสั่งซื้อของผู้ใช้ ID 1 (Status 200)
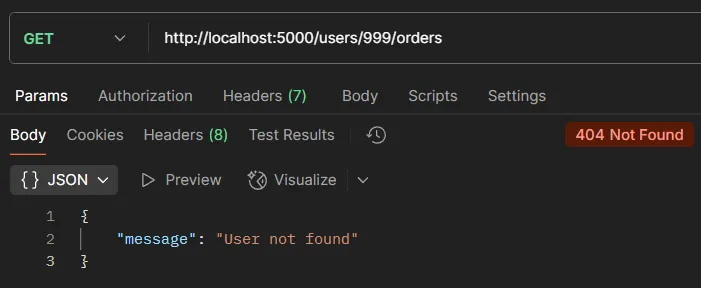
- ทดสอบ Error: ใช้ URL
http://localhost:5000/users/999/ordersเพื่อทดสอบกรณีไม่พบผู้ใช้ (Status 404)
8.2. Get Products in an Order#
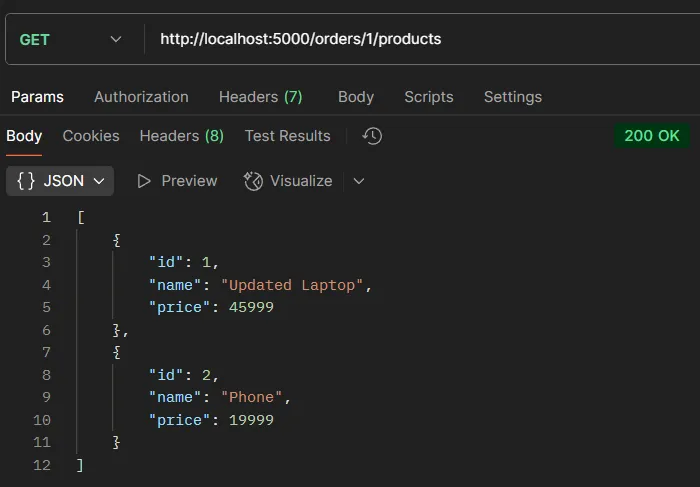
app.get('/orders/:id/products', (req, res) => {
  const orderId = parseInt(req.params.id);
  const order = orders.find(o => o.id === orderId);

  if (!order) {
    return res.status(404).json({ message: 'ไม่พบคำสั่งซื้อ' });
  }

  const productsInOrder = order.productIds.map(pid =>
    products.find(p => p.id === pid)
  );

  res.status(200).json(productsInOrder);
});ทดสอบด้วย Postman:
- Method: GET
- URL:
http://localhost:5000/orders/1/products - Headers:
Content-Type: application/json - Body: ไม่จำเป็น
- ผลลัพธ์ที่คาดหวัง: รายการสินค้าในคำสั่งซื้อ ID 1 (Status 200)
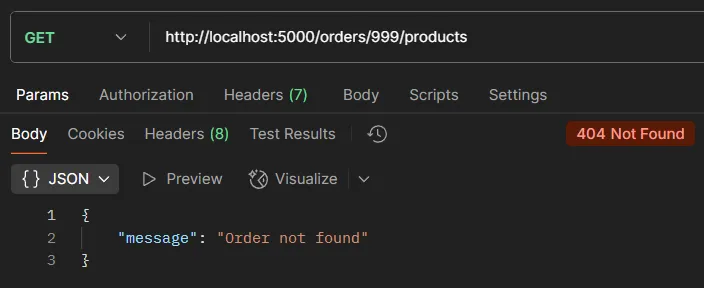
- ทดสอบ Error: ใช้ URL
http://localhost:5000/orders/999/productsเพื่อทดสอบกรณีไม่พบคำสั่งซื้อ (Status 404)
9. สรุป#
สิ่งที่ได้เรียนรู้จากเนื้อหานี้:
- หลักการออกแบบ URI ตามมาตรฐาน REST
- การสร้าง API ด้วย Node.js และ Express
- CRUD Operations สำหรับทรัพยากรหลายประเภท
- Nested Resources สำหรับข้อมูลที่เกี่ยวข้องกัน
- การทดสอบ API ด้วย Postman
ข้อดีของการออกแบบ RESTful API
- ความเข้าใจง่าย - URI ที่ชัดเจนและเป็นมาตรฐาน
- ความยืดหยุ่น - สามารถขยายได้ง่าย
- การแยกส่วน - Client และ Server ทำงานแยกกัน
- การใช้งานซ้ำ - API เดียวรองรับหลายแอปพลิเคชัน
