Cyber Security: Brute Force Attack Lab
Learn Brute Force Attack techniques and prevention through hands-on practice with DVWA and Burp Suite. Use SSH for easy command copy-paste from this tutorial.
Welcome to the Brute Force Attack Lab! Building on the foundation from your Linux Security Lab, this lab covers one of the most fundamental web application attack techniques — and, just as importantly, how to defend against it.
The lab has three parts, each building on the one before:
- Concepts — what brute force attacks are, their variants, and how to prevent them.
- Lab setup — installing DVWA (a deliberately vulnerable app) and Burp Suite on your Ubuntu VM.
- Hands-on attack and defense — intercepting requests, automating a brute force with Burp Intruder, then studying the defenses that stop it.
1. Introduction to Brute Force Attacks#
1.1 Prerequisites#
Before starting this lab, you should have:
- ✅ Ubuntu VM Setup — VirtualBox with Ubuntu installed
- ✅ Linux Command Basics — understanding of terminal commands
- ✅ SSH Knowledge — how to connect to your VM remotely
📚 New to Linux? If you haven’t set up your Ubuntu VM or need a refresher on Linux commands, check out our Linux Security Lab Tutorial ↗ for comprehensive Ubuntu setup and command-line basics.
1.2 What is a Brute Force Attack?#
A Brute Force Attack is a trial-and-error method for obtaining secrets such as a password or personal identification number (PIN). The attacker systematically tries every possible password or passphrase until the correct one is found.
# Password attempts in a brute force attack
password1   -> Incorrect
password123 -> Incorrect
admin123    -> Incorrect
letmein     -> Incorrect
password -> SUCCESS1.3 How Brute Force Attacks Work#
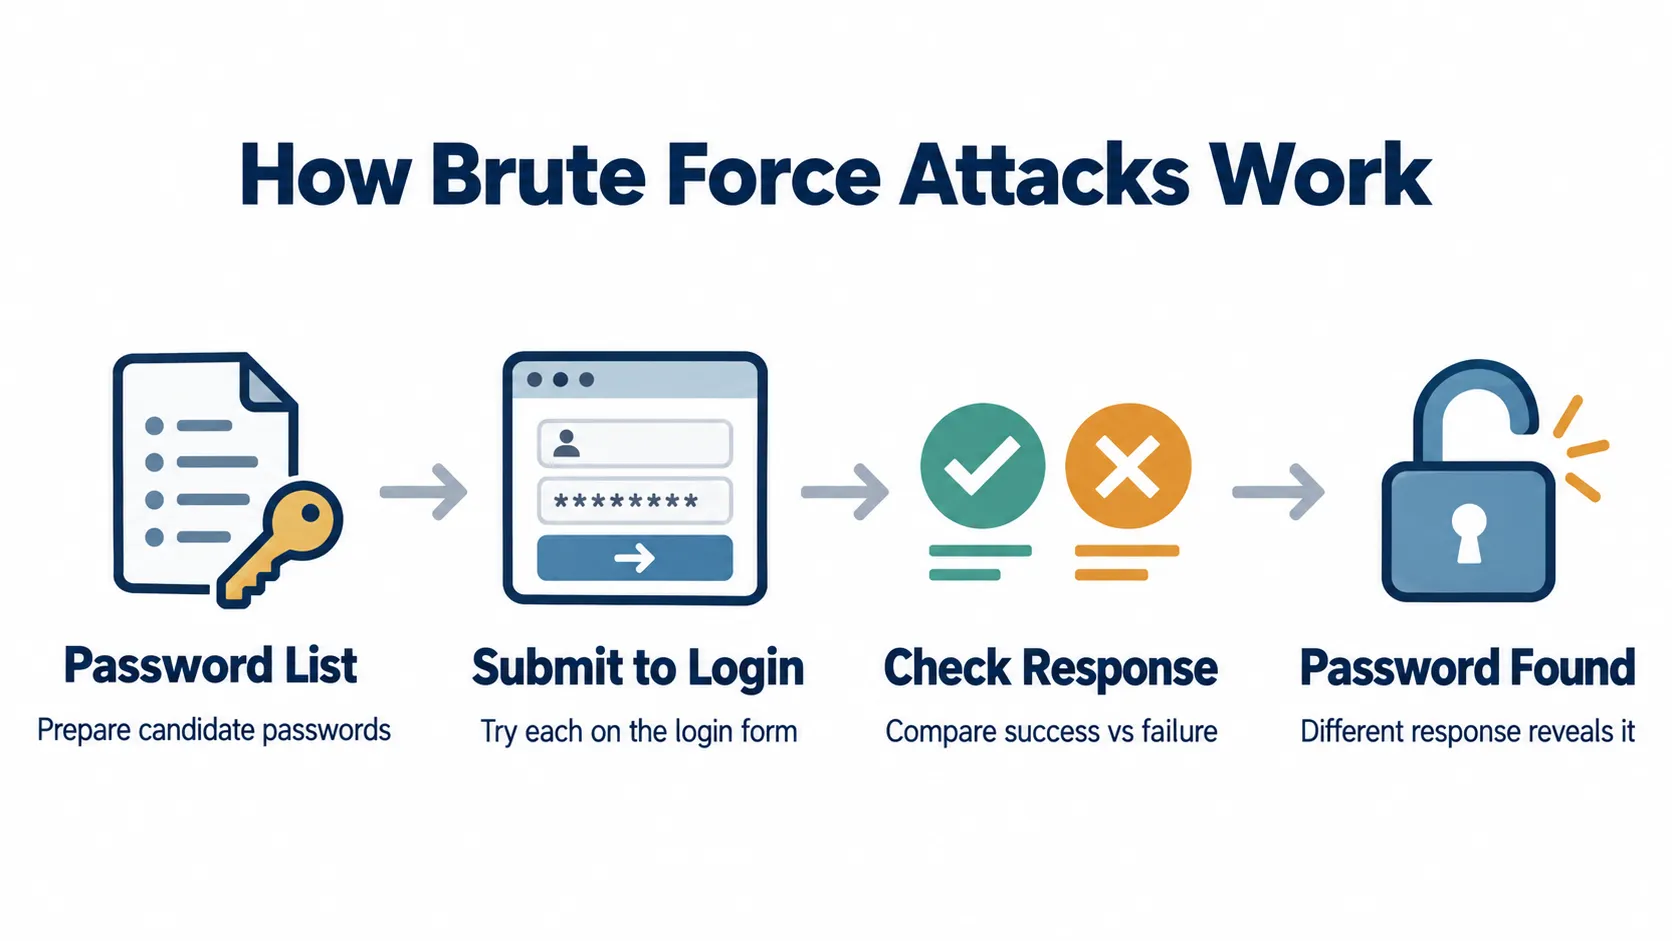
The attacker feeds a list of candidate passwords to a tool that submits each one to the login form and inspects the response. Failed and successful attempts almost always differ in some way — the message shown, the page length, or an HTTP redirect — and that difference is what gives the correct password away.
1.4 Time to Crack Examples#
| Password | Characters | Time to Crack (1000 attempts/sec) |
|---|---|---|
1234 | 4 digits | ~10 seconds |
password | 8 lowercase | ~2 hours |
Password1 | 8 mixed | ~3 days |
P@ssw0rd! | 8 with symbols | ~5 months |
MySecur3P@ss! | 14 with symbols | ~400 million years |
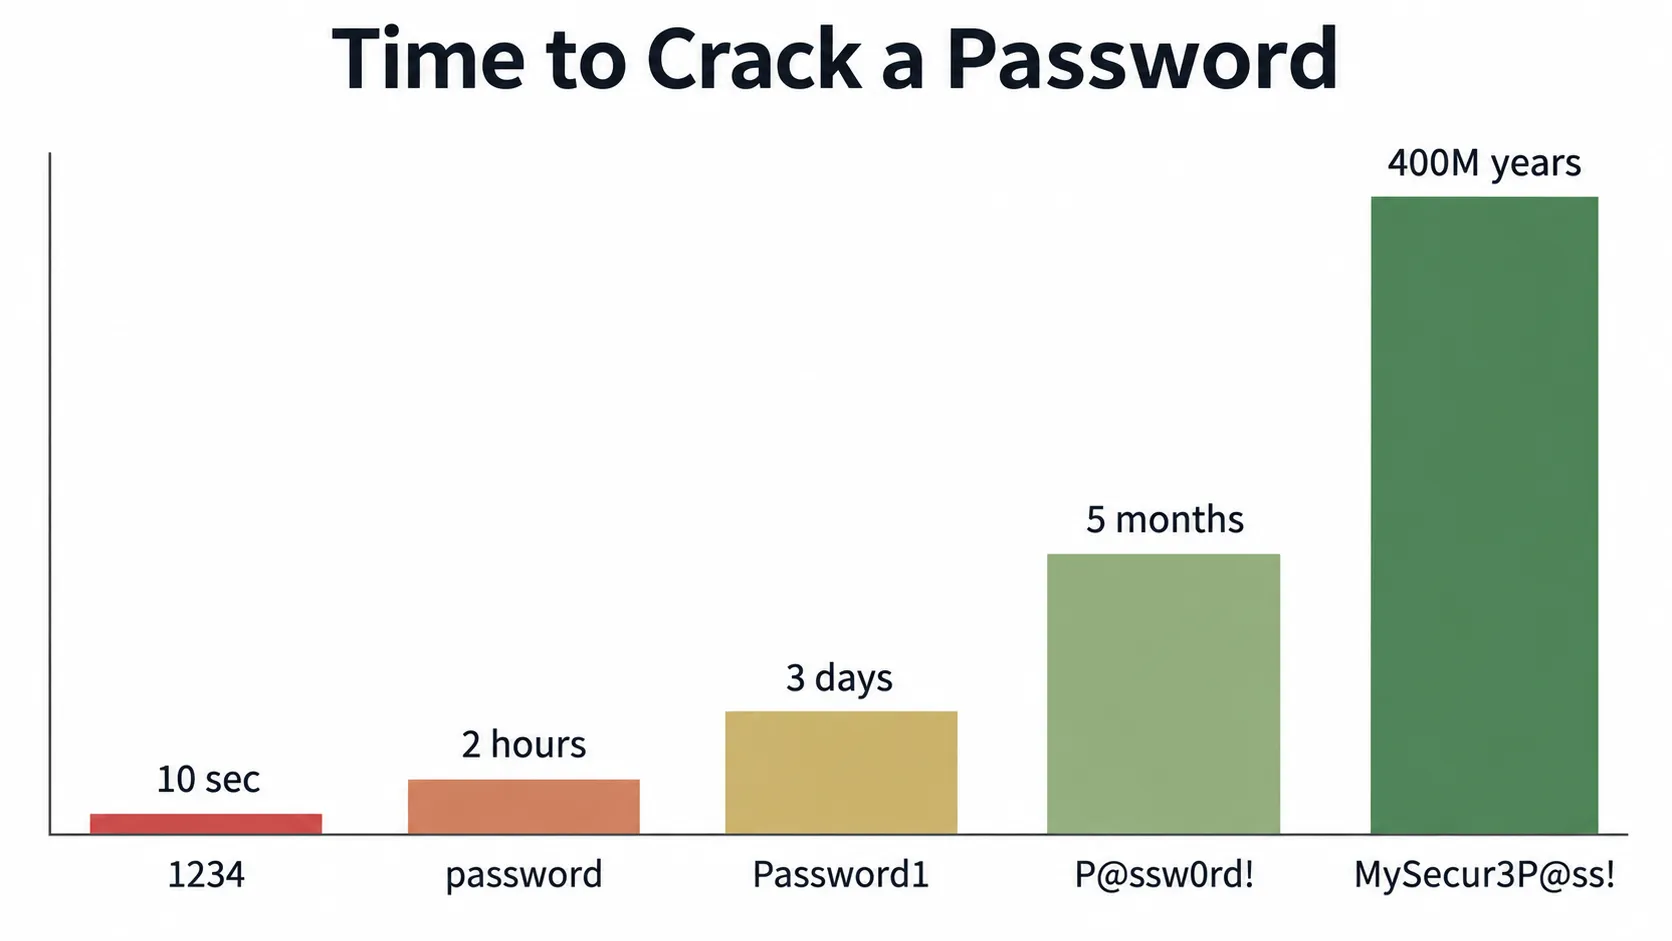
Key Insight: Every extra character of length and complexity multiplies the time needed to crack a password.
2. Types of Brute Force Attacks#
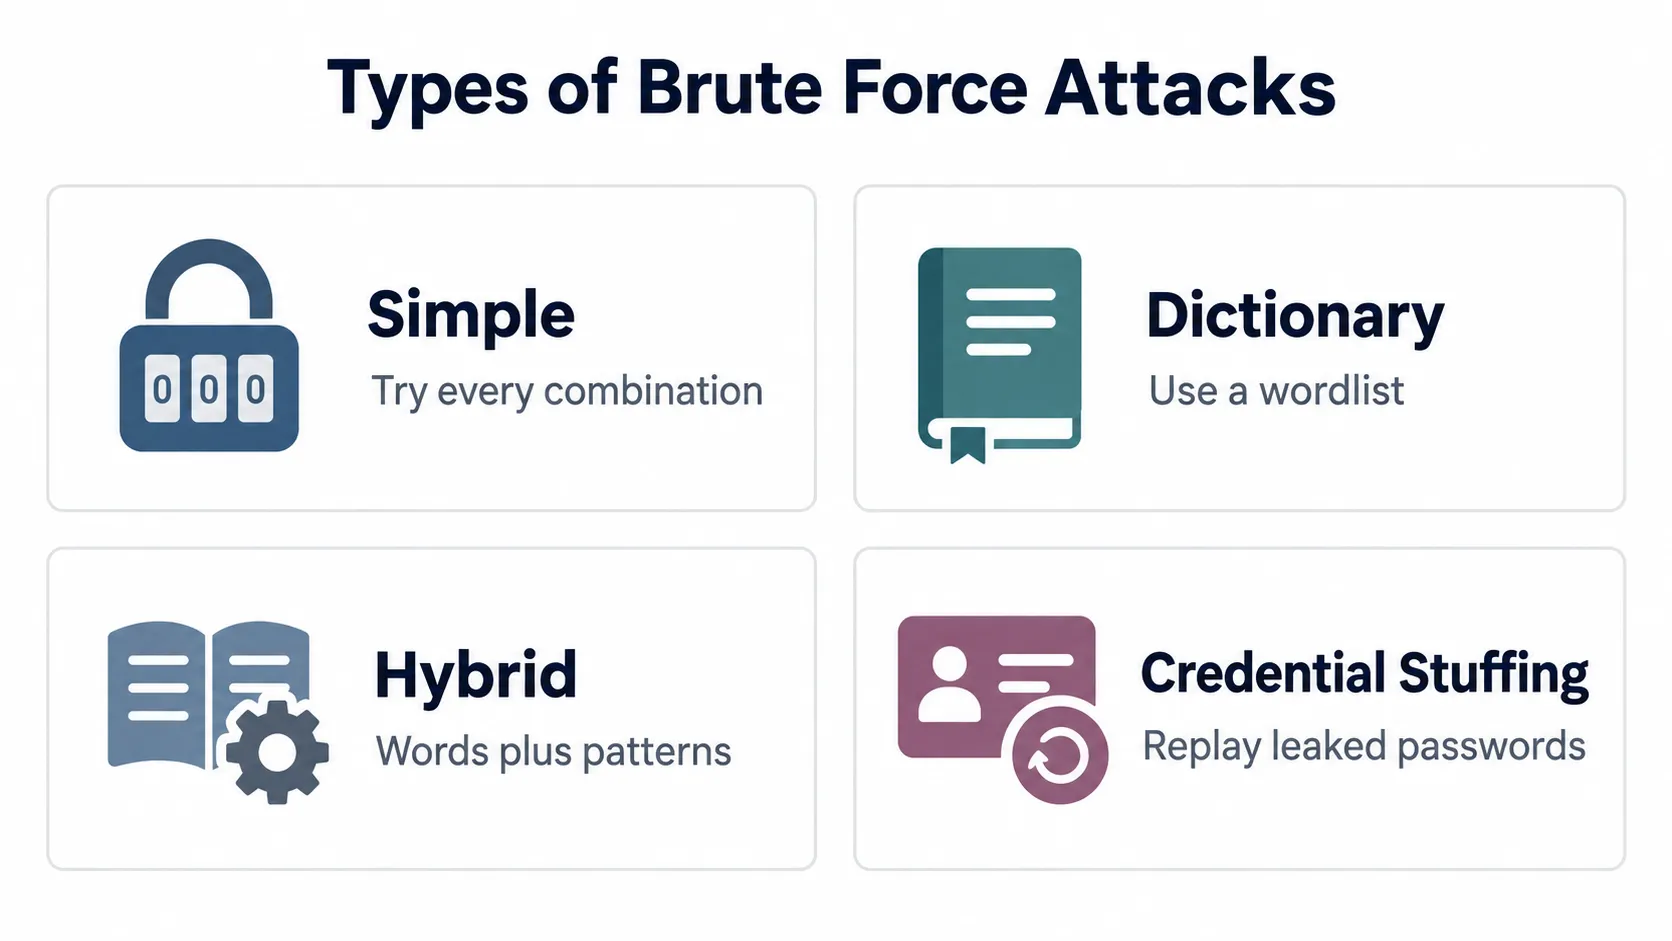
2.1 Simple Brute Force#
The attacker works through every possible combination in order.
a, b, c, ..., z
aa, ab, ac, ..., zz
aaa, aab, aac, ...Pros: guaranteed to find the password eventually. Cons: hopelessly slow against complex passwords.
2.2 Dictionary Attack#
Tries a prepared list of commonly used passwords (a wordlist).
# Common password list examples
password
123456
admin
qwerty
letmein
welcomePros: far faster than simple brute force. Cons: only works against weak, predictable passwords.
2.3 Hybrid Attack#
Combines dictionary words with common patterns and substitutions.
password -> password1, password123, password!
admin -> admin1, Admin2024, admin@2024Pros: effective against passwords built from predictable patterns. Cons: still costs time and computing power.
2.4 Credential Stuffing#
Replays leaked username/password pairs from data breaches, betting that people reuse passwords across sites.
Pros: high success rate wherever passwords are reused. Cons: depends on access to breach databases.
3. Preventing Brute Force Attacks#
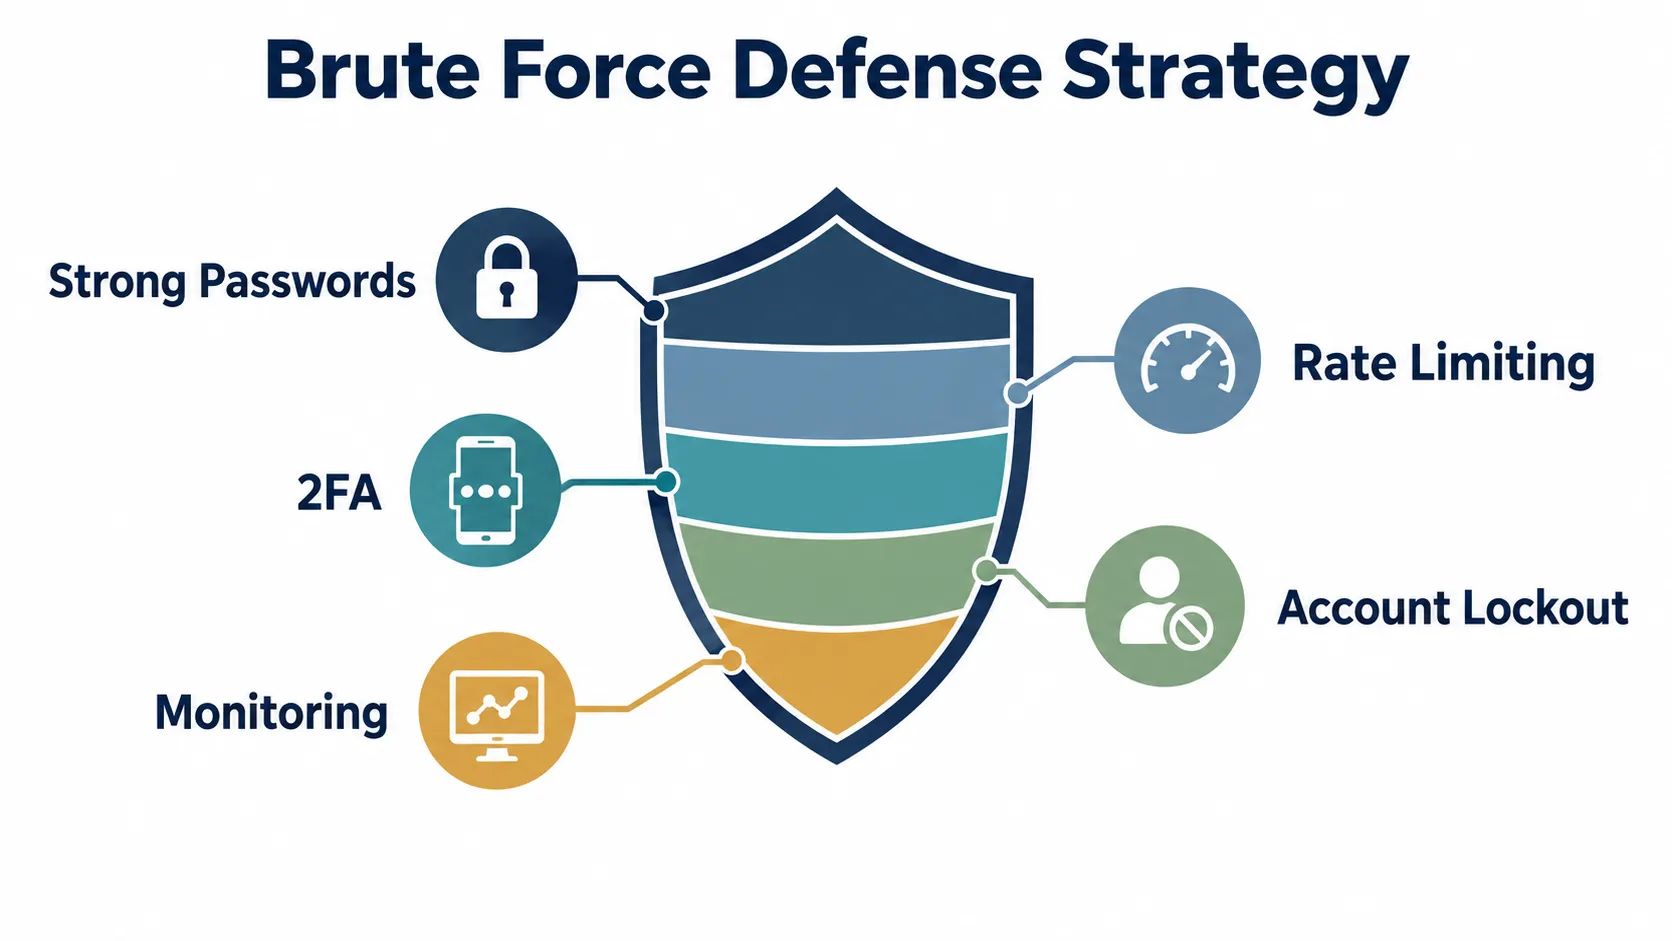
No single control stops brute force attacks on its own. Effective defense comes from layering the techniques below so that an attacker is slowed down, detected, and eventually locked out.
3.1 Use Strong, Complex Passwords#
Create passwords that are:
- Long: at least 12–16 characters
- Mixed: uppercase, lowercase, numbers, symbols
- Unique: different for each account
- Unpredictable: no dictionary words or patterns
# Bad
password123
admin2024
qwerty123

# Good
Tr0ub4dor&3Horse!

# Better (passphrase)
correct-horse-battery-staple

# Best
Use a password manager!3.2 Limit Login Attempts#
Cap how many login attempts are allowed within a given time window.
# Example rate limiting logic
if failed_attempts > 5:
    block_ip_address()
wait_time = 2 ** failed_attempts # exponential backoffImplementation methods:
- Time delays between attempts
- Temporary IP blocking after repeated failures
- CAPTCHA after multiple failures
- Progressive delays (1s, 2s, 4s, 8s, …)
3.3 Enable Two-Factor Authentication (2FA)#
Require a second form of verification on top of the password.
Factor 1: Something you KNOW -> Password
Factor 2: Something you HAVE -> Phone / Token
Factor 3: Something you ARE -> Biometric2FA methods:
- SMS OTP (One-Time Password)
- Authentication app (Google Authenticator, Authy)
- Hardware token (YubiKey)
- Biometric verification
3.4 Account Lockout Policy#
Automatically lock an account after a run of failed attempts.
| Failed Attempts | Action |
|---|---|
| 3–5 | Warning + delay |
| 5–10 | Temporary lockout (15–30 min) |
| 10+ | Extended lockout + admin notification |
Caution: lockout can be abused for denial of service — an attacker can deliberately lock every user out. Always pair it with IP-based rate limiting instead of relying on lockout alone.
3.5 Monitor and Alert#
Log suspicious activity and raise alerts on telltale patterns such as:
- Multiple failed logins from the same IP
- Logins from unusual geographic locations
- Logins at unusual times
- Simultaneous login attempts from different IPs4. Lab Setup — DVWA Installation#
Now let’s build the practical lab around DVWA (Damn Vulnerable Web Application) — a deliberately insecure web application built for security training.
4.1 Prerequisites#
- Ubuntu Linux VM from Chapter 1
- Firefox browser installed on Ubuntu
- Internet connection on the VM
4.2 Start Your Ubuntu VM#
In VirtualBox, double-click the Ubuntu Linux VM to start it.
4.3 SSH Access for Easier Command Copying#
💡 Pro Tip: Connecting over SSH from your host machine makes it far easier to copy commands straight out of this tutorial.
Constantly switching between your browser (for reading) and the VM terminal (for typing) is tedious. SSH lets you read the tutorial on your host machine and run the commands in the Ubuntu VM at the same time.
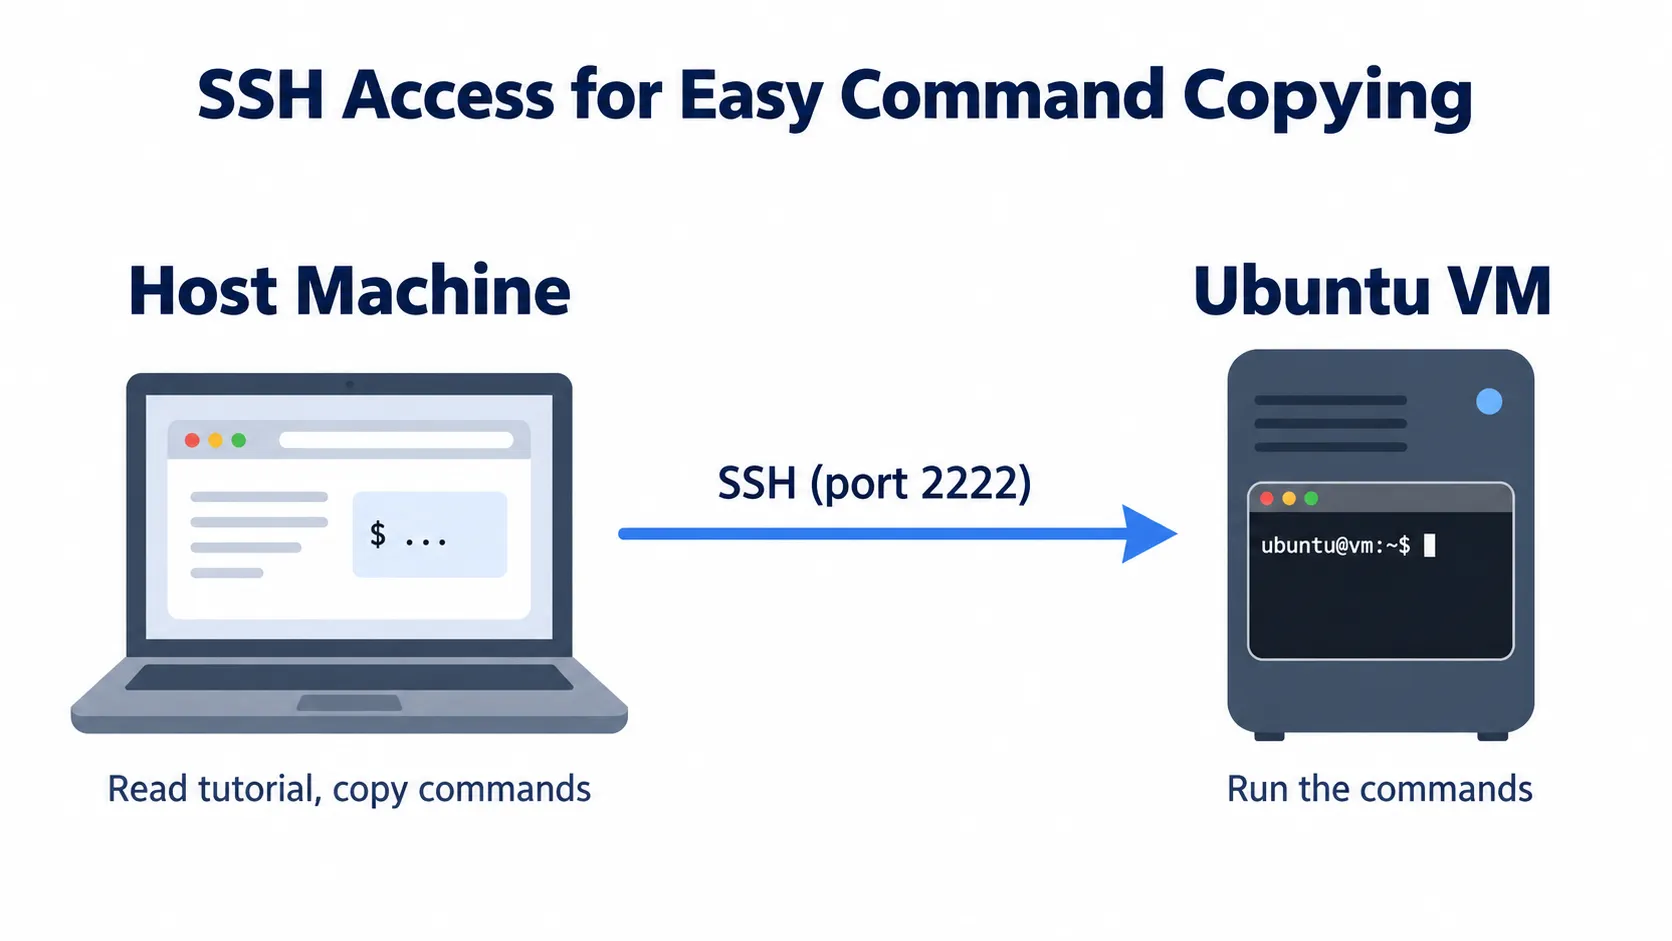
Benefits:
- ✅ Copy-paste commands directly from the browser
- ✅ Read the tutorial on your larger host screen
- ✅ Keep browser and terminal in separate windows
- ✅ No need to switch between VM windows
Verify SSH is running (you configured SSH in Chapter 1):
sudo service ssh statusExpected output:
● ssh.service - OpenBSD Secure Shell server
     Loaded: loaded (/usr/systemd/system/ssh.service; enabled)
Active: active (running)If it isn’t running, start it and enable it so it survives reboots:
sudo service ssh start
sudo systemctl enable sshConnect from your host machine. On Windows (Command Prompt or PowerShell), macOS, or Linux (Terminal), the command is the same:
ssh -p 2222 your_username@localhostReplace your_username with your Ubuntu username (e.g. u6090059) and enter your Ubuntu password when prompted. Once connected, your prompt changes to:
your_username@your_hostname:~$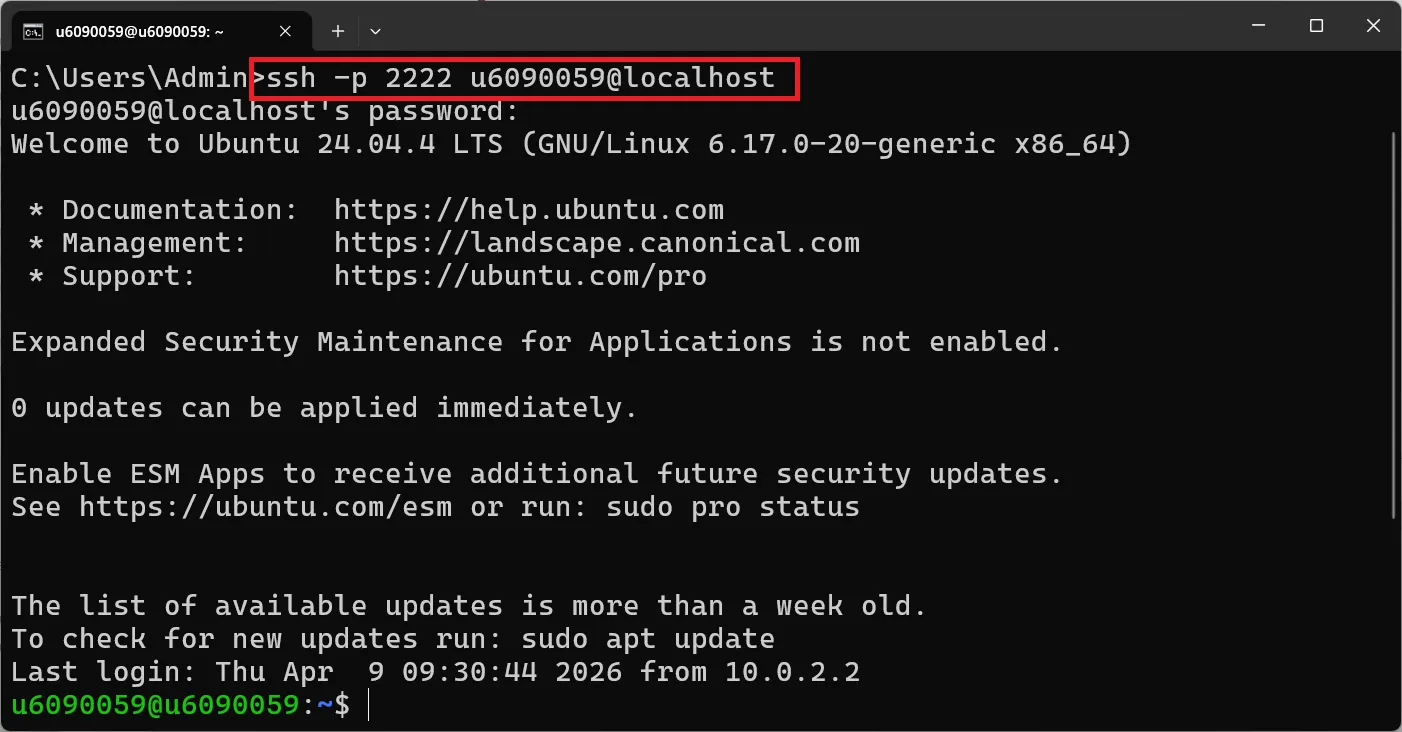
Quick SSH reference:
| Task | Command |
|---|---|
| Connect to VM | ssh -p 2222 user@localhost |
| Exit SSH session | exit or Ctrl + D |
| Copy from browser | Highlight text, Ctrl + C |
| Paste in terminal | Ctrl + Shift + V (Linux) or right-click paste |
Test your connection. Once connected via SSH, run:
pwd
whoami
uname -aExpected output:
/home/your_username
your_username
Linux your_hostname 6.5.0-... #ubuntu SMP ...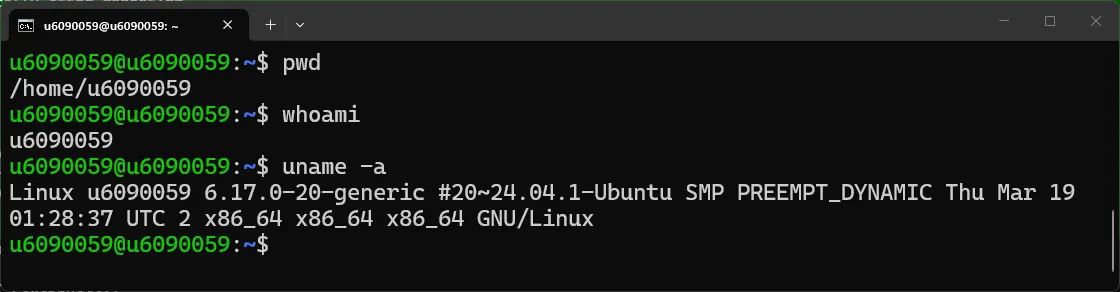
🎯 From here on, every command in this tutorial assumes you’re connected over SSH, so you can copy-paste it straight from your browser into the terminal.
4.4 Install Apache, MariaDB, and PHP#
Update your system first:
sudo apt update
sudo apt upgrade -yInstall the required dependencies:
sudo apt install -y apache2 mariadb-server php php-mysql php-gd libapache2-mod-phpVerify Apache is running:
sudo systemctl status apache2Expected output:
● apache2.service - The Apache HTTP Server
     Loaded: loaded (/lib/systemd/system/apache2.service; enabled)
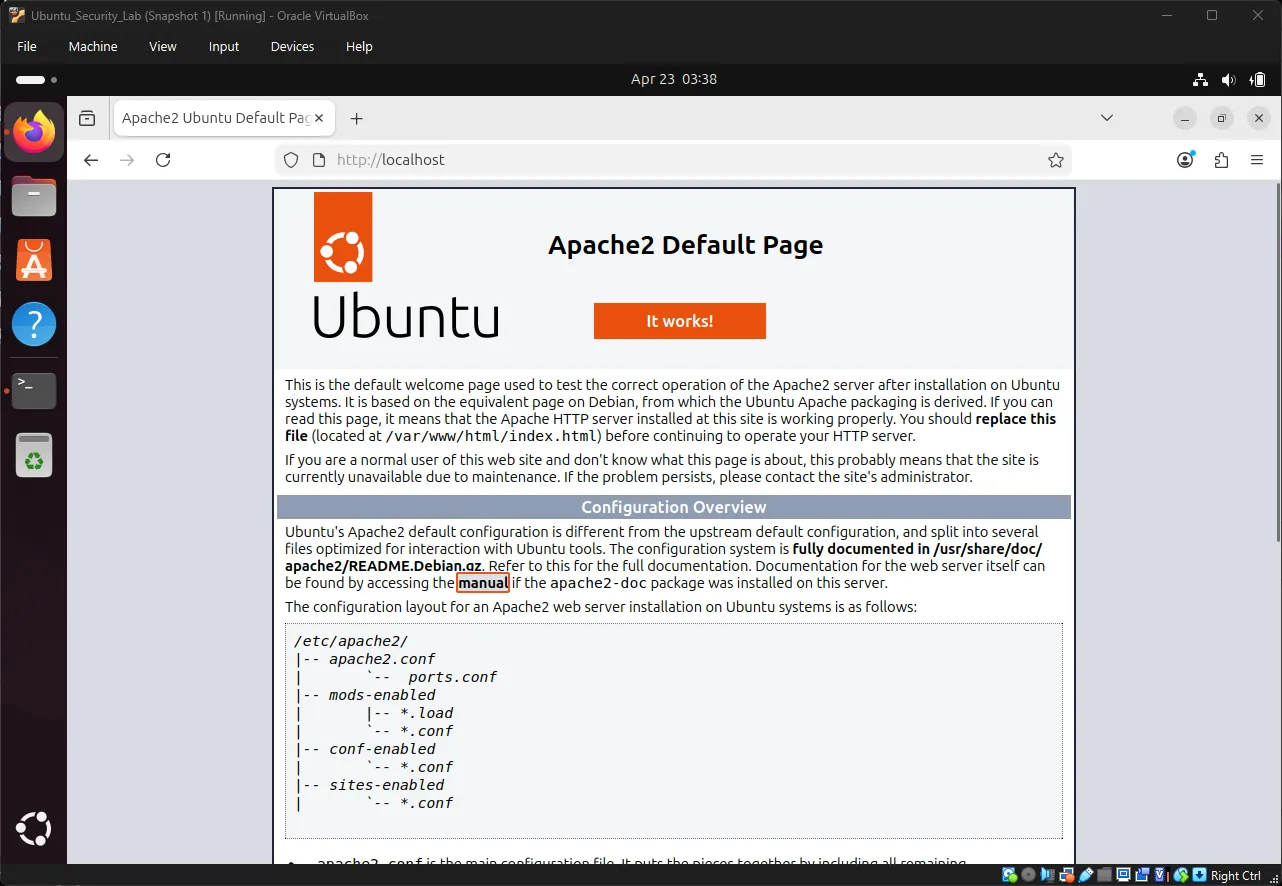
Active: active (running) since ...Open Firefox in the Ubuntu VM and go to http://localhost ↗ — the Apache2 Ubuntu Default Page confirms Apache is working.
4.5 Understand Apache with a First Web Page#
Apache is web server software that serves files over HTTP. When you visit http://localhost, Apache looks in /var/www/html/ and sends the matching file back to your browser.
Browser Request: http://localhost/test/
         |
Apache receives request
         |
Looks for: /var/www/html/test/index.html
         |
Sends file back to browserLet’s create a simple page to see this in action. Make a test directory and an HTML file:
sudo mkdir -p /var/www/html/test
sudo nano /var/www/html/test/index.htmlAdd the following content:
<!DOCTYPE html>
<html>
<head>
    <title>My Test Page</title>
</head>
<body>
    <h1>Hello World</h1>
    <p>This is my first web page on Apache!</p>
</body>
</html>Press Ctrl + O, Enter, then Ctrl + X to save and exit. Set proper ownership and permissions:
sudo chown -R www-data:www-data /var/www/html/test
sudo chmod -R 755 /var/www/html/testIn Firefox (inside the Ubuntu VM), go to http://localhost/test/ ↗ — the “Hello World” heading and text should appear.
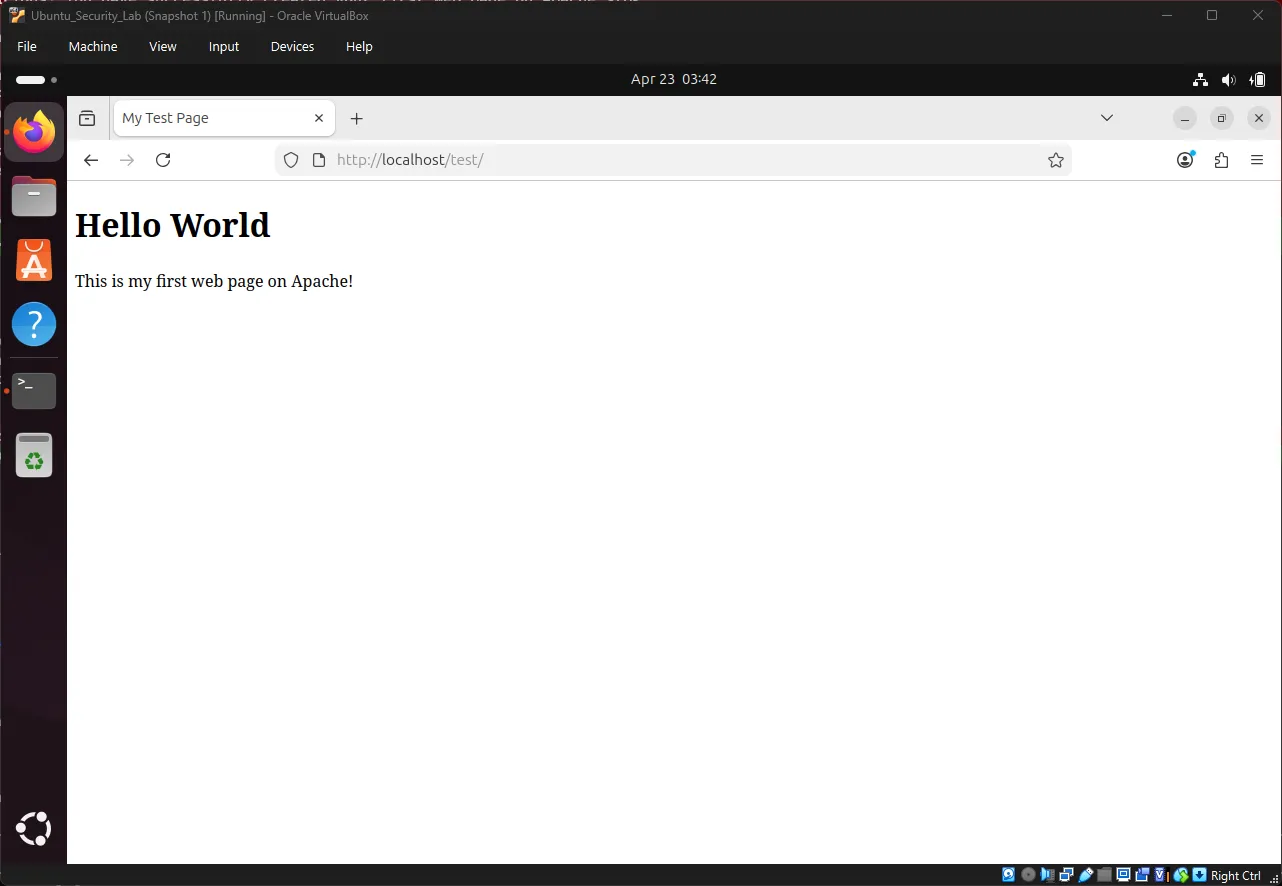
💡 Key Concept: URLs map directly to the file system.
http://localhost/test/maps to/var/www/html/test/, where Apache servesindex.htmlautomatically. DVWA works exactly the same way —http://10.0.2.15/dvwa/maps to/var/www/html/dvwa/. Replace10.0.2.15with your actual IP address.
4.6 Download and Configure DVWA#
Install git, then clone DVWA into Apache’s web root:
sudo apt install git -y
cd /var/www/html
sudo git clone https://github.com/digininja/DVWA.git dvwa
sudo chown -R www-data:www-data /var/www/html/dvwaCreate the DVWA config file from the template and edit it:
cd /var/www/html/dvwa/config
sudo cp config.inc.php.dist config.inc.php
sudo nano config.inc.phpLocate the database password line and make sure it matches the password you’ll set in the next step:
$_DVWA[ 'db_password' ] = getenv('DB_PASSWORD') ?: 'p@ssw0rd';Press Ctrl + O, Enter, then Ctrl + X to save. Set permissions on the writable paths:
sudo chmod 666 /var/www/html/dvwa/hackable/uploads/
sudo chmod 666 /var/www/html/dvwa/config/config.inc.phpEnable allow_url_include in PHP:
sudo nano /etc/php/8.1/apache2/php.iniPress Ctrl + W, type allow_url_include, and press Enter to jump straight to the setting. Change:
allow_url_include = Offto:
allow_url_include = OnSave with Ctrl + O, Enter, Ctrl + X, then restart Apache:
sudo systemctl restart apache24.7 Create the Database and User#
Open the MariaDB shell:
sudo mysqlAt the prompt, create the database and user — the password must match the one in config.inc.php:
CREATE DATABASE dvwa;
CREATE USER 'dvwa'@'localhost' IDENTIFIED BY 'p@ssw0rd';
GRANT ALL PRIVILEGES ON dvwa.* TO 'dvwa'@'localhost';
FLUSH PRIVILEGES;
EXIT;Note: MariaDB is a drop-in replacement for MySQL, so these commands work identically.
4.8 Access DVWA#
Find your VM’s IP address. First install net-tools, which provides ifconfig:
sudo apt install net-tools -y
ifconfigLook for an address such as 10.0.2.15 or 192.168.56.x.
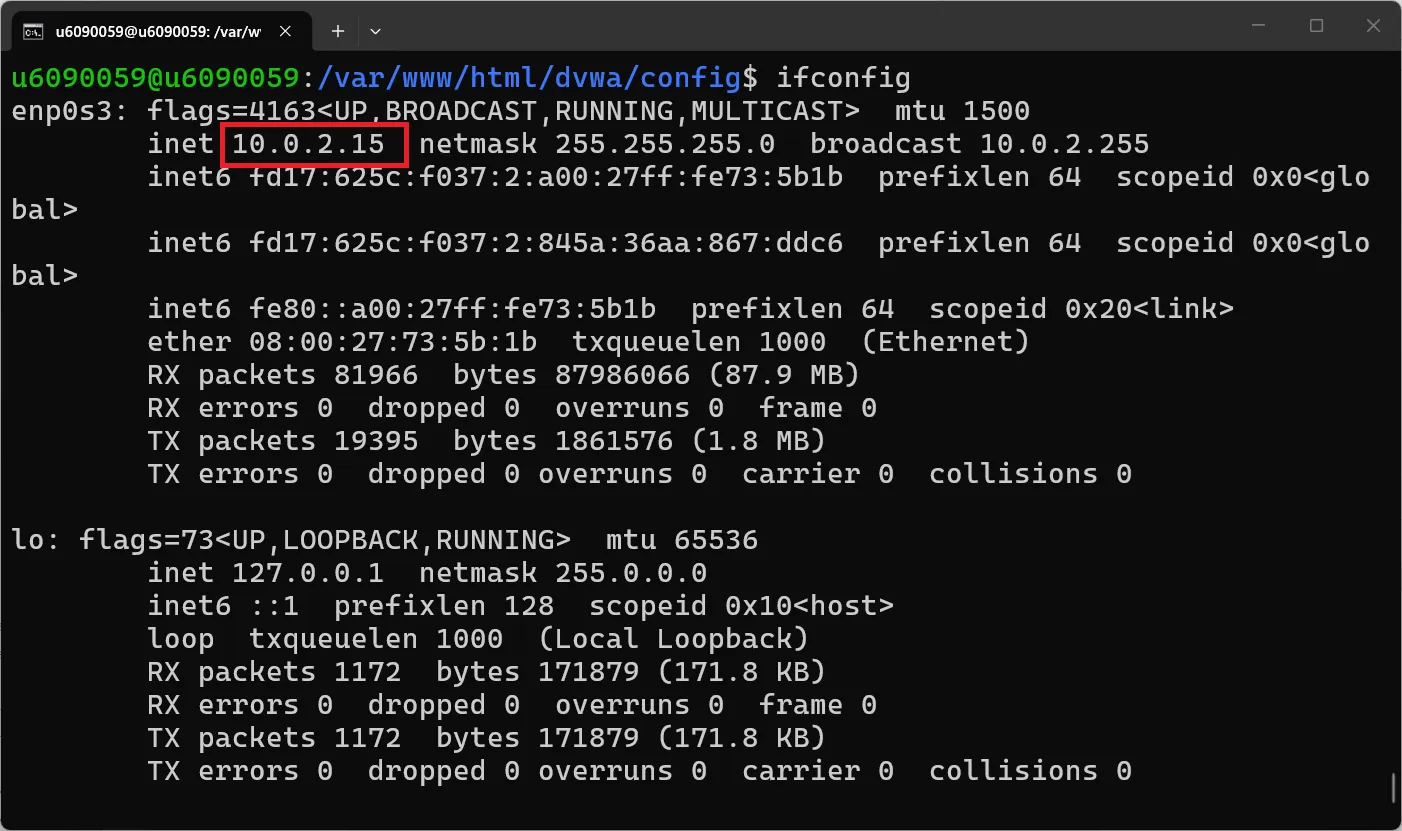
Open Firefox in Ubuntu and navigate to http://10.0.2.15/dvwa/setup.php ↗
Note: Replace
10.0.2.15with your actual IP address. When working inside the VM, http://localhost/dvwa/setup.php ↗ works too.
Click Create / Reset Database to initialize DVWA. This builds all the required tables and fills them with demo data.
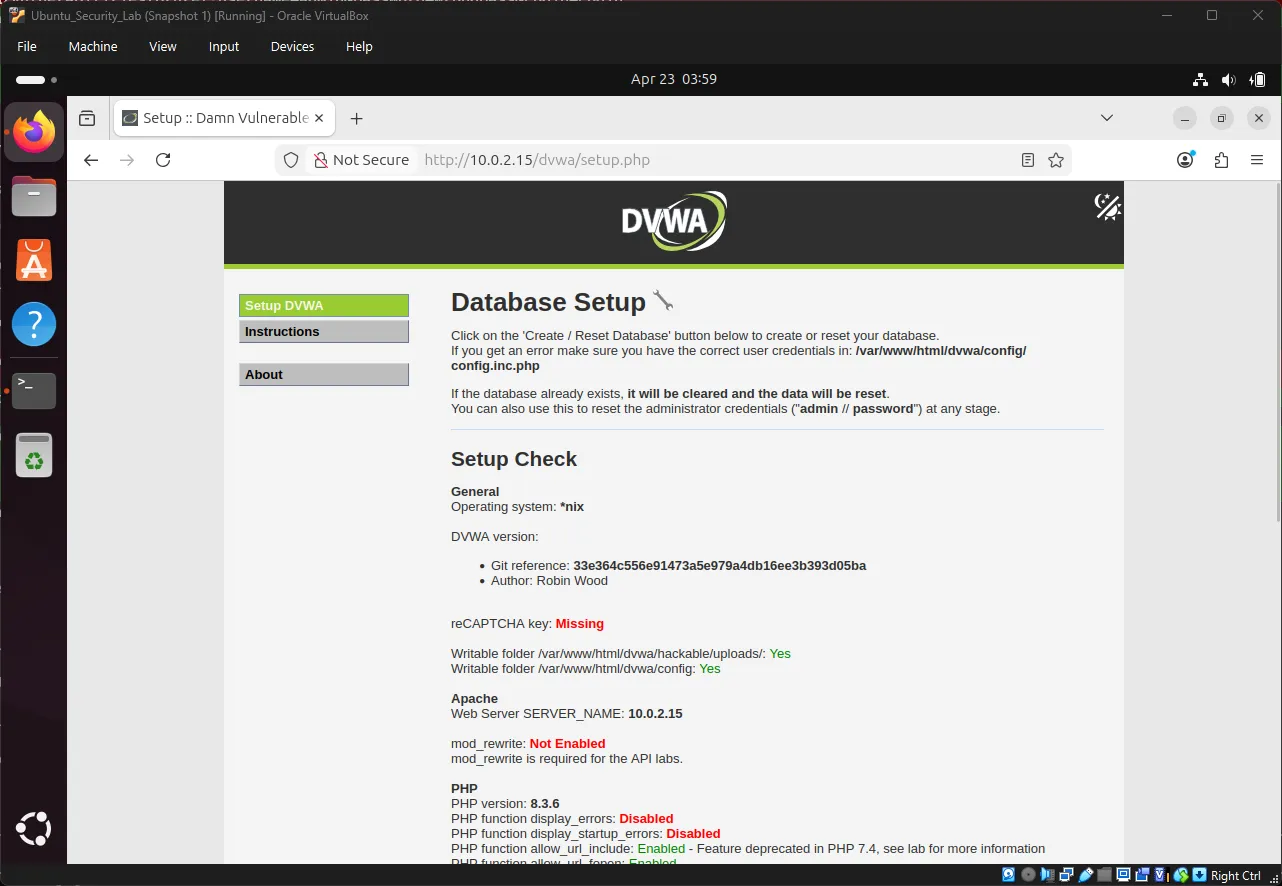
Note: If you hit errors, double-check that the credentials in
config.inc.phpmatch the database user you created in step 4.7.
Now log in to DVWA:
URL:      http://10.0.2.15/dvwa/login.php
Username: admin
Password: password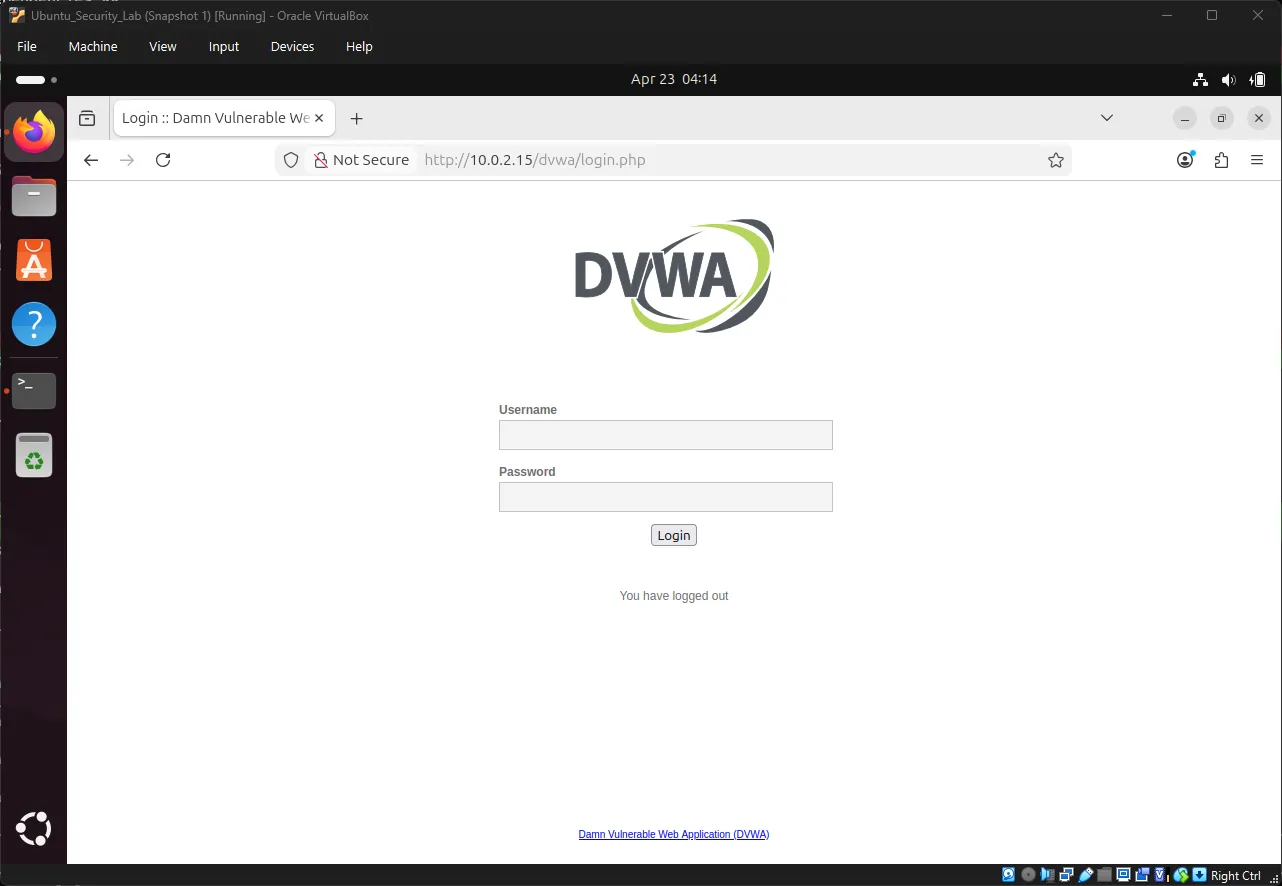
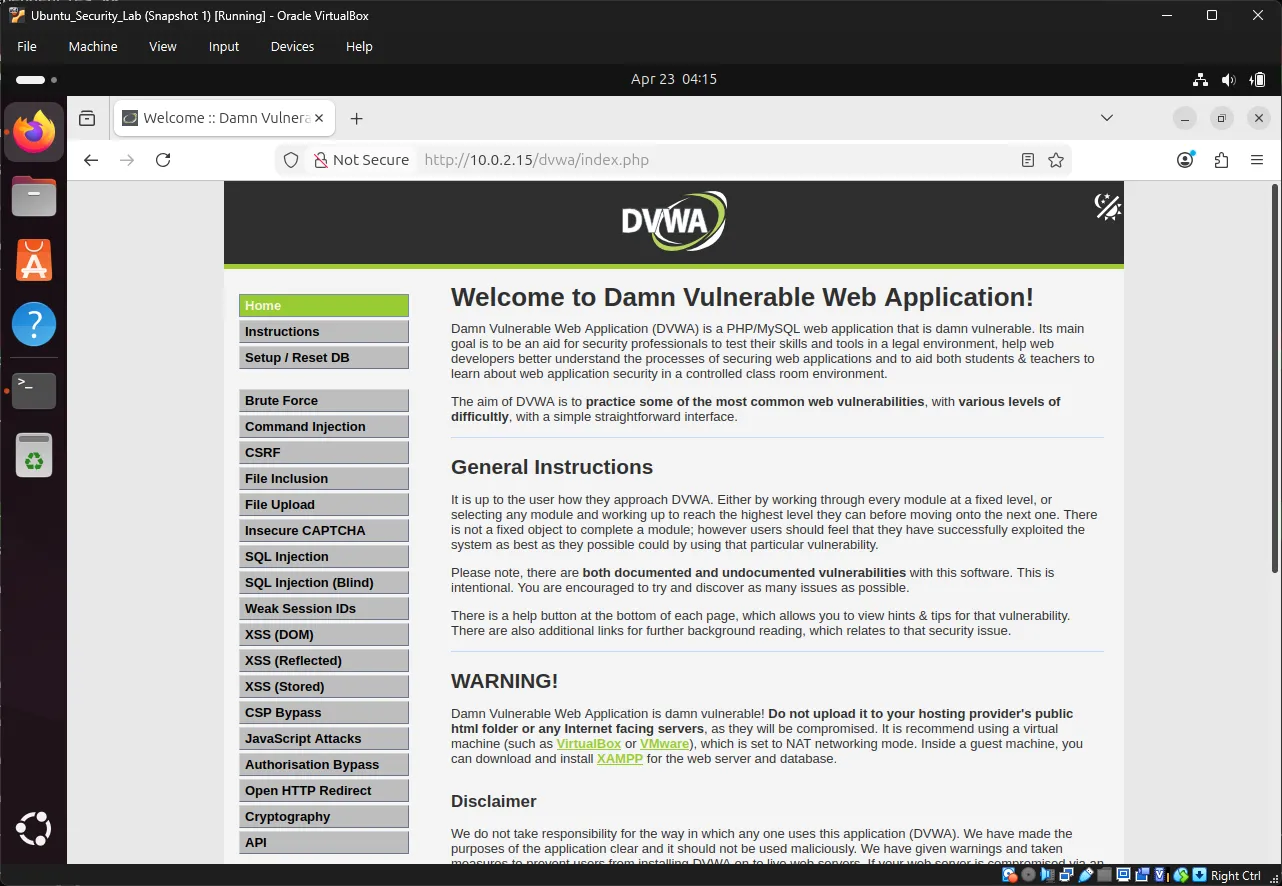
5. Understanding the Brute Force Vulnerability#
5.1 Explore the DVWA Brute Force Module#
Go to http://10.0.2.15/dvwa/security.php ↗, set the security level to Low, and click Submit.
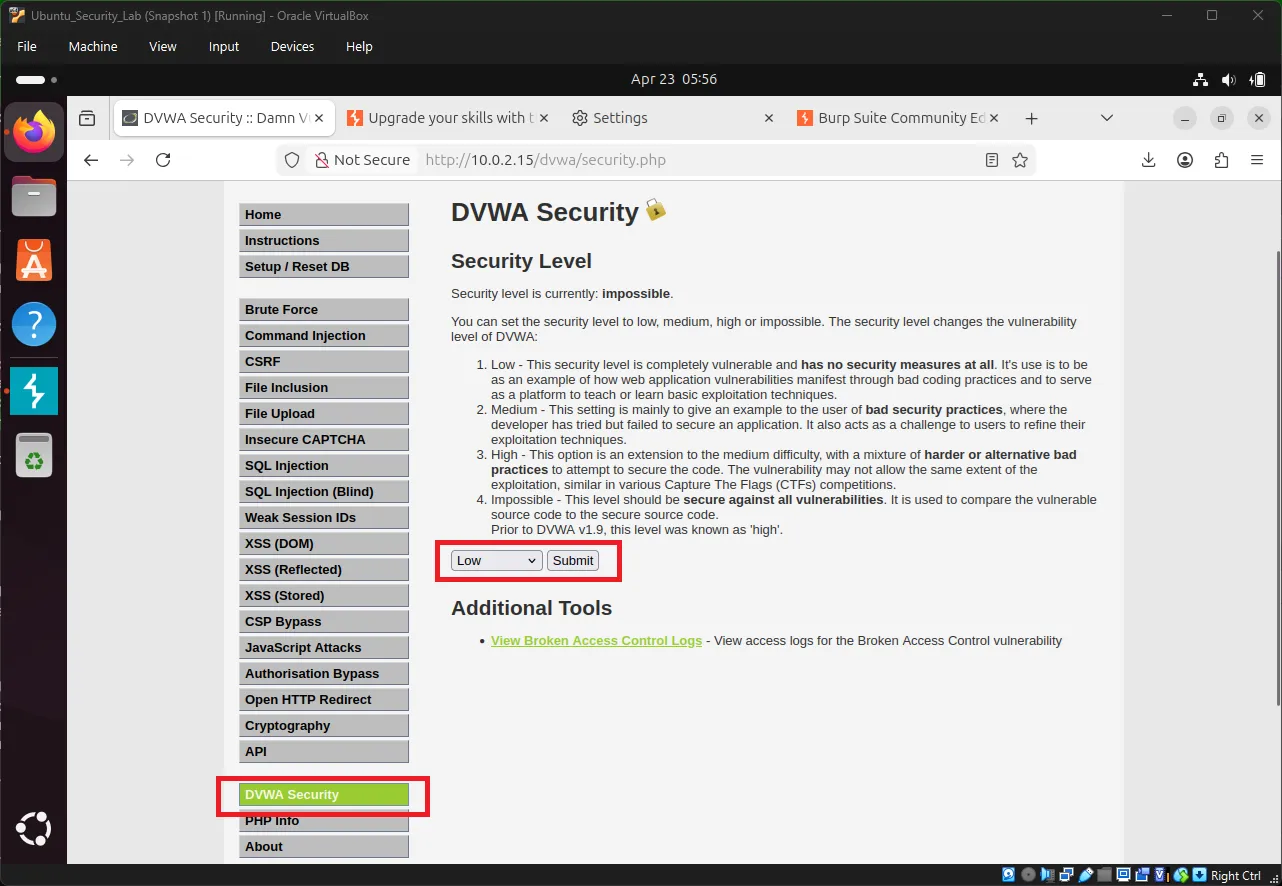
Note: DVWA has four security levels (Low, Medium, High, Impossible). We start with Low because its near-total lack of controls makes the attack easy to follow.
Then go to http://10.0.2.15/dvwa/vulnerabilities/brute/ ↗ and log in with the known credentials:
Username: admin
Password: passwordA success message confirms the login. Now log out and try a wrong password:
Username: admin
Password: wrongpassNotice what shows up in the URL:
http://10.0.2.15/dvwa/vulnerabilities/brute/?username=admin&password=wrongpass&Login=LoginNote: Replace
10.0.2.15with your actual IP address — the URL will show your own IP.
Key observation: the username and password travel in a GET request as URL query parameters. That makes them trivial to read, intercept, and manipulate.
5.2 GET vs POST#
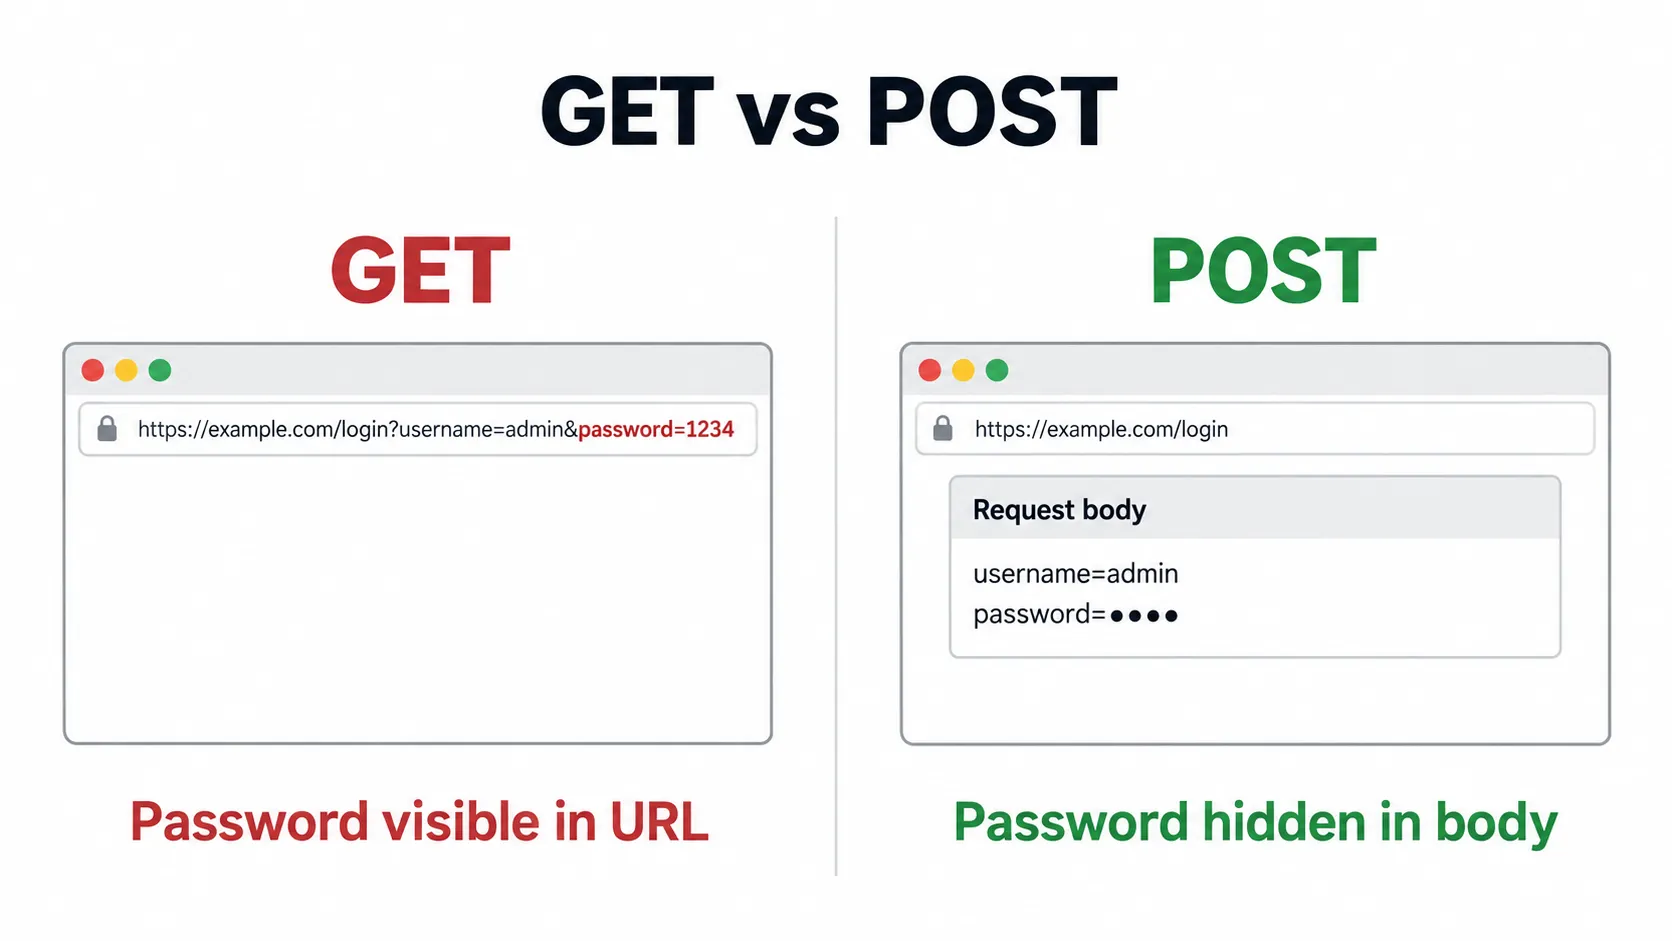
| Method | How Data is Sent | Security | Visibility |
|---|---|---|---|
| GET | In URL query params | Less secure | Visible in URL, history, logs |
| POST | In request body | More secure | Not visible in URL |
# GET request (what DVWA Low uses)
GET /dvwa/vulnerabilities/brute/?username=admin&password=wrongpass HTTP/1.1

# POST request (more secure)
POST /dvwa/vulnerabilities/brute/ HTTP/1.1
Content-Type: application/x-www-form-urlencoded

username=admin&password=wrongpass6. Installing Burp Suite Community Edition#
Burp Suite is the industry-standard intercepting proxy for web application security testing.
6.1 Download Burp Suite#
In Firefox on Ubuntu, open https://portswigger.net/burp/communitydownload ↗ and download the Linux version (a shell script installer).
6.2 Install Burp Suite#
Navigate to your Downloads folder, make the installer executable, and run it:
cd ~/Downloads
ls -l burp*
sudo chmod +x burpsuite_community_*.sh
./burpsuite_community_*.shWork through the installation wizard, accepting the prompts.
6.3 Launch Burp Suite#
There are two ways to start Burp Suite.
Method 1 — Ubuntu Applications:
- Click the Show Applications button (grid icon) at the bottom left
- Type
Burp Suitein the search bar - Click Burp Suite to launch
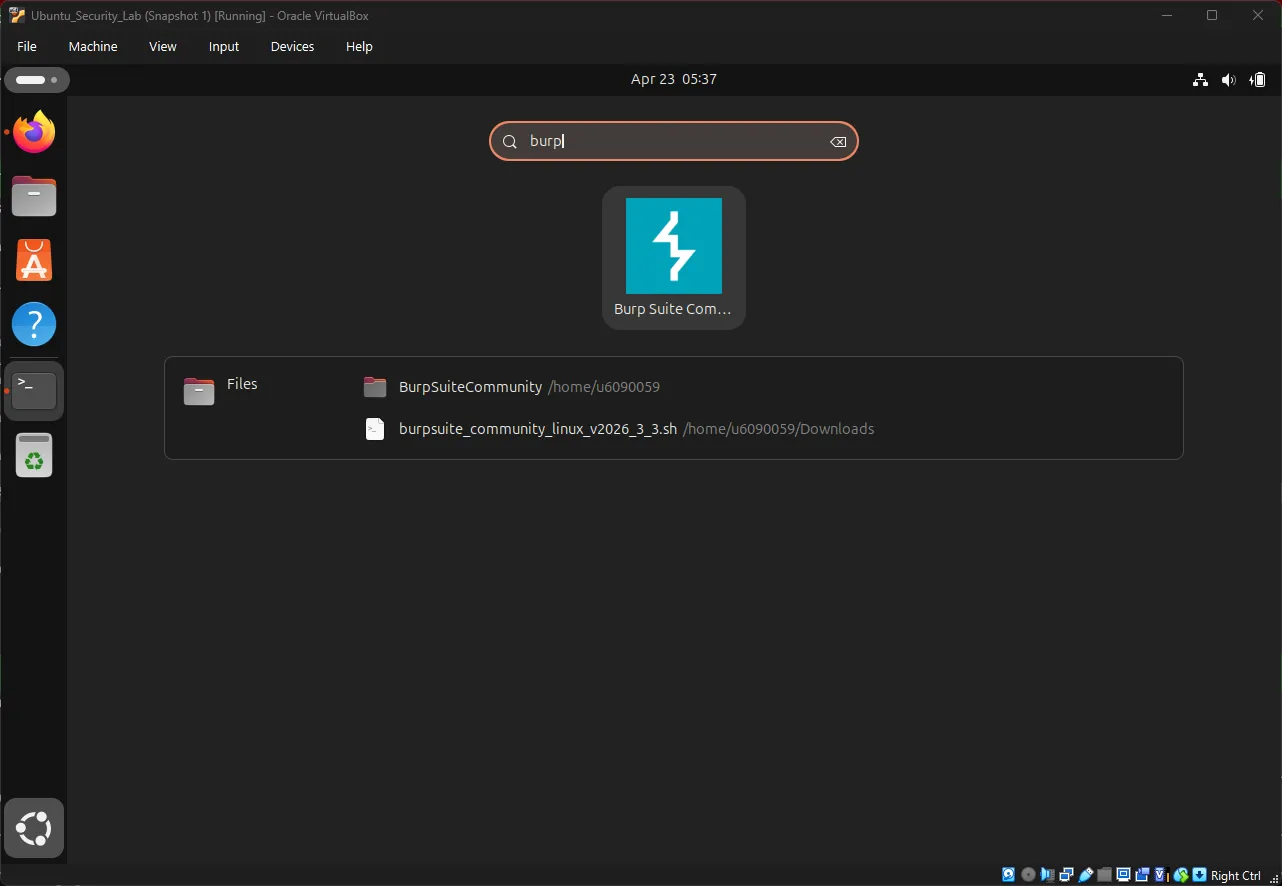
Method 2 — command line:
cd /opt/BurpSuiteCommunity
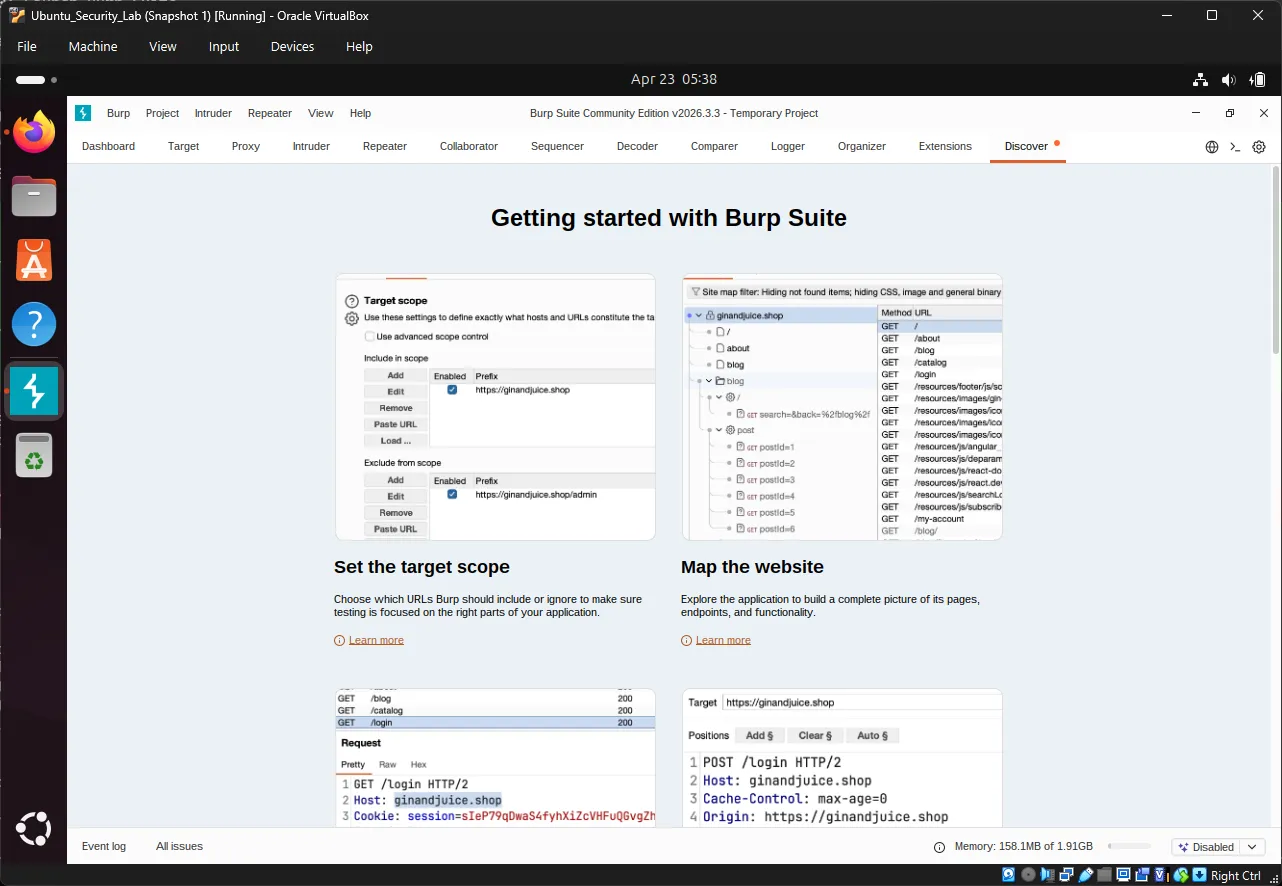
./burpsuiteIn the startup wizard, click Next, select Use Burp defaults, then click Start Burp to open the main interface.
6.4 Configure Firefox Proxy#
Open Firefox in Ubuntu and route its traffic through Burp so the proxy can see it:
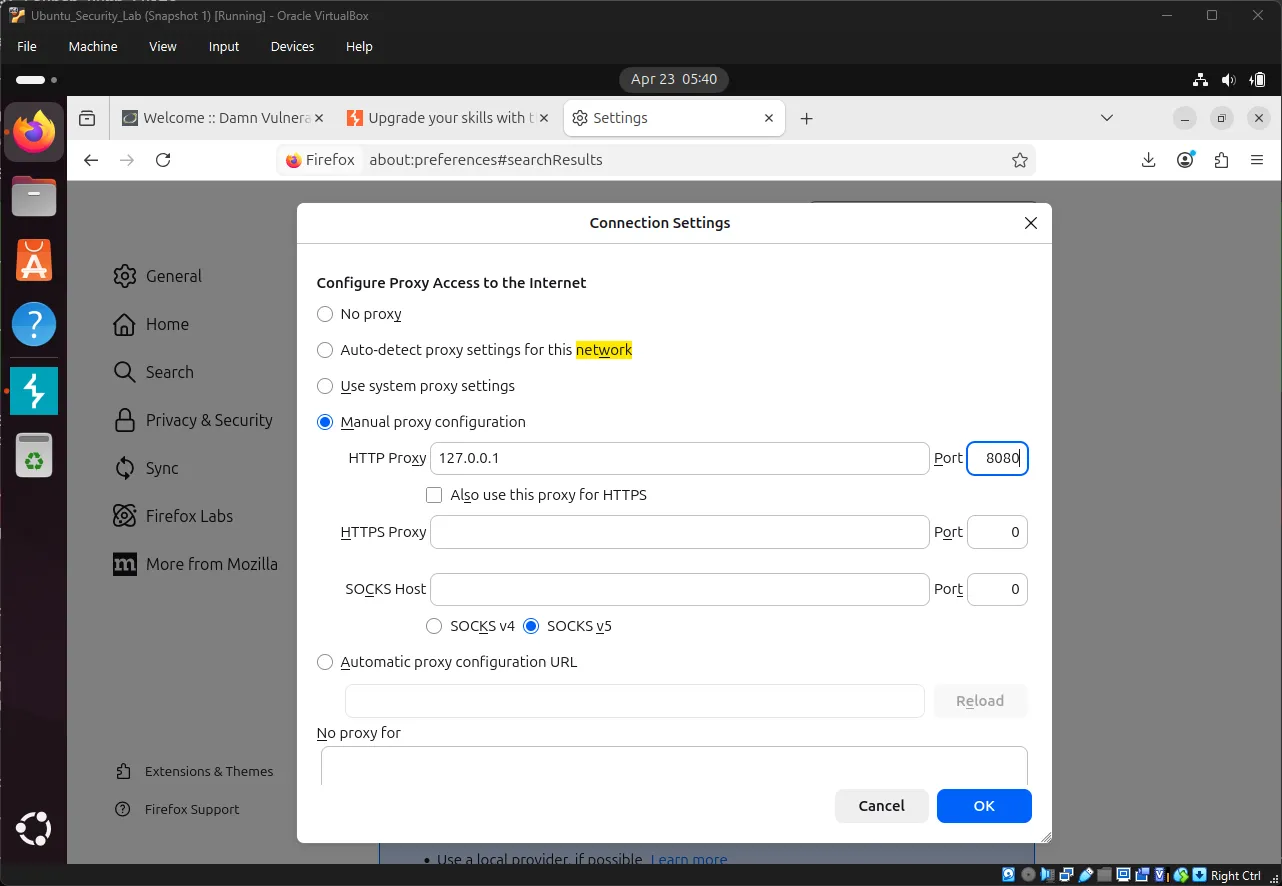
- Click the menu button (three lines)
- Go to Settings → Network Settings and click Settings
- Select Manual proxy configuration
- Set HTTP Proxy to
127.0.0.1and Port to8080 - Check Use this proxy for all protocols
- Click OK
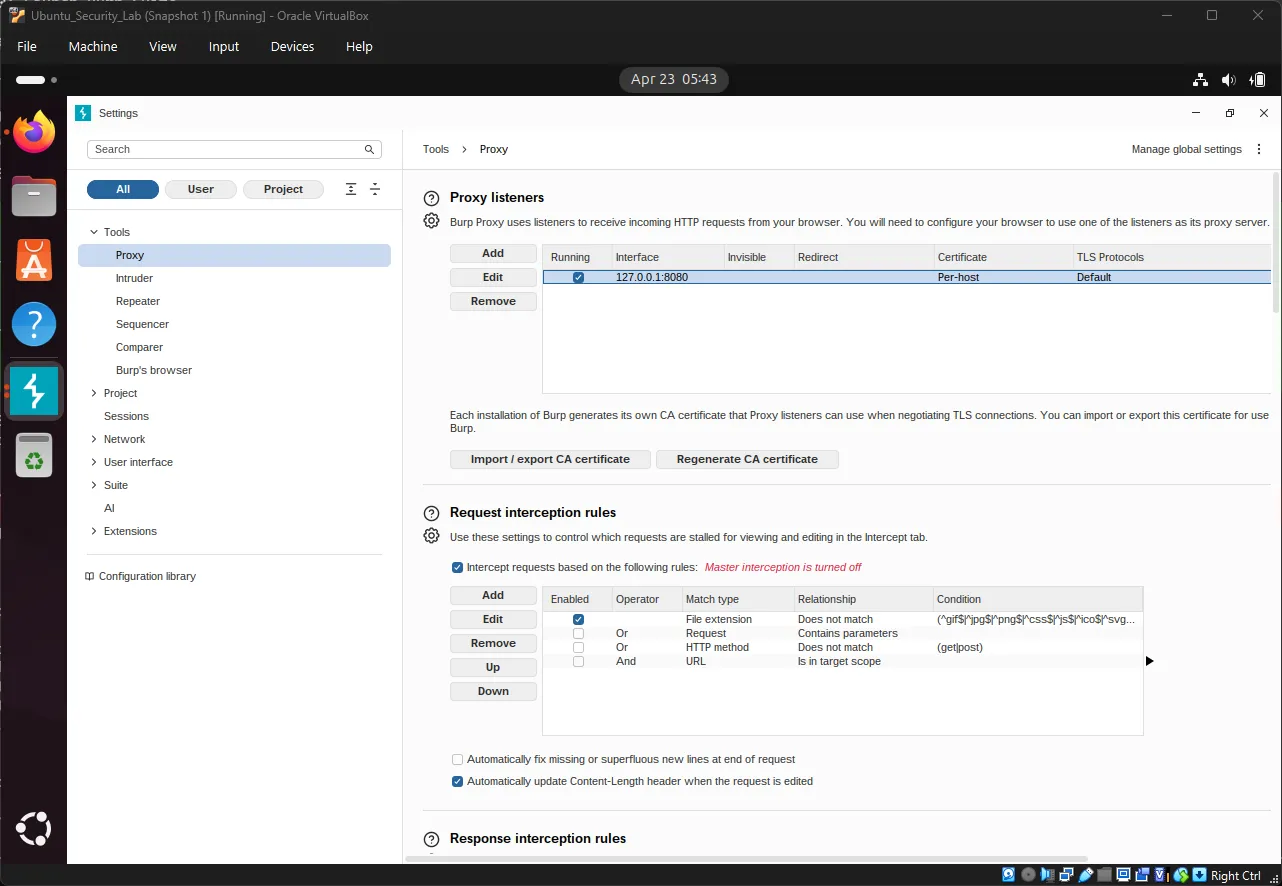
Verify the listener in Burp Suite under Proxy → Proxy settings → Proxy:
- Interface:
127.0.0.1 - Port:
8080 - Running: ✓ (green checkmark)
6.5 Install Burp Suite CA Certificate#
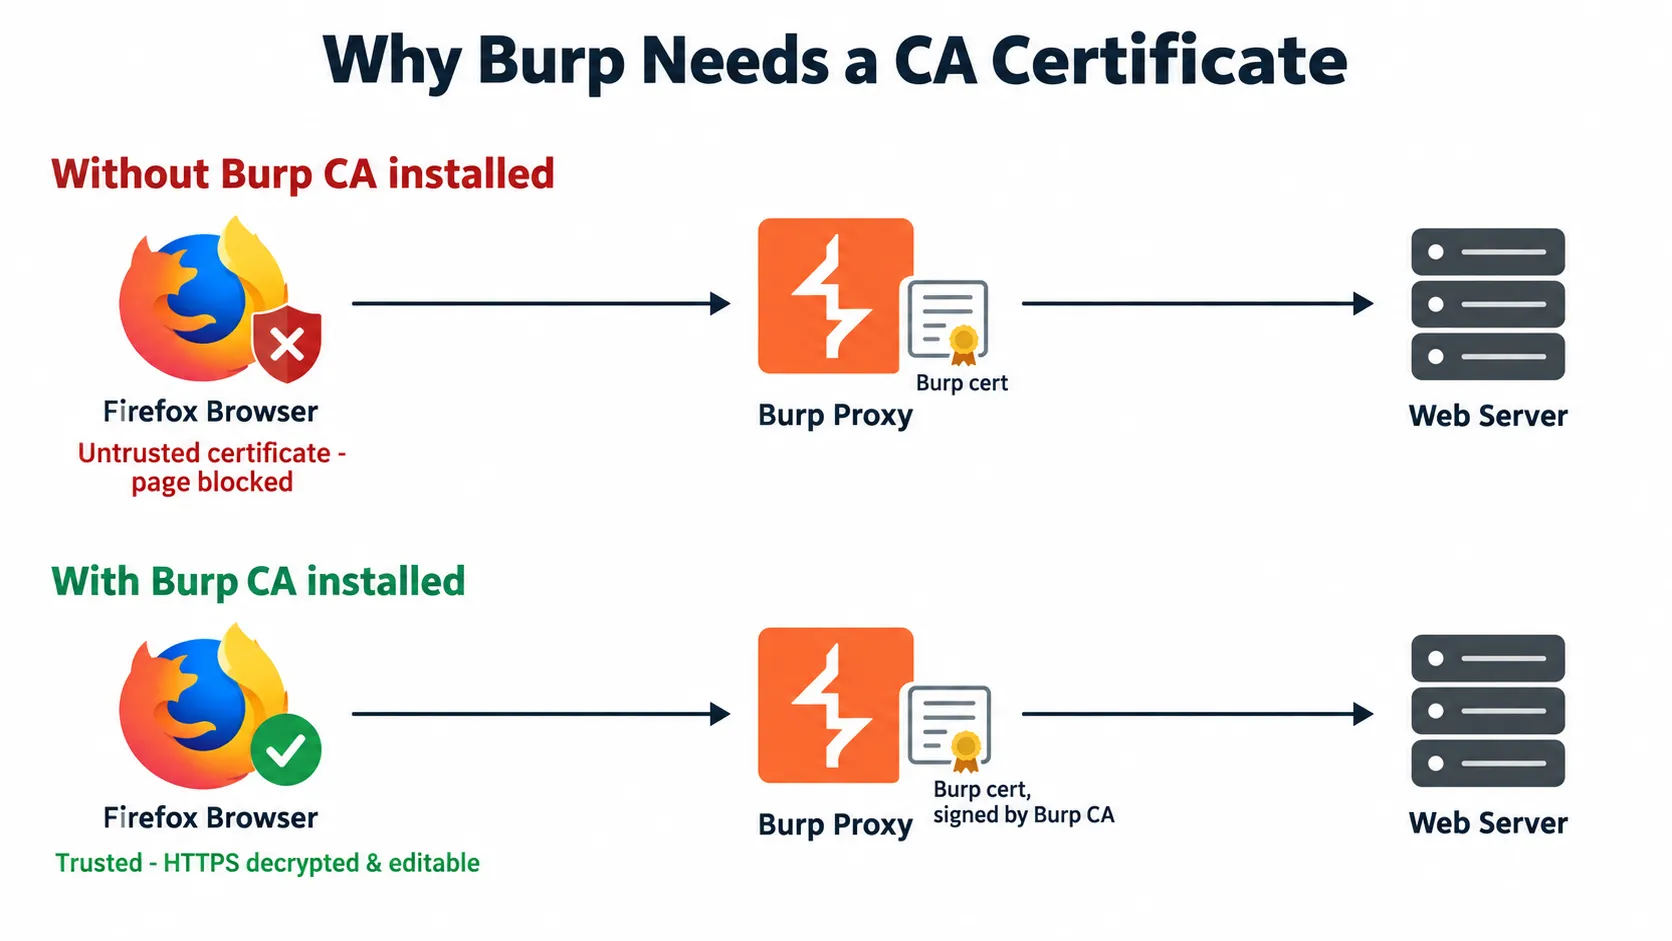
To intercept HTTPS traffic, Firefox must trust Burp’s certificate.
A browser only trusts an HTTPS site if its certificate is signed by a Certificate Authority (CA) it knows. But Burp is a man-in-the-middle — it forges a fresh certificate for each site, signed by Burp’s own CA, which Firefox doesn’t recognize, so it shows a warning and blocks the page. Installing Burp’s CA makes Firefox trust anything Burp signs, so HTTPS loads normally while Burp still reads and edits the traffic.
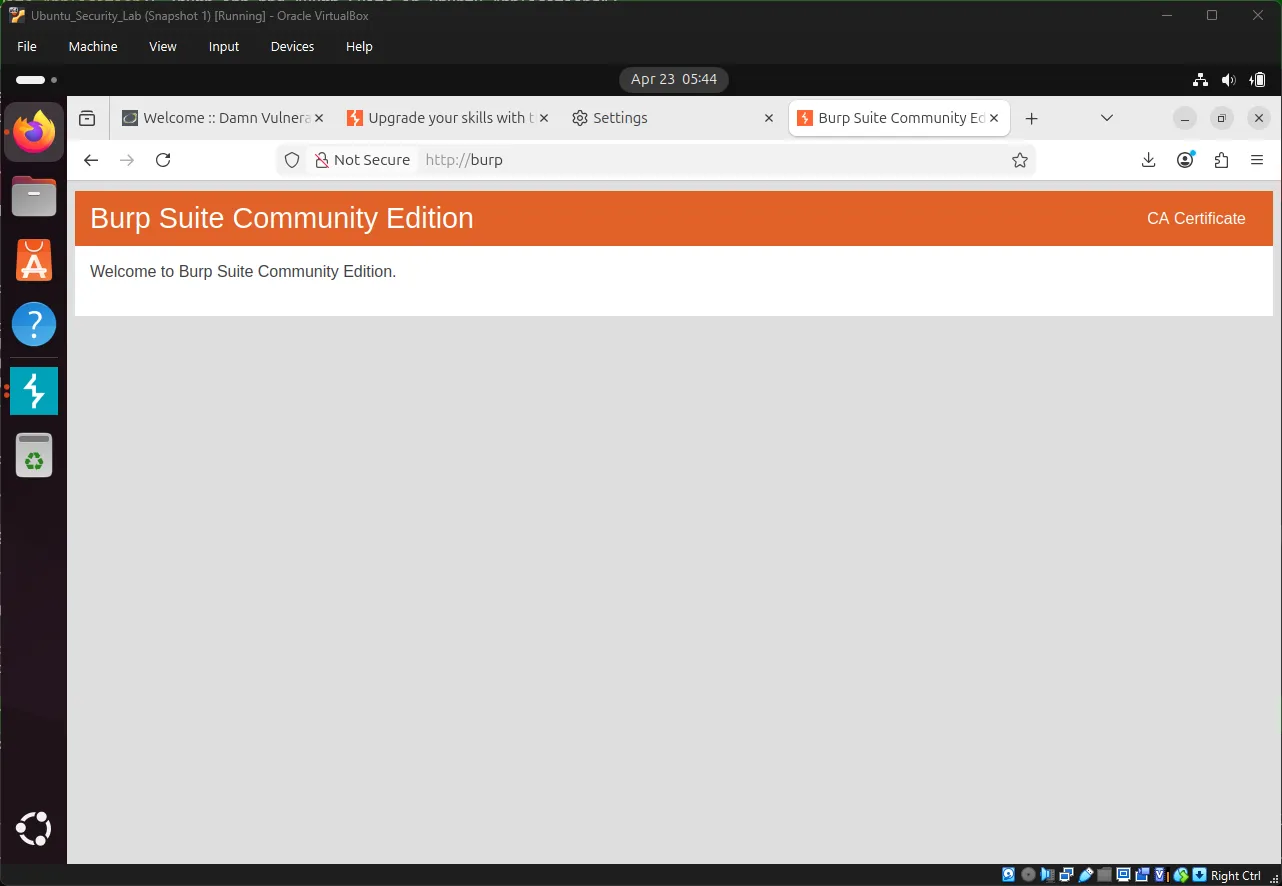
In Firefox, go to http://burp ↗, click CA Certificate, and save the file as cacert.der.
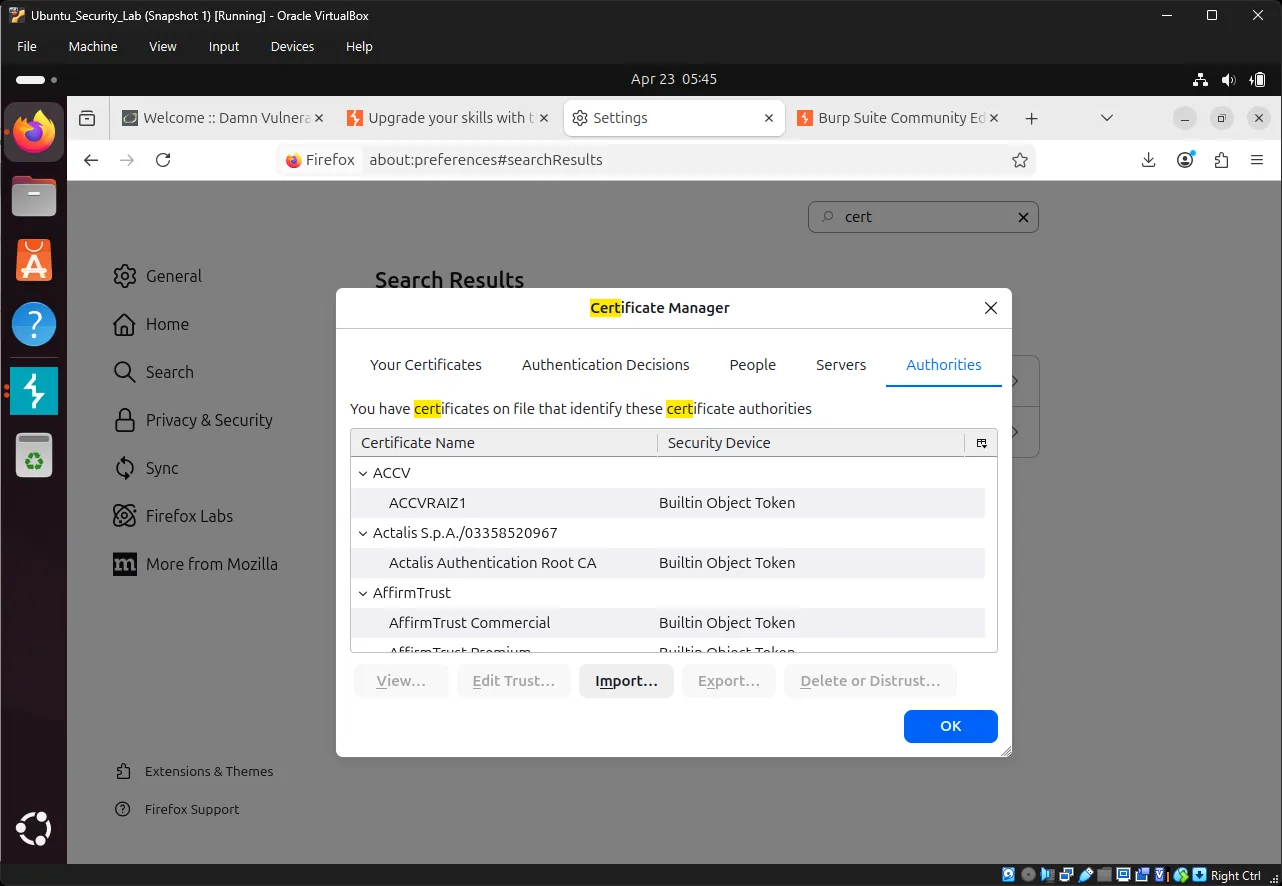
Then import it:
- In Firefox, go to Settings → Privacy & Security
- Scroll to Certificates and click View Certificates
- Go to the Authorities tab and click Import
- Select
cacert.der - Check Trust this CA to identify websites
- Click OK
7. Intercepting Requests with Burp Suite#
⚠️ Before proceeding: make sure your DVWA security level is set to Low. Check http://10.0.2.15/dvwa/security.php ↗ before continuing.
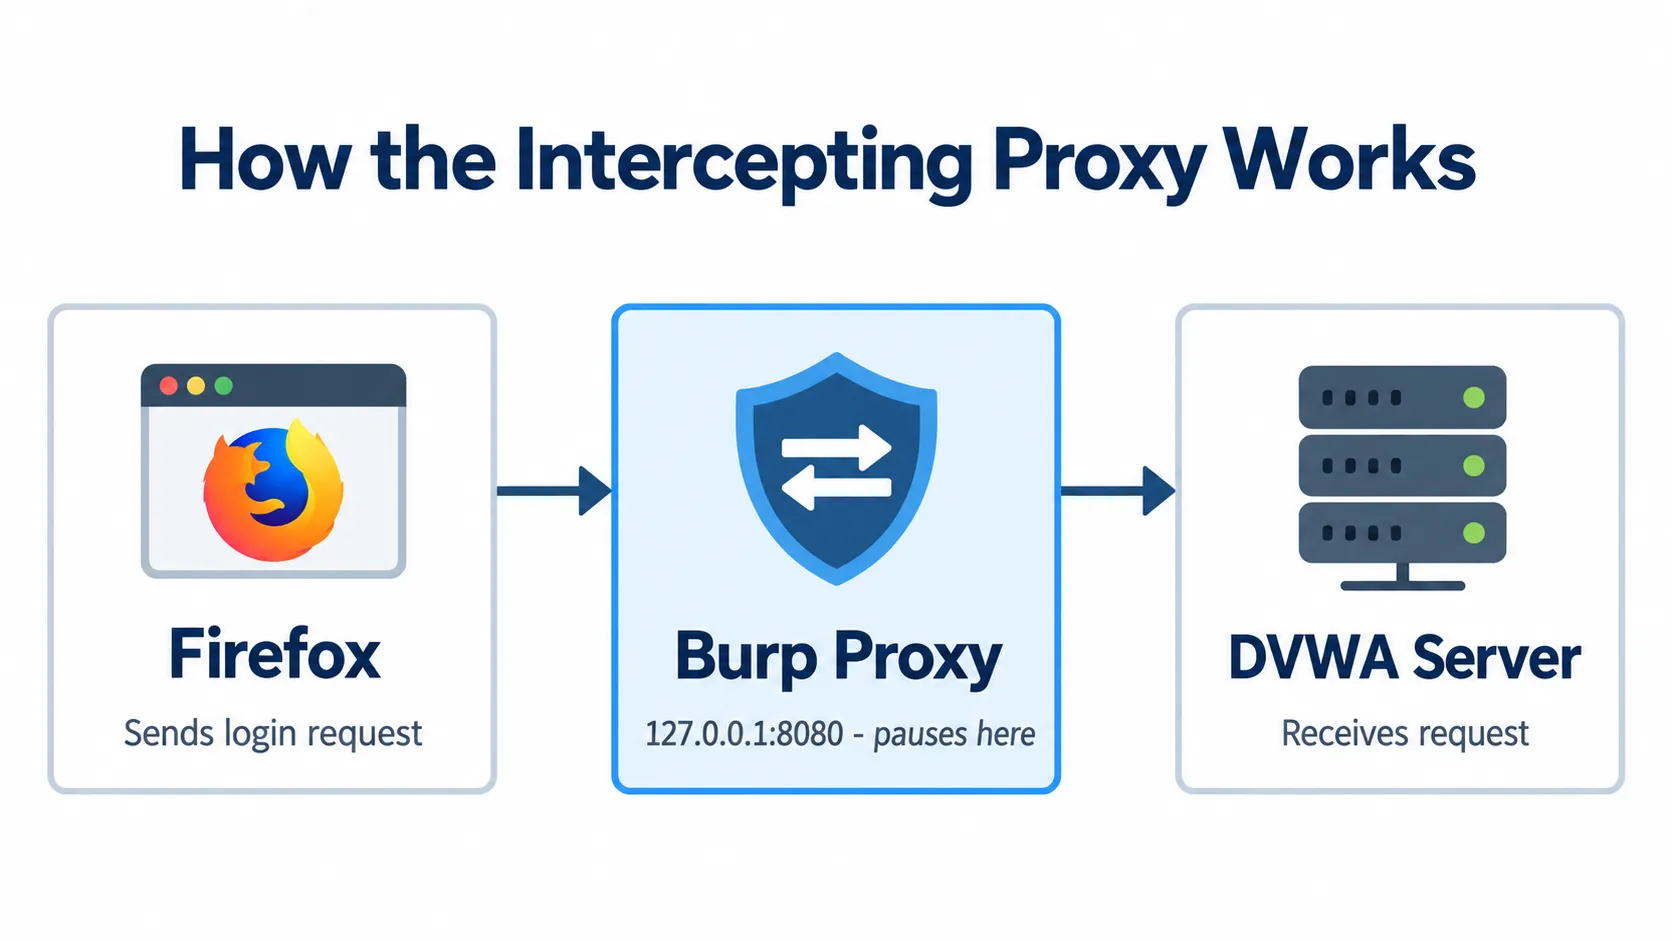
Burp sits between Firefox and DVWA. Every request Firefox makes is routed through Burp’s proxy, where it can be paused, inspected, and edited before being forwarded to the server.
7.1 Enable Intercept Mode#
In Burp Suite:
- Go to the Proxy tab
- Click the Intercept sub-tab
- Click Intercept is on to toggle it ON
With Intercept ON, Burp pauses and captures every request coming from Firefox.
7.2 Intercept a DVWA Login#
With Intercept enabled:
- In Firefox, go to the DVWA Brute Force page
- Try logging in with username
adminand passwordtest123 - Firefox will appear to hang — that’s expected; the request is now paused inside Burp
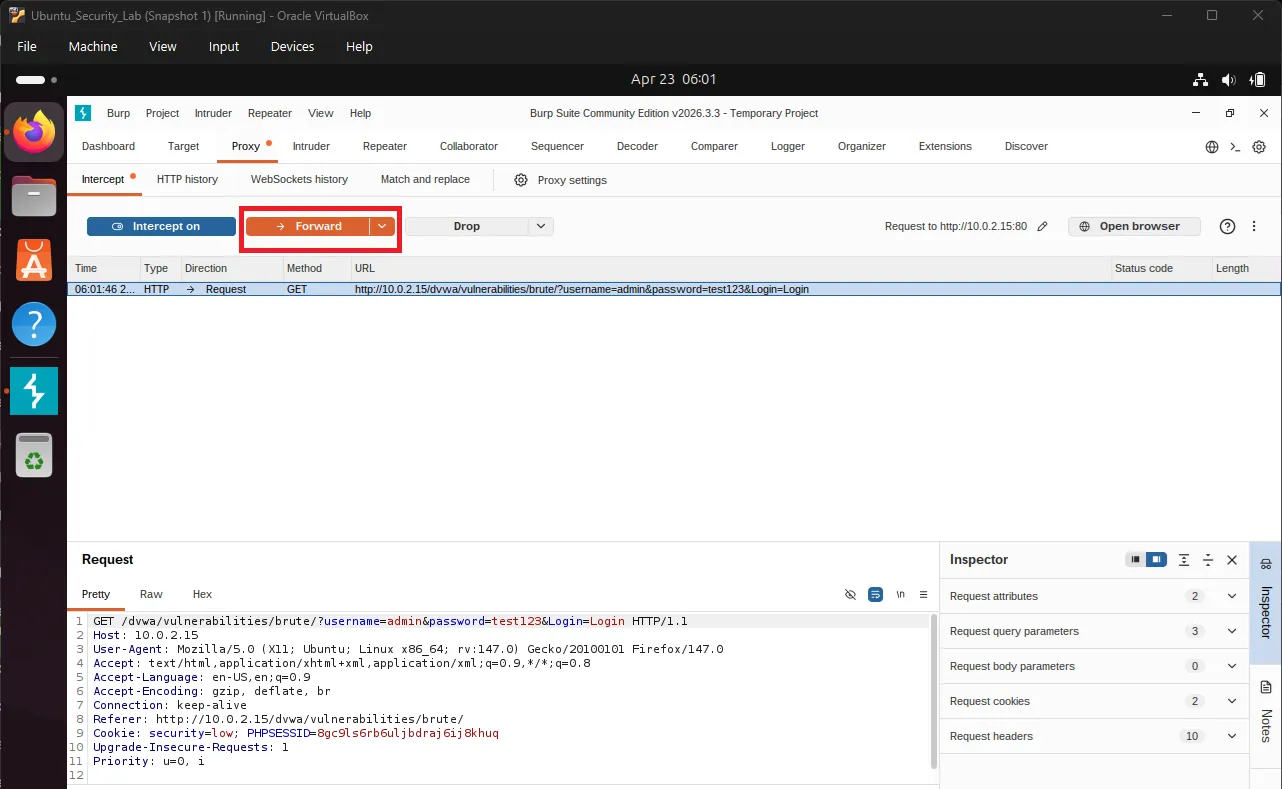
Switch over to Burp Suite to see the captured request:
GET /dvwa/vulnerabilities/brute/?username=admin&password=test123&Login=Login HTTP/1.1
Host: localhost
User-Agent: Mozilla/5.0 ...
Accept: text/html,application/xhtml+xml...You now have three ways to act on the paused request:
| Action | Shortcut | Result |
|---|---|---|
| Forward | Ctrl + F | Send request to server |
| Drop | Ctrl + D | Cancel request |
| Intercept | Ctrl + I | Toggle intercept on/off |
Click Forward to send the request to DVWA.
7.3 Examine HTTP History#
In Burp Suite:
- Go to Proxy → HTTP History
- Find the DVWA login request you just made and click it
Look at how the request is structured:
Request line:
GET /dvwa/vulnerabilities/brute/?username=admin&password=test123&Login=Login

Headers:
Host: localhost
User-Agent: Mozilla/5.0...
Accept: text/html...

GET parameters:
username = admin
password = test123
Login = LoginNow click the Response tab. For the wrong password, the body contains:
<pre><br />
Username and/or password incorrect.<br /><br /></pre>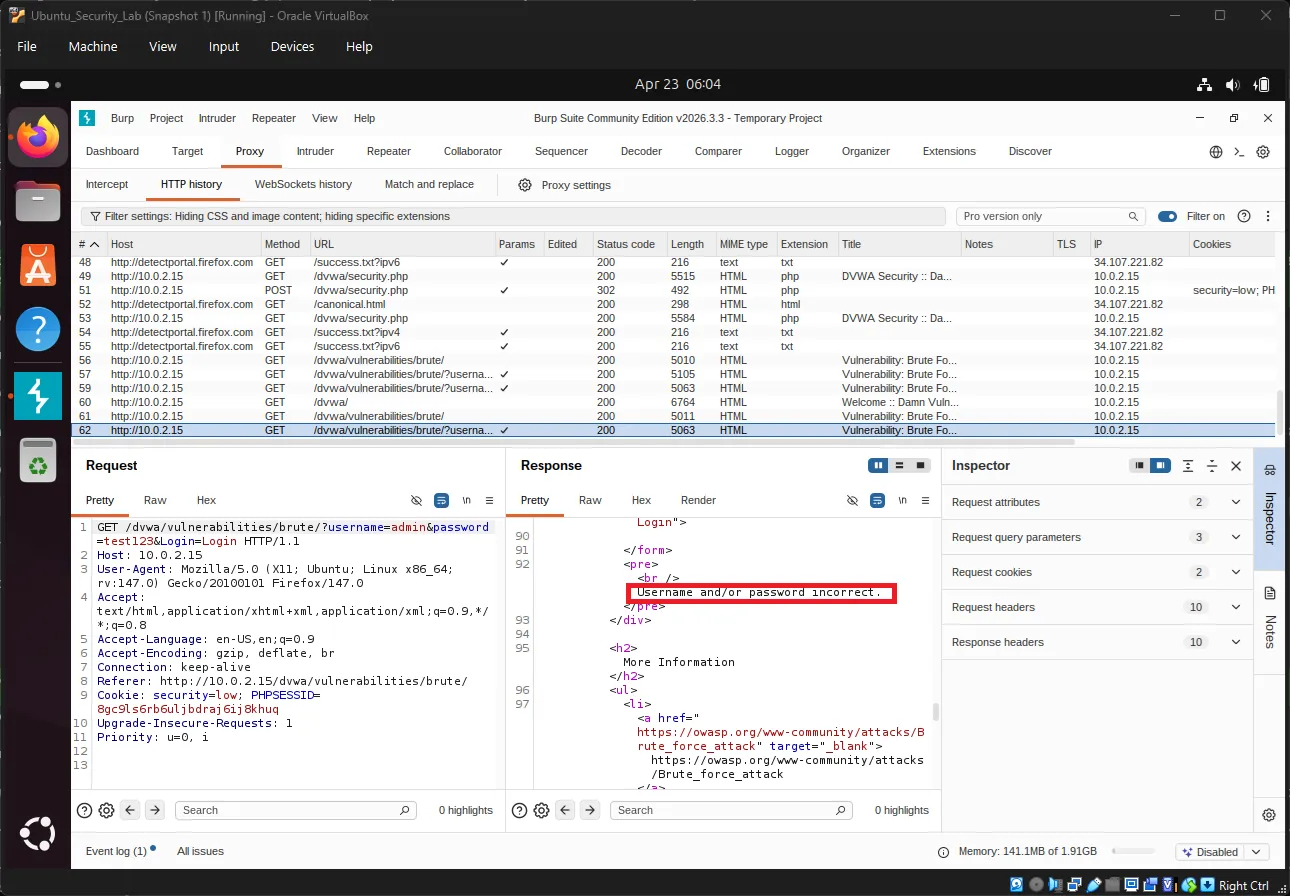
This “incorrect” message is the tell we’ll rely on to separate failed attempts from a successful one.
8. Automated Brute Force with Burp Intruder#
8.1 Send Request to Intruder#
From HTTP History, right-click the DVWA login request and select Send to Intruder, then switch to the Intruder tab.
8.2 Configure the Attack Position#
In Intruder → Positions, the full request is shown. Tell Burp exactly which value to attack:
- Click Clear § to remove the default positions
- Select just the password value (e.g.
test123) - Click Add §
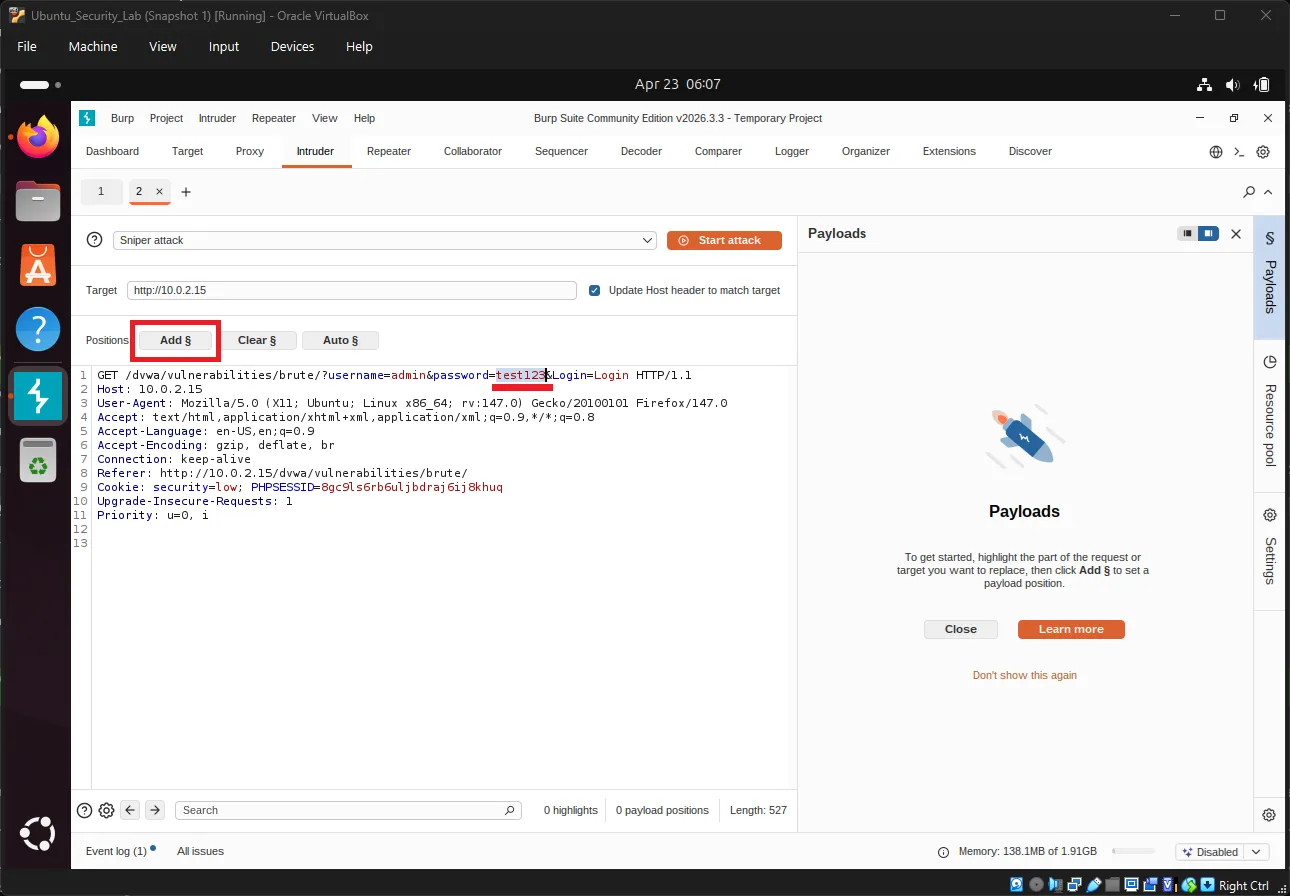
💡 Note: The
§symbol is the section sign. In Burp Suite it marks the spots where payload values get inserted during the attack.
Your request should now read:
...username=admin&password=§test123§&Login=Login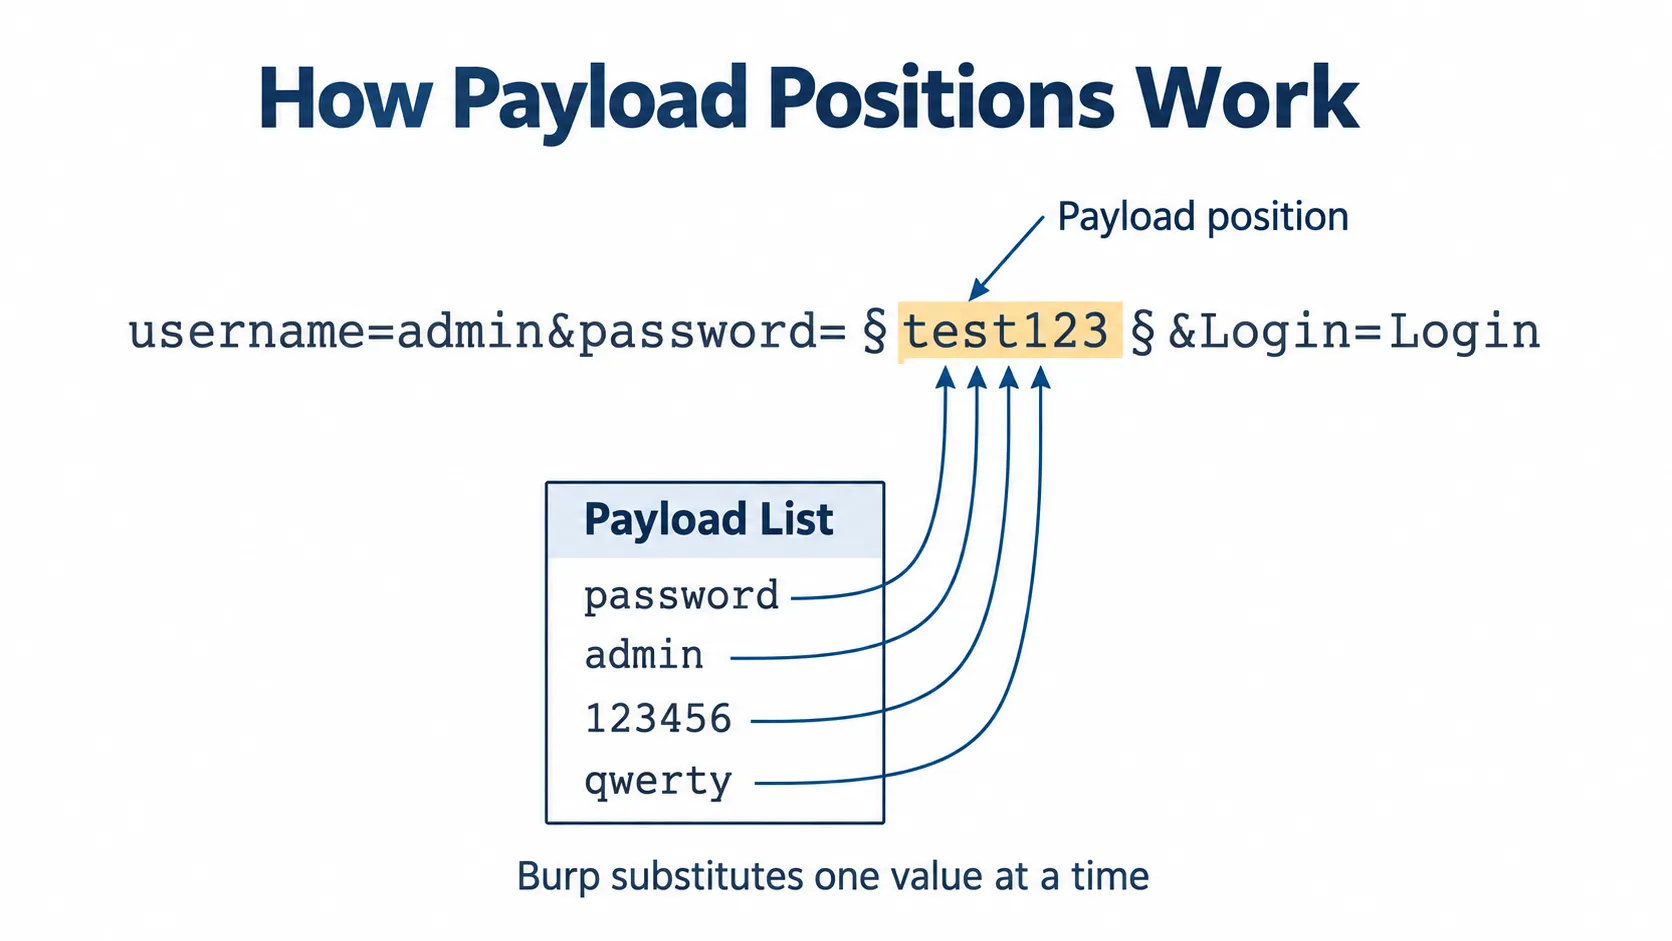
The §...§ markers define a payload position — a slot Burp fills with a different value on each request. During the attack it takes each entry from the payload list in turn, drops it into that slot, and sends the request, so one run covers the whole list automatically.
8.3 Set Up Payloads#
Go to Intruder → Payloads. Set Payload type to Simple list, then add a few common weak passwords under Payload Options:
password
admin
123456
qwerty
letmein
welcome
admin123
password123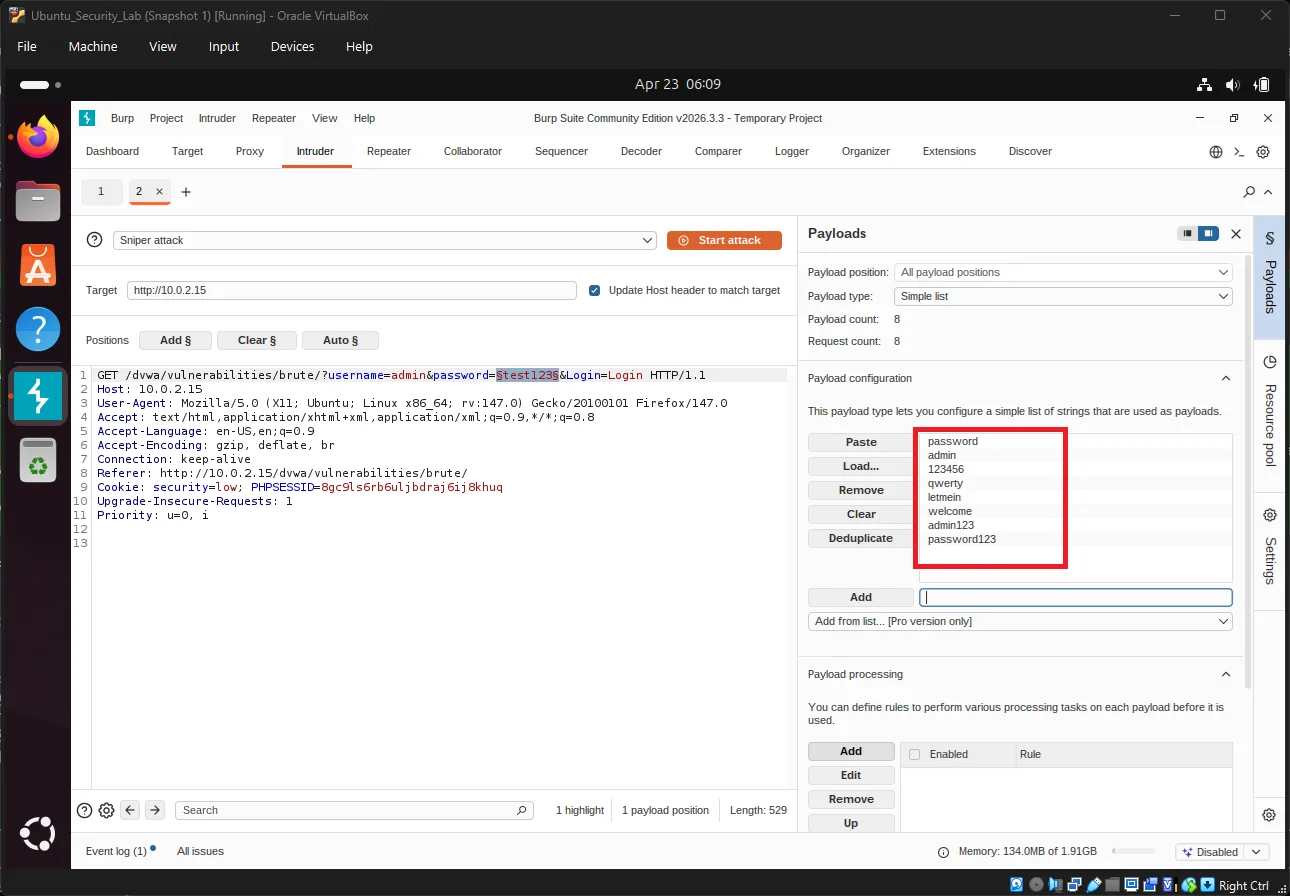
8.4 Configure Attack Settings#
Go to Intruder → Settings and set the Attack type to Sniper (one payload position, tested one value at a time).
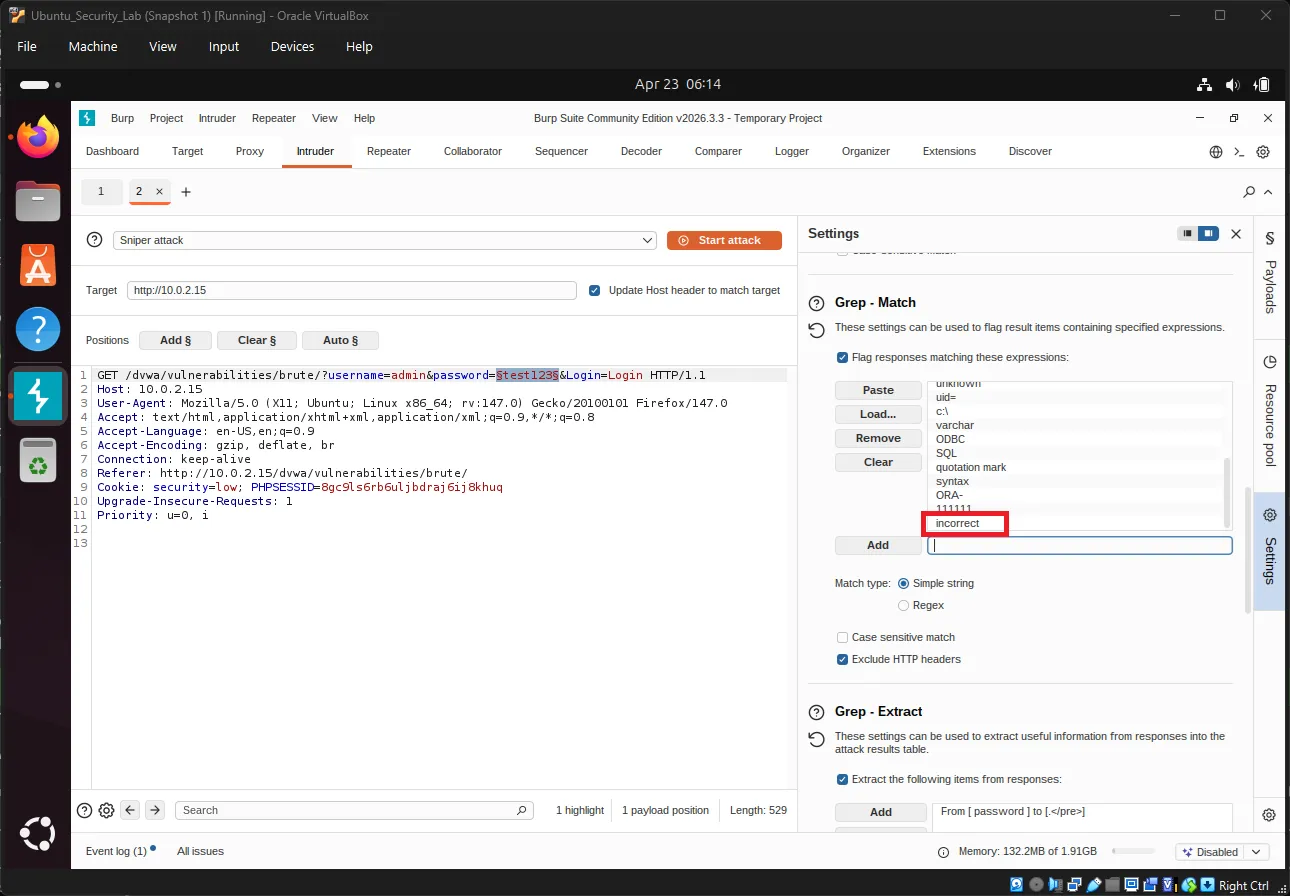
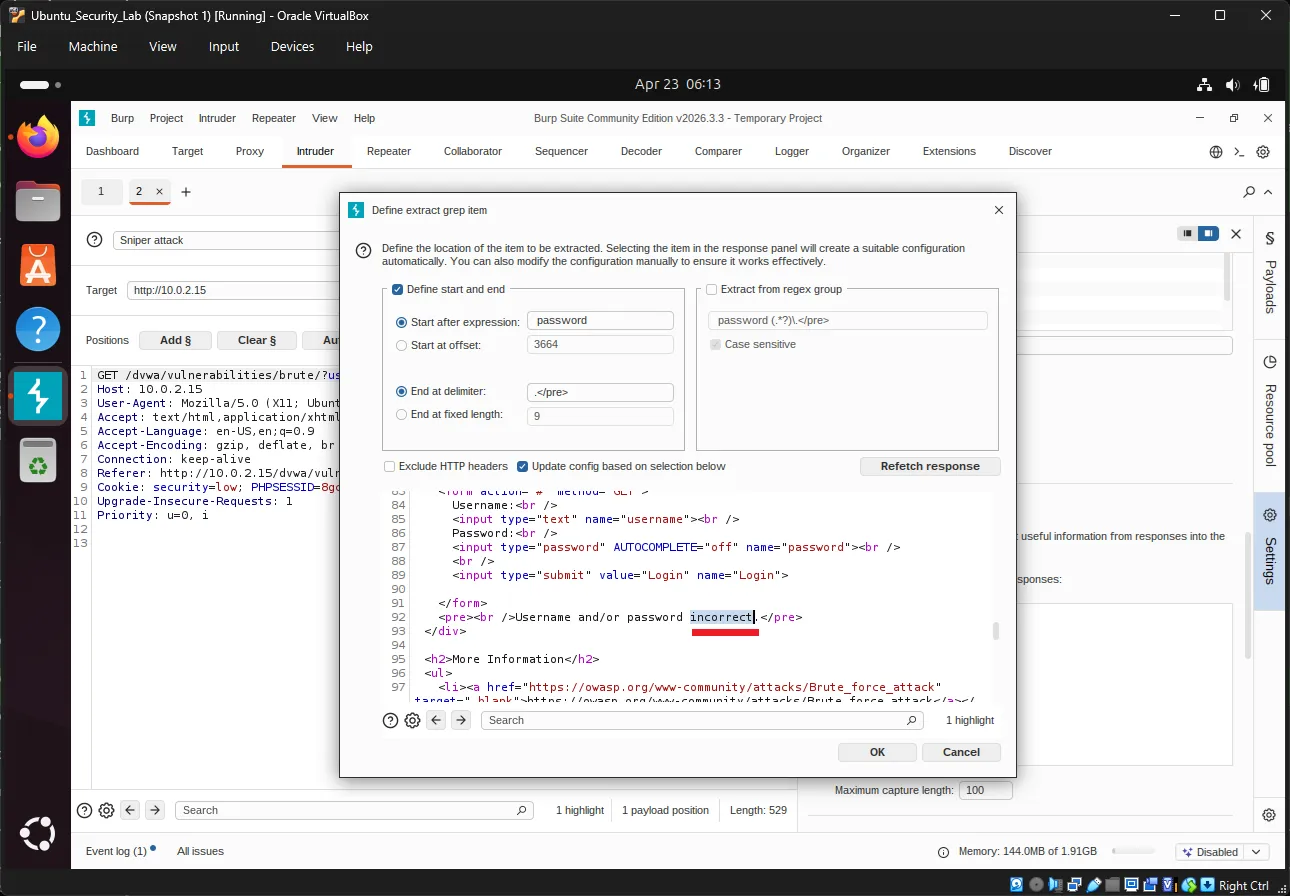
Add response filters so a success stands out at a glance:
- Grep - Match: click Add and enter
incorrect. Burp flags every response containing “incorrect” — the one entry without the flag is your success. - Grep - Extract (optional): click Add, then highlight “incorrect” in the response to pull it into its own column.
8.5 Launch the Attack#
Click Start attack in the top-right. A results window opens and fills in as each payload is tried:
| Payload # | Payload | Status | Length | incorrect |
|---|---|---|---|---|
| 1 | password | 200 | 5120 | (no flag) |
| 2 | admin | 200 | 4874 | ✓ |
| 3 | 123456 | 200 | 4874 | ✓ |
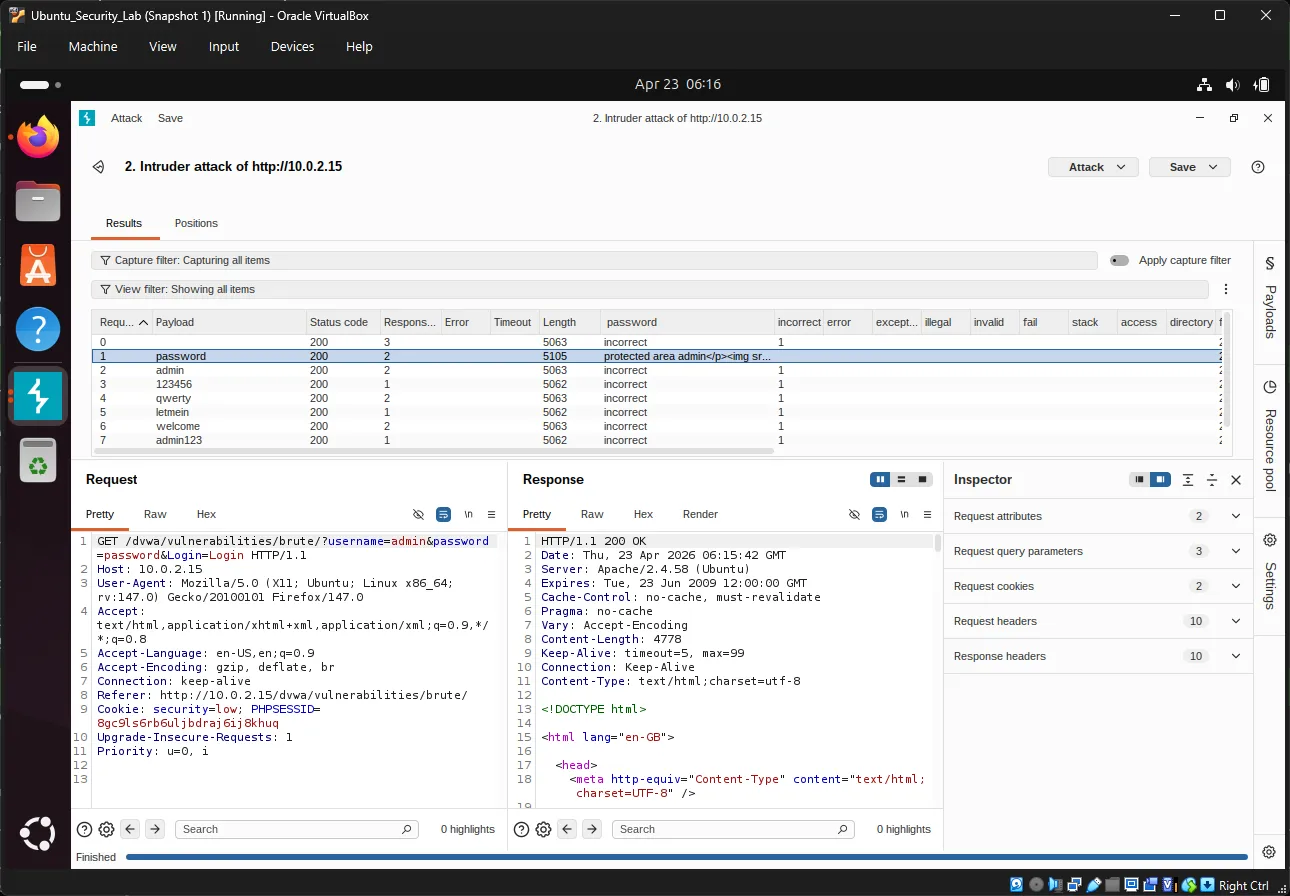
Key observations:
- Status 200 only means the server responded — it says nothing about whether the login succeeded.
- Length differences point to different response content.
- The payload with a different length and no “incorrect” flag is the correct password.
8.6 Analyze Results#
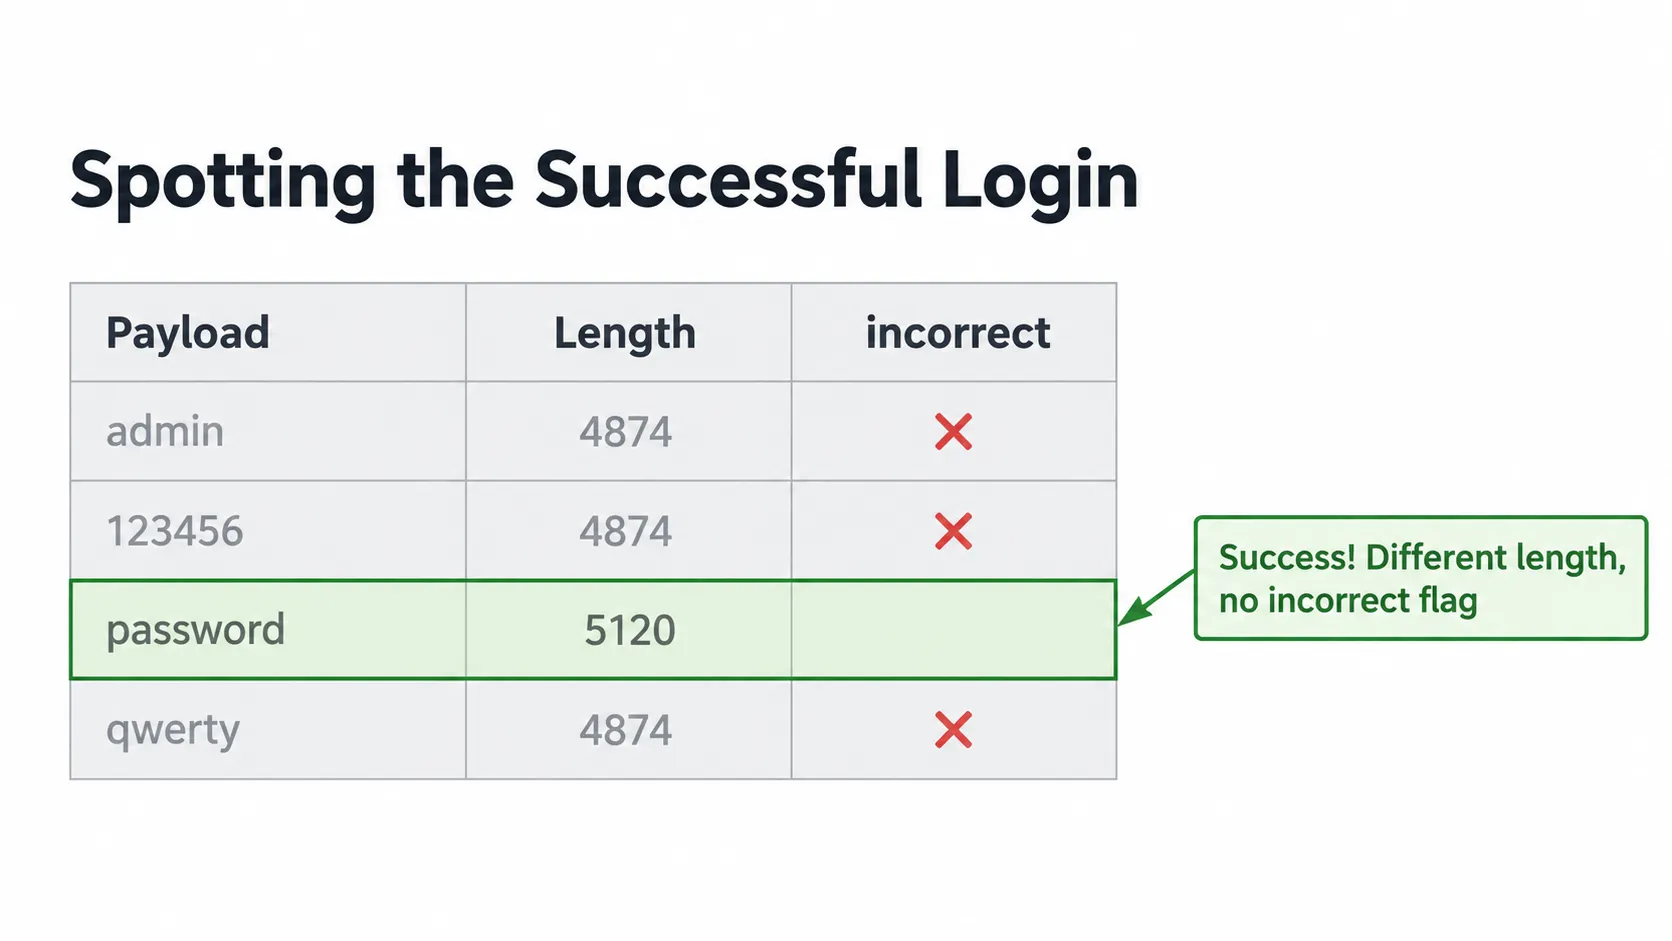
Failed attempts all look the same — identical response length and the “incorrect” flag. The successful login is the outlier: a different length and no “incorrect” flag. That single difference is what gives the correct password away.
In the results window:
- Click the Length column header to sort, and spot the outlier
- Check the Grep column — the entry without the “incorrect” flag is the successful login
Confirm it by logging in manually with the winning password:
Username: admin
Password: password9. Dictionary Attack with Password Lists#
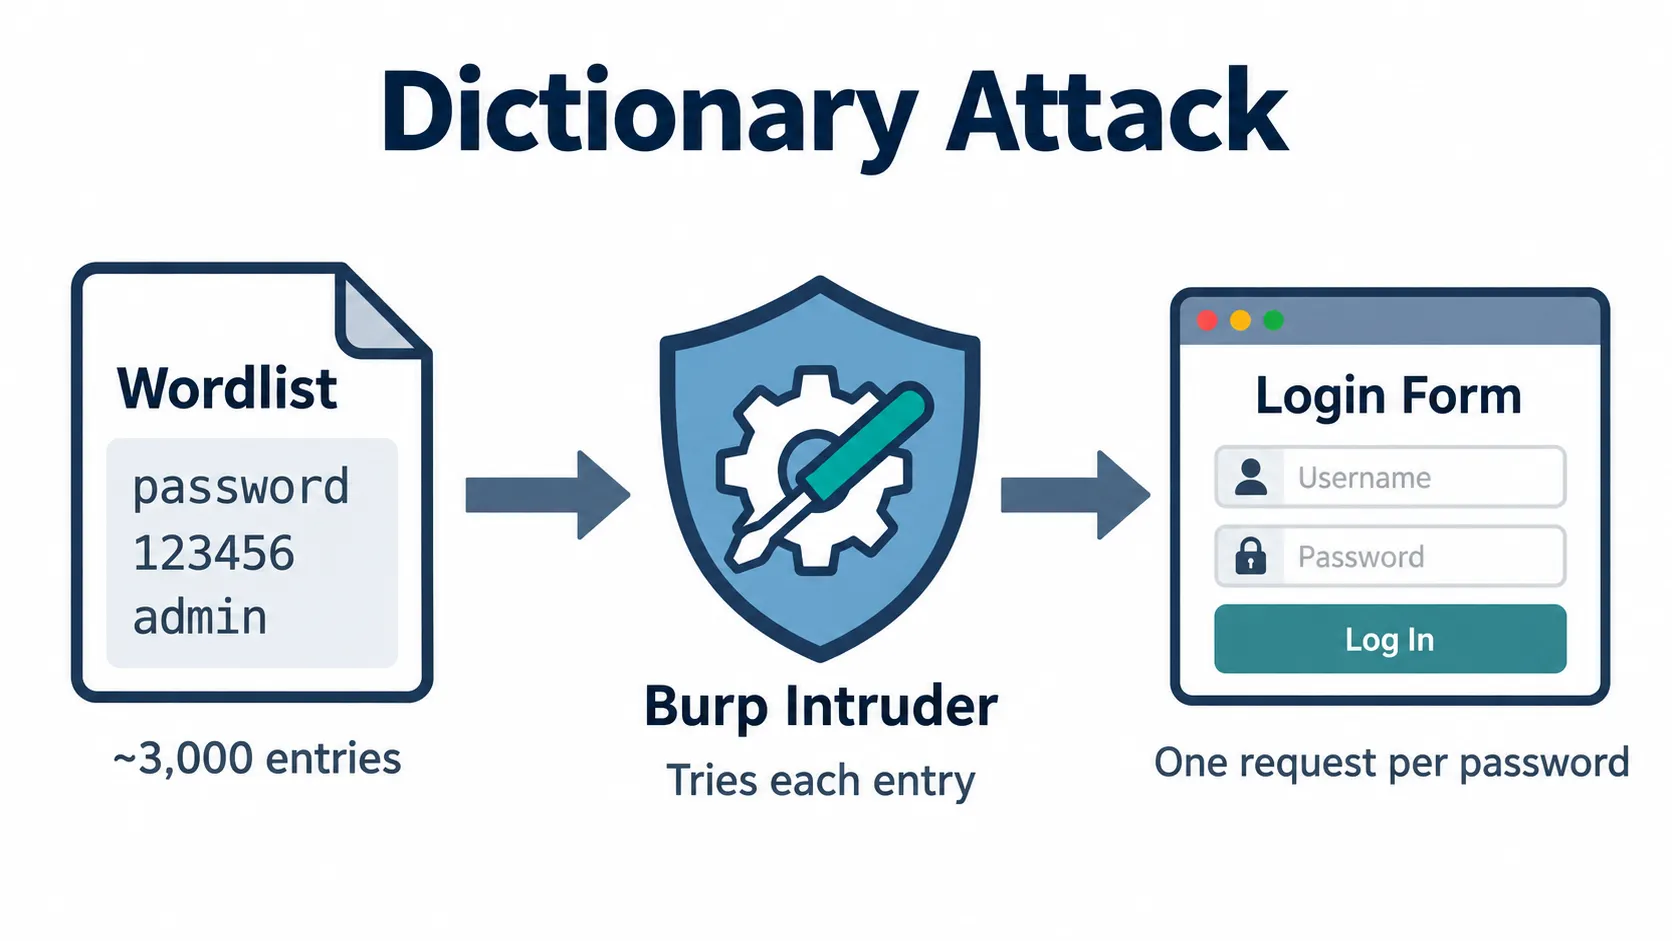
9.1 Download a Password Wordlist#
In the Ubuntu terminal, download a ready-made wordlist:
cd ~/Downloads
wget https://raw.githubusercontent.com/openwall/john/bleeding-jumbo/run/password.lst -O passwords.txtFor a much larger collection, clone SecLists:
git clone https://github.com/danielmiessler/SecLists.gitUseful lists inside SecLists:
Passwords/Common-Credentials/10-million-password-list-top-1000.txtPasswords/Software/dragonfly41-top10k.txt
9.2 Load the Wordlist into Burp#
Back in Burp Suite Intruder:
- Go to the Payloads tab
- Under Payload Options, click Load…
- Select
~/Downloads/passwords.txtand click Open
The preview should now list hundreds or thousands of passwords.
9.3 Run the Dictionary Attack#
Tweak a couple of settings before launching:
- In Intruder → Settings → Request Engine, set threads to 1–5 so you don’t overwhelm the lab
- Confirm the Attack type is still Sniper
Click Start attack and let it run to completion.
9.4 Filter and Analyze#
In the results window:
- Click the Length column to sort and pick out the outliers
- Use the Grep - Match rule for
incorrect— the entry without the flag is the successful login
The winning entry stands out with a different response length, no “incorrect” message, and often a welcome message or redirect.
10. Advanced Analysis Techniques#
10.1 Response Length Analysis#
A change in response length usually signals a change in outcome:
| Response | Length | Meaning |
|---|---|---|
| ~4800 bytes | Base length | Failed login |
| ~5100 bytes | Different length | Successful login |
10.2 Grep - Extract for Precise Filtering#
Instead of eyeballing lengths, pull specific text out of each response:
- Go to Settings → Grep - Extract → Add
- Highlight the text you want to extract (e.g. “incorrect”)
- Confirm the start and end markers
- Results appear in a new column, one value per request
10.3 Burp Intruder Attack Types#
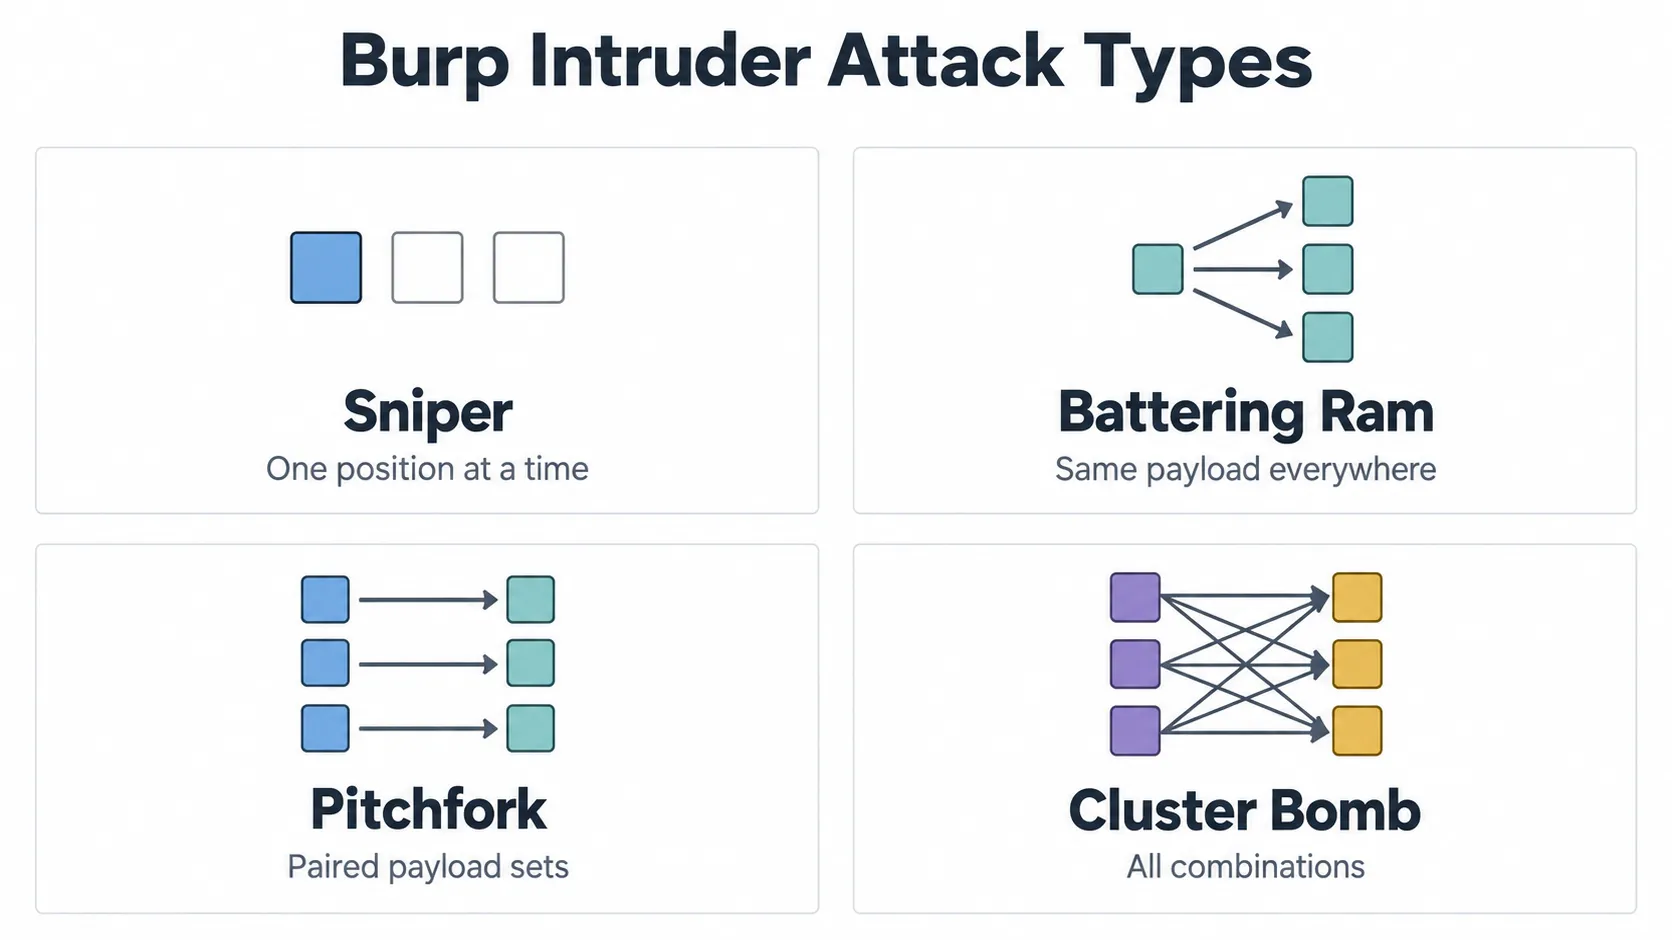
| Type | Description | Use Case |
|---|---|---|
| Sniper | One payload set, one position at a time | Single-field brute force |
| Battering Ram | Same payload in all positions | Testing one value everywhere |
| Pitchfork | Multiple payload sets, paired by index | Username + password combos |
| Cluster Bomb | All payload combinations | Cartesian product testing |
11. DVWA Security Levels Comparison#
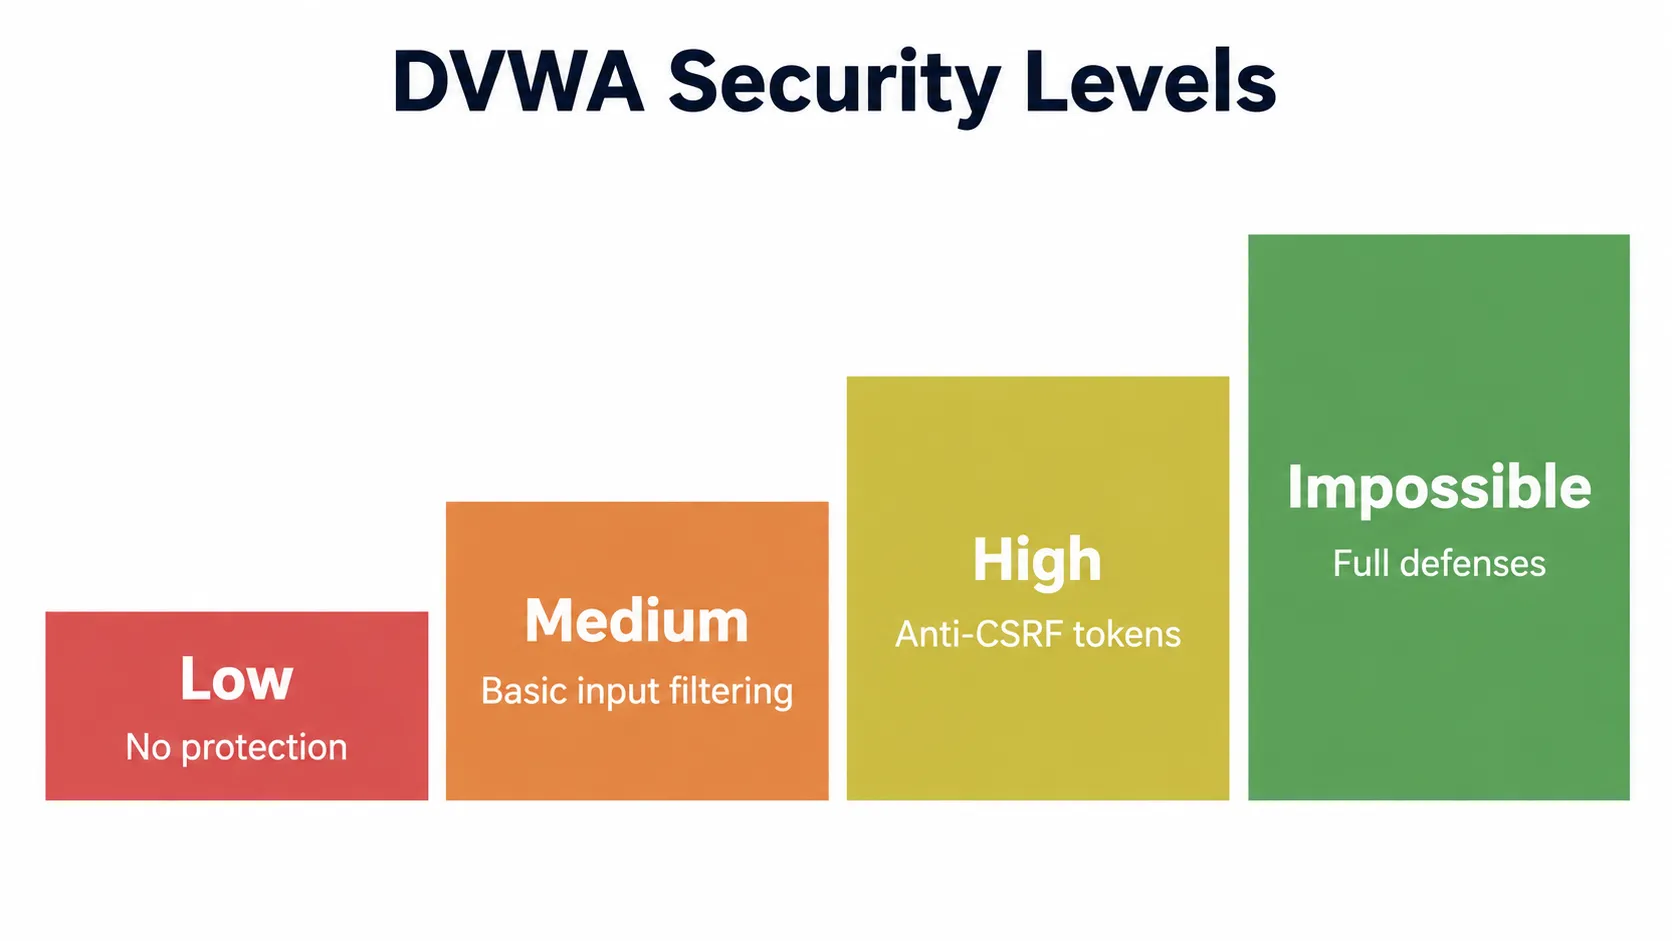
DVWA ships the same brute force page written four ways, one per security level — showing how each added defense makes the attack harder, from trivial at Low to unbreakable at Impossible.
11.1 Low Security (What We Tested)#
// No protection
if( isset( $_GET[ 'Login' ] ) ) {
    $user = $_GET[ 'username' ];
    $pass = $_GET[ 'password' ];
    // Check against database
    // No rate limiting
    // No lockout
}Credentials go straight from the URL to the database with nothing in between — no delay, no attempt counter, no token. That’s why the Burp Intruder attack was so quick: thousands of guesses replayed back to back with no pushback.
Vulnerabilities:
- ❌ No rate limiting
- ❌ No account lockout
- ❌ GET requests visible in URL / history
- ❌ No CAPTCHA
- ❌ No delay between attempts
11.2 Medium Security#
// Some input sanitization added
$user = stripslashes( $user );
$pass = stripslashes( $pass );
$user = mysql_real_escape_string( $user );
$pass = mysql_real_escape_string( $pass );
// Still vulnerable to brute forceThe added sanitization defends against SQL injection, not brute force — there’s still no rate limiting or lockout, so the same Intruder attack works unchanged. A fix for one vulnerability class does nothing for another.
11.3 High Security#
// Anti-CSRF token required on every request
checkToken( $user_token, $_SESSION[ 'session_token' ], 'index.php' );An anti-CSRF token is a secret, random value the server puts in the login page and ties to the session; every request must return the matching token or it’s rejected. Its main job is to block Cross-Site Request Forgery, but it also frustrates brute force — each guess must first fetch a fresh token from the page, breaking tools that just replay the login request.
11.4 Impossible Security#
// PDO with prepared statements
// Strong password hashing
// Comprehensive input validation
// Rate limiting
// Account lockout
// 2FA readyThis layers every defense from Chapter 3 at once: PDO prepared statements close SQL injection, password hashing (bcrypt/argon2) protects a stolen database, and rate limiting plus account lockout cap how fast and how many guesses are possible. The attempts get throttled long before any wordlist is exhausted — defense-in-depth applied properly.
12. Defenses in Practice#
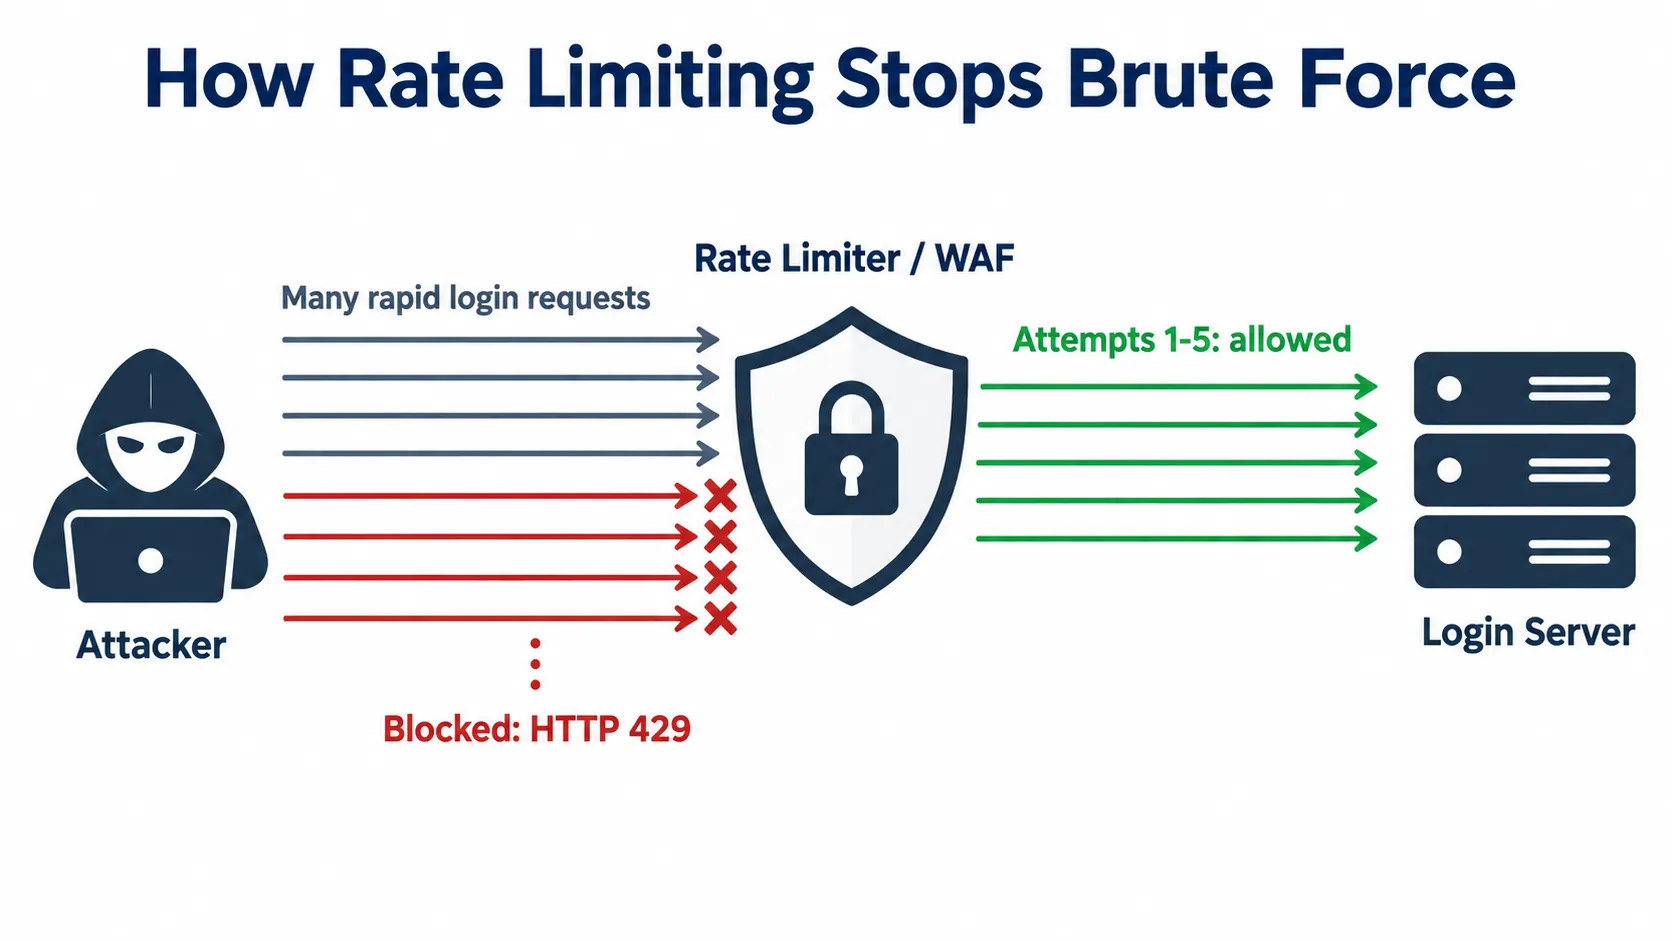
12.1 Implementing Rate Limiting#
Here is a minimal session-based rate limiter in PHP:
<?php
session_start();

// Check for an active lockout
if (isset($_SESSION['failed_attempts']) && $_SESSION['failed_attempts'] > 5) {
    if (time() < $_SESSION['lockout_time']) {
        die("Account locked. Try again later.");
    } else {
        // Lockout expired, reset the counters
        unset($_SESSION['failed_attempts']);
        unset($_SESSION['lockout_time']);
    }
}

// On a failed login, increment and lock if needed
if (login_failed) {
    $_SESSION['failed_attempts'] = isset($_SESSION['failed_attempts'])
        ? $_SESSION['failed_attempts'] + 1
        : 1;

    if ($_SESSION['failed_attempts'] > 5) {
        $_SESSION['lockout_time'] = time() + 900; // 15 minutes
    }
}
?>12.2 Web Application Firewall (WAF)#
Enforce rate limits at the web server or WAF layer.
# Nginx example
limit_req_zone $binary_remote_addr zone=login:10m rate=5r/m;

location /login {
    limit_req zone=login burst=3 nodelay;
    # ... rest of config
}# Apache mod_security example
SecAction "id:1001,phase:1,nolog,pass,initcol:ip=%{REMOTE_ADDR}"
SecRule IP:FAILED_LOGINS "@gt 5" "phase:1,deny,status:429,msg:'Rate limit exceeded'"13. Detection and Monitoring#
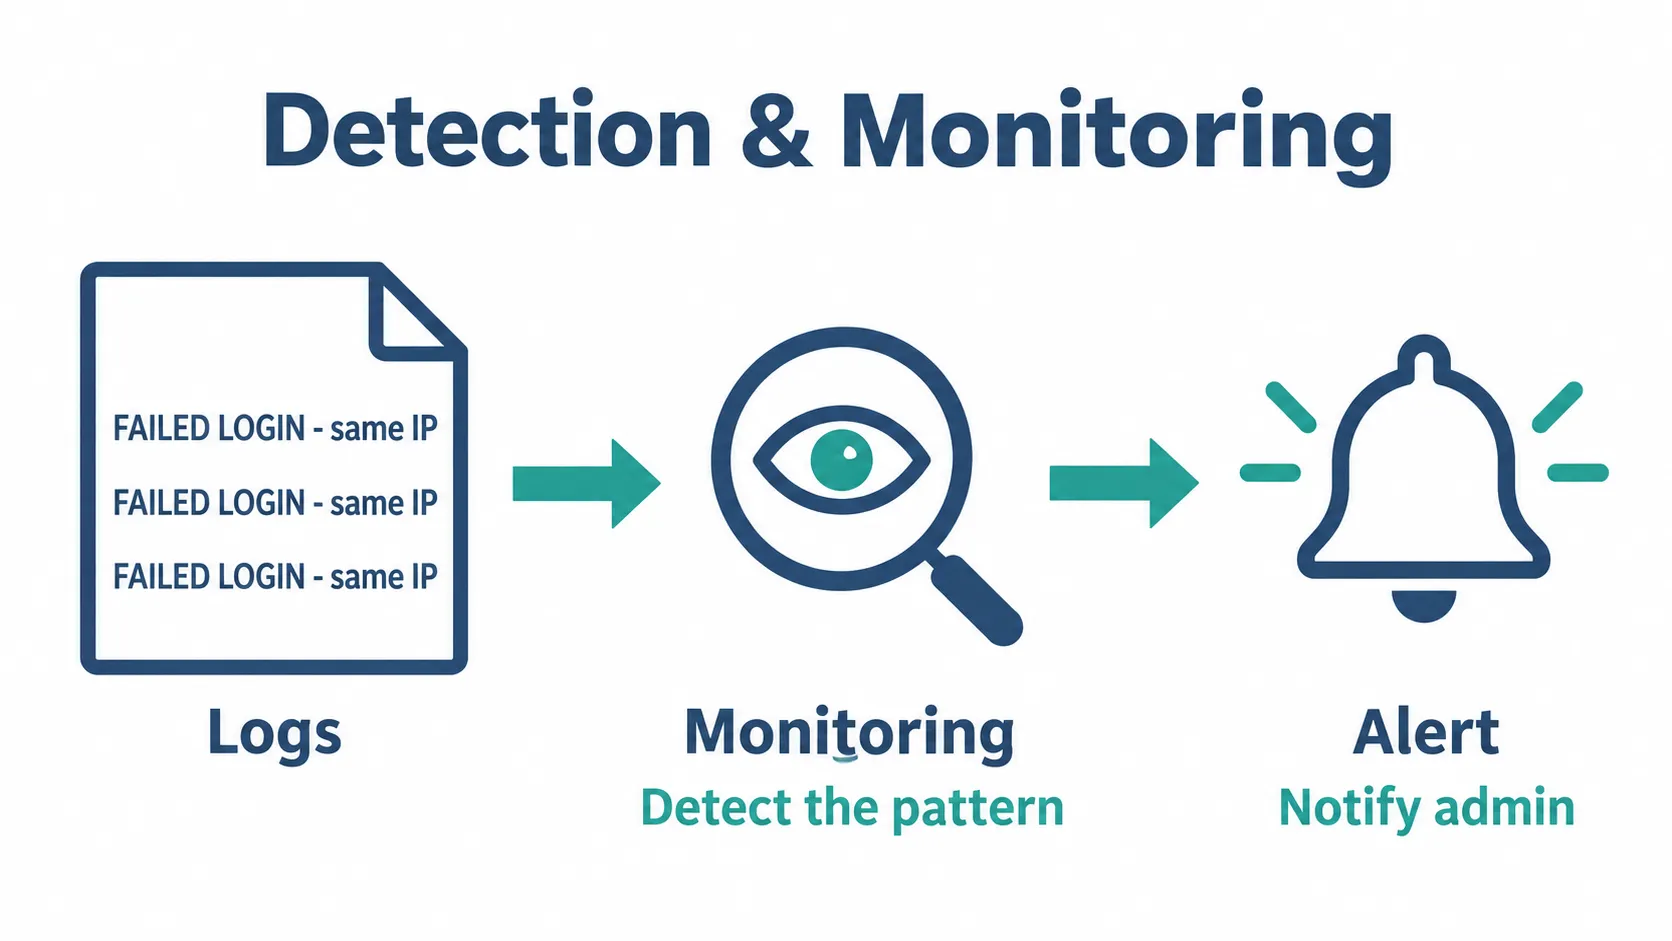
13.1 Log Analysis#
A burst of failed logins from a single IP is the classic brute force signature:
[2024-04-23 10:15:23] FAILED LOGIN - user: admin, IP: 192.168.1.100
[2024-04-23 10:15:24] FAILED LOGIN - user: admin, IP: 192.168.1.100
[2024-04-23 10:15:25] FAILED LOGIN - user: admin, IP: 192.168.1.100Useful monitoring commands:
# Count failed logins by IP
grep "FAILED LOGIN" /var/log/auth.log | awk '{print $NF}' | sort | uniq -c

# Real-time monitoring of login POSTs
tail -f /var/log/apache2/access.log | grep "POST.*login"13.2 Alerting#
Configure alerts for patterns such as:
# Multiple failed logins from same IP (5+ in 1 minute)
alert: auth_failures > 5 within 60 seconds

# Login attempts from unusual locations
alert: country NOT in ["US", "CA", "UK", "TH"]

# Login attempts outside business hours
alert: time NOT BETWEEN 09:00 AND 17:0014. Quick Reference#
14.1 Burp Suite Key Shortcuts#
| Shortcut | Action |
|---|---|
Ctrl + I | Toggle intercept on/off |
Ctrl + F | Forward intercepted request |
Ctrl + D | Drop intercepted request |
Ctrl + Shift + I | Send to Intruder |
Ctrl + Shift + R | Send to Repeater |
14.2 Common Password Wordlists#
| Wordlist | Size | Source |
|---|---|---|
passwords.txt | ~3,000 | John the Ripper |
rockyou.txt | ~14 million | Breach data |
10k-most-common.txt | 10,000 | SecLists |
14.3 Defense Checklist#
- ✅ Strong password policy (12+ characters, complexity)
- ✅ Rate limiting (5 attempts per minute)
- ✅ Account lockout (15+ minutes)
- ✅ 2FA / MFA enabled
- ✅ CAPTCHA after failures
- ✅ Logging and monitoring
- ✅ WAF rules configured
- ✅ HTTPS enforced
- ✅ Secure password storage (bcrypt / argon2)
15. Next Steps#
Congratulations! You’ve completed the Brute Force Attack Lab, and you now have:
- ✅ Understanding of brute force attack methods
- ✅ Knowledge of prevention techniques
- ✅ Hands-on experience with DVWA
- ✅ Practical skills with Burp Suite
- ✅ The ability to perform and analyze brute force attacks
15.1 Recommended Learning Path#
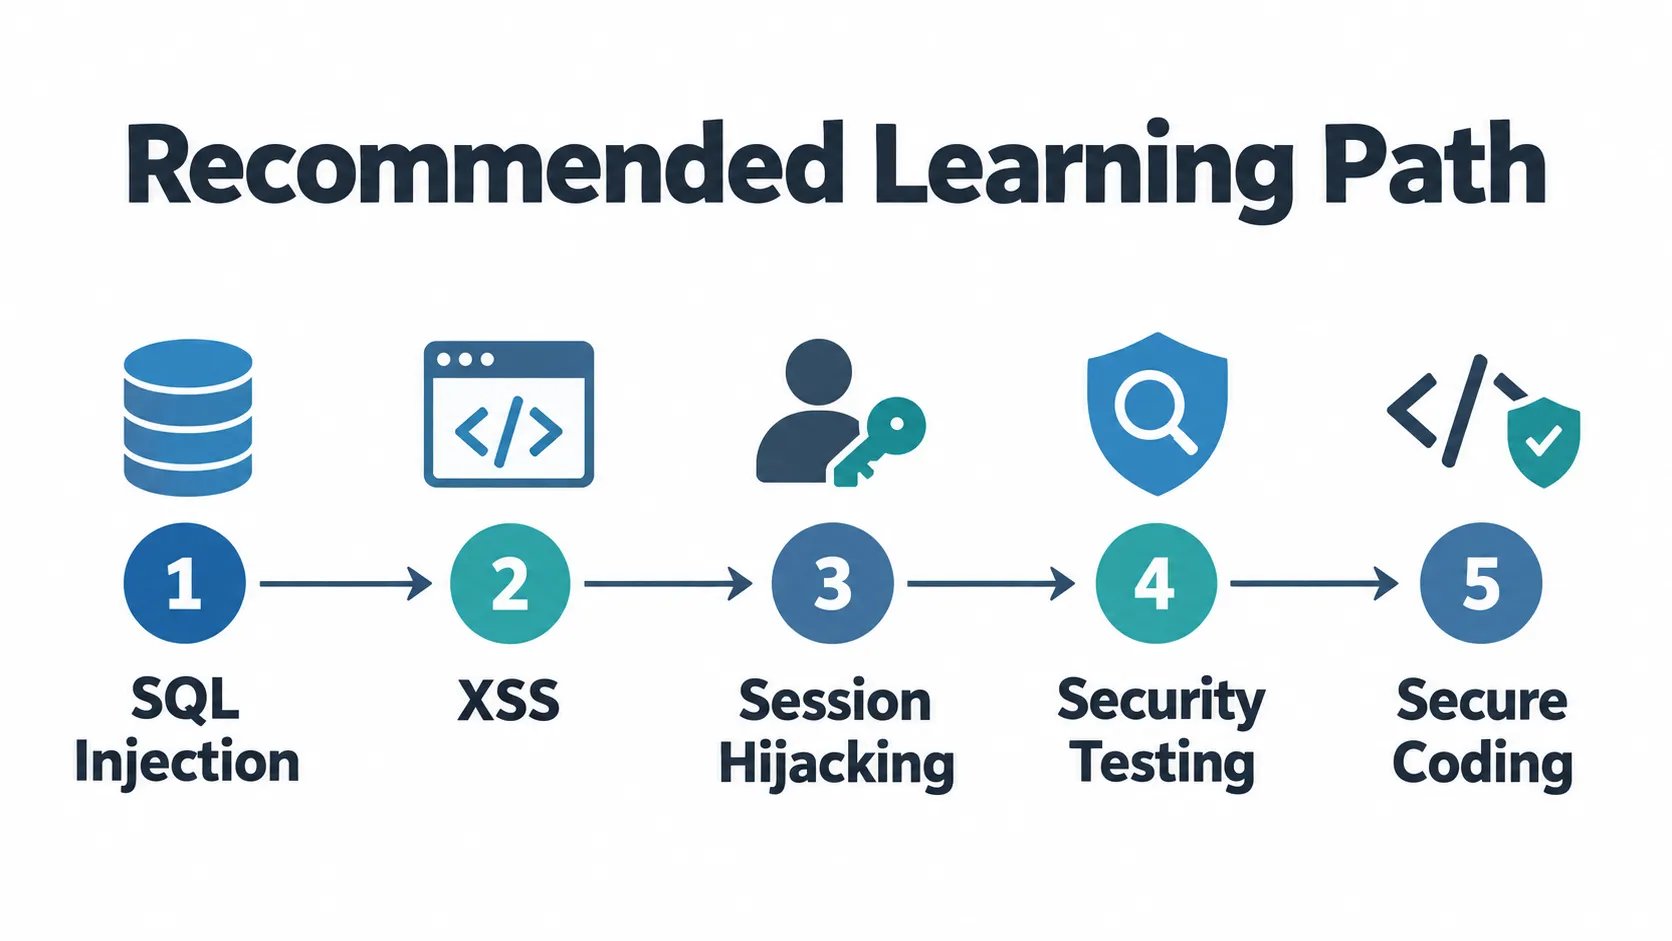
- SQL Injection — database attacks
- Cross-Site Scripting (XSS) — client-side attacks
- Session Hijacking — stealing user sessions
- Security Testing Methodologies — the OWASP Testing Guide
- Secure Coding — writing attack-resistant code
15.2 Practice Resources#
| Resource | URL |
|---|---|
| OWASP Top 10 | https://owasp.org/www-project-top-ten/ ↗ |
| Burp Suite Documentation | https://portswigger.net/burp/documentation ↗ |
| DVWA Documentation | https://github.com/digininja/DVWA ↗ |
| Web Security Academy | https://portswigger.net/web-security ↗ |
| SecLists | https://github.com/danielmiessler/SecLists ↗ |
15.3 Ethical and Legal Considerations#
⚠️ IMPORTANT
- Only test systems you own or have explicit written permission to test
- Brute force attacks are illegal when performed without authorization
- Use these skills for defensive purposes and authorized security testing
- Report vulnerabilities responsibly through proper disclosure channels
Unauthorized access to computer systems is a criminal offense in most jurisdictions. This tutorial is for educational purposes only and should be practiced solely in isolated lab environments like the DVWA setup you just built.
Happy learning and stay ethical! 🔐